Adding Payload To An RC Cessna

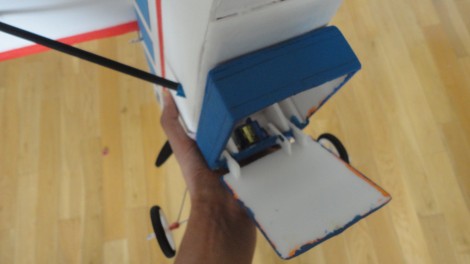
For just a few bucks you can add a payload to your flying toys. In this case it’s a Cessna RC plane which now has an added surprise. The first thing to be dropped was a parachute with a weight on it (for testing purposes). But there are hints of future projects that will use the same system for different purposes.

As you can see in the image above, the system depends on an additional compartment attached to the bottom of the plane. It was built from foam board to keep the weight down and connects using rare earth magnets. The bottom of the enclosure acts as the door, hinging on a servo motor with a bamboo skewer as the axle. So far the test drops have gone pretty well, but some more work needs to be done with the parachute design. It only opens about 60% of the time. We can sympathize, having had to work out some of our own parachute issues.

Don’t miss video from the plane as well as the ground after the break.

Continue reading “Adding Payload To An RC Cessna”

Box Maker Extension For Inkscape

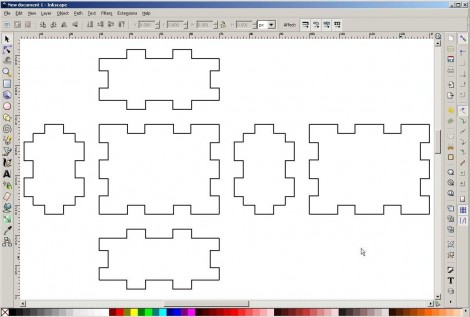
If you use Inkscape to lay out your laser cutter designs you might want to look into this box maker extension. Inscape is [Elliot’s] drawing software of choice since it’s easy to use, and it’s open source. After having to lay out the tabs for a box he decided it was worth his effort to develop a tool to do this automatically. The extension works inside of Inkscape, letting you start your projects with a set of automatically generated box sides.

The input window for the extension leaves you plenty of options for the joint design. In addition to the size of the box (inside or outside measurements can be selected), you need to enter the thickness of the material, the kerf size (how wide the cut will be), and how much clearance you want between the teeth. The width of the teeth is also configurable.

Our feature of a laser cut replacement case is what prompted [Elliot] to tip us off about his extension. That project used a web-based parts generator to do the joint design.

Make Your Own Custom IPhone Back Glass

[Jake von Slatt] is at it again; putting his own artistic spin on ordinary items. This time around it’s the glass on the back of an iPhone. It kept breaking and after a few replacements he wanted to try to replace the glass with a piece of etched brass. But part way through that experiment, he figured out how to use toner transfer to develop these stunning custom iPhone glass back plates.

The first step is to source the correct replacement back for your phone. These are made of two parts, the glass and a plastic backer. By carefully heating and wedging the two parts with some popsicle sticks he was able to separate the pieces. Next, he cleans and buffs the glass, preparing it for the artwork he is about to apply. Toner transfer paper, just like that used for PCB resist, is used to print and adhere a design to the underside of the glass. From there he hand paints over the black outline to achieve the results seen above.

It takes time and patience, but shouldn’t be any harder than etching a circuit board.

Know Thy Enemy: Open Vias In BGA Footprints

[Andrew Zonenberg] has crossed a line in his electronic hobby projects. The Ball Grid Array (BGA) is a type of chip footprint which most hobbyists leave to the professionals. But he’s learned the skills necessary to use them in his projects. Recently he ran a test batch to show off his soldering process and illustrate one of the errors a novice might make.

For those that are unfamiliar, the BGA footprint is notoriously difficult to accurately solder because it consists of a large grid of tiny points covering the bottom of the chip. There’s no way to get in there with an iron, so soldering depends on accurate placement of solder paste and chip, as well as a near-perfect reflow cycle. Often times it’s difficult for the professionals too. Many blame the heat-failure of Xbox 360 on the complications of the BGA connects for one of the console’s chips.

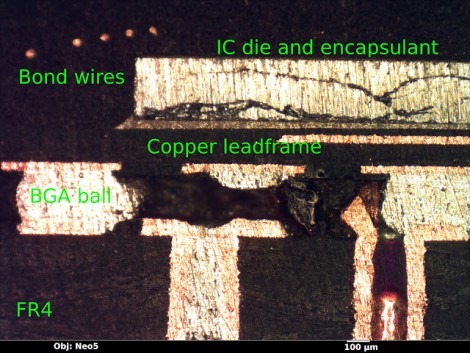
For this experiment [Andrew] wanted to show what happens if you include vias in the BGA footprint. It’s fine to do so, as long as they’re capped. But if a standard via is included, capillary action ends up pulling the solder down into the via instead of making a connection with the chip. The image above is a cross-section of one such uncapped via, seen on the far right.

[Thanks George]

Building A Custom Interface For Surplus HF Radios

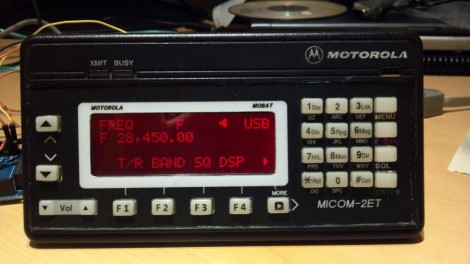
[PRC148] picked up a Motorola Micom radio from eBay. These are US State Department surplus, but apparently the 125 Watt HF units are top-of-the-line at a tenth of the sticker price. The one hangup is that they’re headless; you can’t control them without additional hardware. But the Internets are often kind to the hobbyists, and this is no exception. You can get software to run the radio from a PC thanks to the Micom Yahoo Group. [PRC148] took that software as an example and built his own stand-alone interface. [Cached version of the page]

The head unit is an Arduino driving a four-line LCD display and a rather large array of buttons. The forum thread linked above shows his humble beginnings on a breadboard. During the project [PRC148] learned a lot of skills to end up with what you see above. Hiding behind the reused bezel is a PCB he designed in Eagle CAD and etched himself. It allowed him to cram the tactile switches close enough to work with the button overlay on this keypad.

UPDATE: The traffic from this feature took down the forum hosting the content. They requested that we do not link to them because of this. A cached version without images can be found above thanks to [Termm].

A Mixer (re)built To Travel

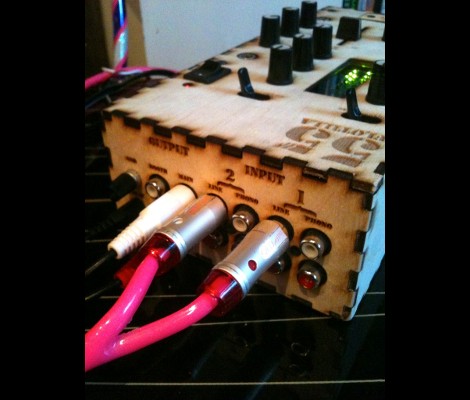
[Toby Cole] likes to mix tunes whenever he gets a chance. But the size of his DJ equipment made it a real bother to lug around with him. He does own a Behringer portable mixer but without cross faders it’s not really all that usable, and most of the other offerings don’t get good reviews. He ended up replacing the enclosure of a proper mixer in order to make it light and small. The growing availability of affordable laser-cut parts made this project possible.

Build Brighton, [Toby’s] local Hackerspace, has a laser cutter. So he knew that if he could figure out a smaller case design it would be a snap to get his parts made. He cracked open the heavy metal case on the KMX 100 mixer and found it had a ton of extra room inside. He designed all of the plates using a digital calipers to properly space the holes and text labels. These designs were combined with BoxMaker to produce the files the laser cutter needed. The first prototype was cut from cardboard, with the finished product cut from 3mm plywood.

Fabricating Your Own Backpack Straps For Unorthodox Uses

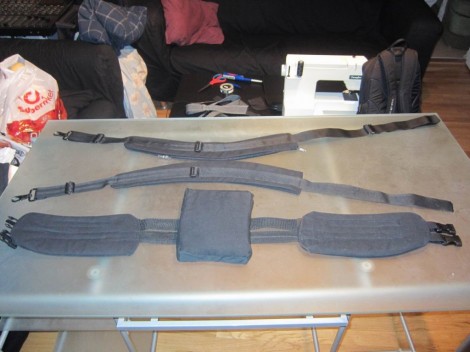
Back in the 1980’s there was a movie cliché that the person with the largest boombox on their shoulder was always the coolest. It’s obvious to us that [Tim Gremalm] thinks that’s silly. Why be uncomfortable carrying something like that on your shoulder when you can strap a much larger object to your back? He’s working on a mammoth speaker enclosure which can be carried around, but he needed a set of backpack straps to make it happen.

This thing is going to be adding some serious weight to his body, so he also whipped up the padded waist belt seen above. For fabric he reused an Ikea couch cover. The material is made to survive a lot of pulling and stretching. For padding he used what he calls ‘floor mop’. It looks like it might be microfiber mop cloth be we can’t really be sure. With ten layers of the mop encased in the couch cover he finish off each strap by sewing it to some nylon webbing.

After the break you can see a picture of [Tim] modelling the huge polycarbonate speaker enclosure for which these backpack and waist straps were made. This project has many posts associated with it so if you’re interested in seeing more you can use this project tag link.

Continue reading “Fabricating Your Own Backpack Straps For Unorthodox Uses”