Hackaday Prize Entry: Modular Circuits With SnapBloks

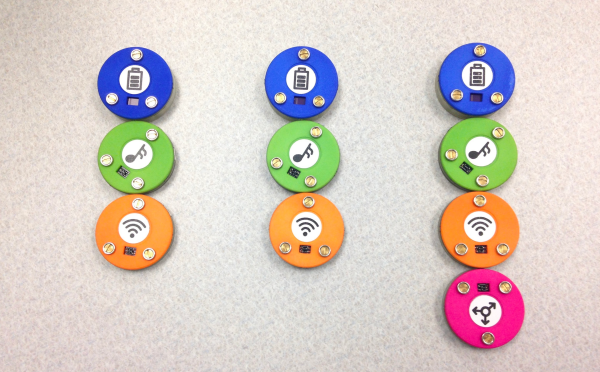
[Ekawahyu Susilo]’s twist on the modular circuit kit, SnapBloks helps you create circuits by stacking components on top of each other with the help of three magnetic contacts that not only keep the modules stuck together but also deliver power, ground, and data to each part.

[Ekawahyu] envisioned it as a prototyping kit, used to whip together an idea without a lot of hassle. It could also be an educational aid, used to teach Arduino coding while skipping the confusing tangle of wiring. You can stack a sound module on top of a power module to make a buzzer, or attach power to a wheel Blok to make a robot.

With version 2 of the project [Ekawahyu] updated the look with color-coded shells, with pink signifying input Bloks, green for output, orange for communication, and blue for power. Each Blok has a Arduino chip inside — an STM32, which Hackaday reviewed back in March. For version three, he hopes to leverage the ESP8266 to make a WiFi-enabled Blok. [Ekawahyu]’s idea of having a cheap SMD Arduino in every module seems like a smart way to simplify module creation—no “controller block” needed!

Dirty Now Does Cables

PCB makers Dirty made a name for themselves in the prototype PCB biz, with a convenient web form and numerous options for PCB color, thickness, layers, silk screening, and so on. Now they’ve branched out into custom cabling with Dirty Cables.

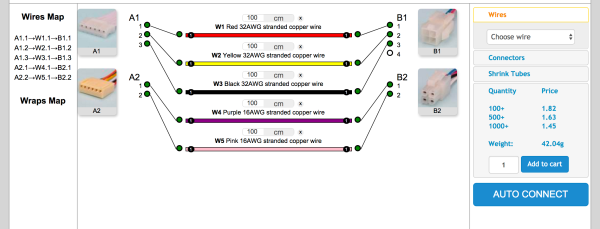
You can design it yourself by dragging wires and connectors out of a sidebar and arranging them on a workspace, deciding which wire goes to what pin of the connector. Your choices for wires include various gauges and ribbon configurations. You choose a color (they have eleven) select connectors and drag those out too–choose from 17 cable-to-cable and cable-to-board connector families. We made a quick cable with four 32ga wires and two 16ga wires, with two different connectors on each side, with pricing updated realtime. If you want a sample pack of connectors, Dirty sells them for $10.

The downside to the service: there’s a minimum order of 100, though paying Shenzhen prices might make it worth your while. Just imagining crimping all of those connectors makes Hackaday’s hands hurt.

To get a sense of the diversity of connectors out there, read Elliot’s piece on the connector zoo that we published last year.

[thanks, Akiba]

3D-Printed Rover Rolls Light And Looks Right

[Rick Winscott]’s RO-V Remotely Operated Vehicle instructable shows you how to make this cool-looking and capable robot. The rover, a 1/10th scale truggy, sports a chassis printed in silver and black PLA. It’s got a wireless router mounted on the back, and a webcam in a 2-servo gimbal up front. [Rick] made his own steering rack and pinion out of 3D printed parts and brass M3-threaded rods which he tapped himself.

The simplified drive system nixes the front, rear, and center differentials, thereby saving [Rick] on printing time, complexity, and weight — he was able to include a second 4000 mAH battery. A TReX Jr motor controller runs a pair of Pololu gear motors. All of this is controlled by a Beaglebone Black alongside a Spektrum DX6i 2.4Ghz transmitter and an OrangeRx 6-channel receiver. The DX6i [Rick] employs typically finds use as an airplane/quad controller, but he reconfigured it to steer the rover—the left stick controls direction and the right stick (elevator and aileron) control the webcam servos.

Enough talking technicals. We think this rover is pretty in the face. Much of this attraction owes to the set of Dagu Wild Thumper wheels (an entirely reasonable name) and the awe-inspiring 100mm shocks that jack up this whip so pleasingly. However, [Rick]’s elegant chassis and the silver-and-black color scheme doesn’t hurt one bit. The wheels are mostly for the cool factor, however—[Rick] recommends swapping out the relatively modest Pololu 20D gear motors in favor of higher-torque models if you’re planning any actual off-road extremeness. If you’re interested in making your own you can download the chassis files from Tinkercad or the BeagleBone code from Github.

If it’s other drone projects you’re after, check out the duct rover and solar wifi rover we published recently.

Hackaday Prize Entry: Elephant AI

[Neil K. Sheridan]’s Automated Elephant Detection System was a semi-finalist in last year’s Hackaday Prize. Encouraged by his close finish, [Neil] is back at it with a refreshed and updated Elephant AI project.

The purpose of Elephant AI is to help humans and elephants coexist by eliminating contact between the two species. What this amounts to is an AI that can herd elephants. For this year’s project, [Neil] did away with the RF communications and village base stations in favor of 4G/3G-equipped, autonomous sentries equipped with Raspberry Pi computers with Go Pro cameras.

The main initiative of the project involves developing a system able to classify wild elephants visually, by automatically capturing images and then attempting to determine the elephant’s gender and age. Of particular importance is the challenge of detecting and controlling bull elephants during musth, a state of heightened aggressiveness that causes bulls to charge anyone who comes near. Musth can be detected visually, thanks to secretions called temporin that appear on the sides of the head. If cameras could identify bull elephants in musth and somehow guide them away from humans, everyone benefits.

This brings up another challenge: [Neil] is researching ways to actually get elephants to move away if they’re approaching humans. He’s looking into nonlethal techniques like audio files of bees or lions, as well as ping-pong balls containing chili pepper.

Got some ideas? Follow the Elephant AI project on Hackaday.io.

Writing A New Game For The Game Boy Color

If you’re bored with the Game Boy Color’s offerings, it’s understandable: it’s been around for nearly 20 years, and doesn’t get a lot of new releases these days. [Antonio Niño Díaz] spent over a year coding a game for the GBC: µCity, a Sims City style game. He designed the graphics and even wrote his own music.

[Antonio] did all the programming in Assembly Language, creating modules for managing traffic and the power grid, building creation and destruction, as well as disaster simulations. He has extensive notes in his GitHub page detailing each module and describing how it all works together. He’s given it a GPLv3+ license, so hack away.

The ROM works on emulators, but [Antonio] has verified it works on the original hardware; it just reduces the number of saved cities to accommodate the handheld’s lesser stats.

Hackaday loves our GBC: we’ve written up DIY coprocessors for the GBC, adding an audio amp, and even making a solar-powered Game Boy.

Continue reading “Writing A New Game For The Game Boy Color”

Making A Wearable NFC Bus Pass

[Stephen Cognetta] is trying to get the total number of things he owns down below 115, and he’s always looking for ways to streamline his life.

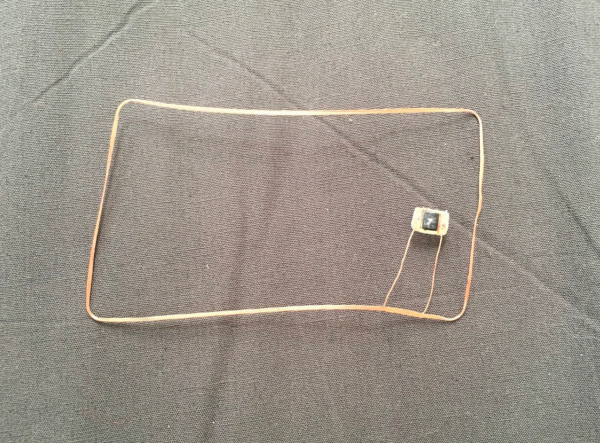
Toward this goal he dissolved his SF Transit Clipper Card in acetone to get at the NFC tag embedded inside. The tag consists of a tiny chip attached to an antenna the size of the card itself. It took about three days (video below the break) for the layers to separate and [Stephen] was able to extricate the tag.

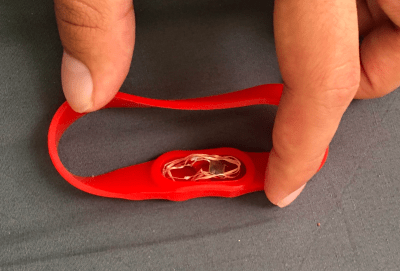
He ended up trying a few different ways of storing the delicate chip and antenna, including a lump of Sugru as well as a waterproof aspirin band, pictured to the right.

One supposes the transit pass idea might save you a little time, but what would really simplify your life would be having a single wearable tag that unlocked a bunch of things. Also it should be noted that, un-coolly, damaging a card violates SF Transit’s terms of service…

HaD has covered NFC wearables before, including the phone-unlocking NFC ring as well as the NFC ring box. This NFC-controlled infinity mirror makes great use of the technology.

Continue reading “Making A Wearable NFC Bus Pass”

Restoring A Retro 747 Control Display Unit

Anyone who’s into retro aviation gear falls in love with those mysterious displays, dials, keypads, banks of knife switches. There’s a lot of sexy in those devices, built with high standards in a time when a lot of it was assembled by hand.

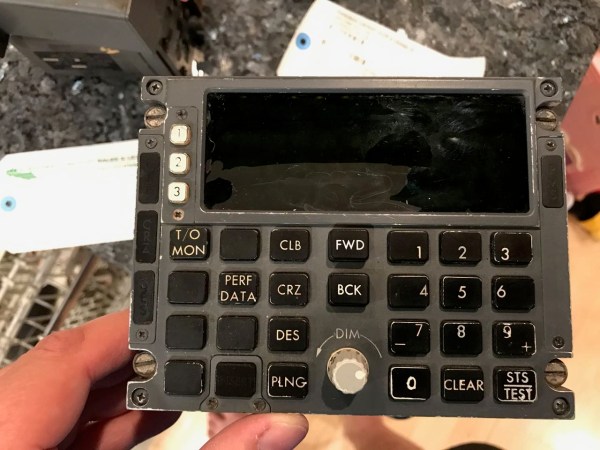
[Jeremy Gilbert] bought a 747-200’s Control Display Unit (CDU)– the interface with the late ’70s in-flight computer–and is bringing it back to life in a Hackaday.io project. His goal is to get it to light up and operate just as if it were installed in a 747.

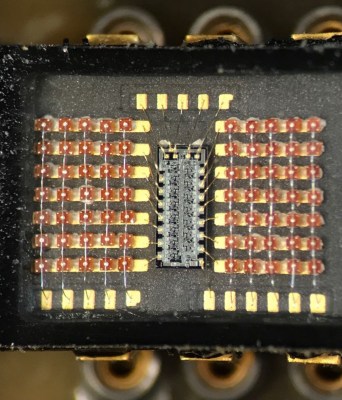
Of particular interest is the display, which turned out to consist of a series of 5×7 matrices (seen on the right) controlled by chips no one uses any more. However, [Jeremy] found a blog post where someone had hacked out Arduino code for a cousin of the chip, saving him a lot of time. However, he’s got a lot more sleuthing yet to do.

If you’re into retro displays, we’ve mentioned a number of good ones, including the legendary Apollo DSKY and an awesome retrocomputer.