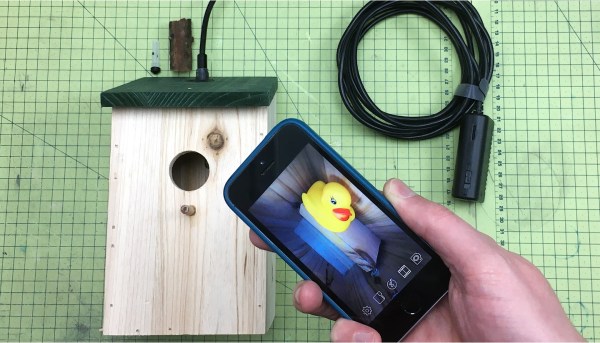
WiFi bird box with phone showing video of a rubber ducky

Building A WiFi-Enabled Bird Box On The Cheap

[Jude] was looking for a fun DIY project for him and his son and thought that a bird box might be a good option. He wanted to equip the box with a WiFi camera so he could watch his little guests from his phone but didn’t find any suitable, inexpensive, commercially-available options. So with that, he built one himself.

He did, however, start with a generic bird box, which he bought online, and then modified with his particular features of interest. He wanted the project to be scalable so after-school programs and other kids clubs could easily implement his design within a classroom setting. He figured minimizing the woodwork would make the project easier for children.

He added a dowel to the generic bird box he bought online, but cautions that readers need to investigate if a dowel would attract invasive species in their area. He found a relatively inexpensive WiFi-enabled endoscope that he noted was far more affordable than the camera-equipped, commercially-available bird boxes he found earlier. He craftily used a plastic syringe as a waterproof spy hole that housed the endoscope, allowing him to easily slip the camera in and out of the bird box without disturbing its occupants. He noted that the 3 mL syringe had the perfect inner diameter to fit the endoscope rather snugly.
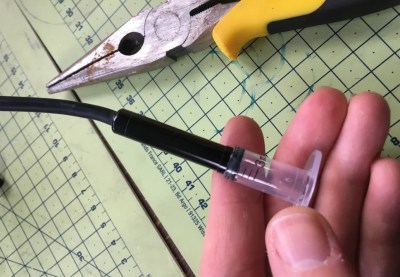
[Jude] doesn’t intend to have the endoscope active 24/7, so he needed a way to seal the access hole when the camera was not in use. His many years at Dyson taught him that implementing a removable, water-tight, rubber seal is not as easy as people may think. Fortunately, the rubber stopper at the tip of the syringe’s plunger was naturally a perfect removable seal and he could use it to plug the access hole when the endoscope was not in use.

The endoscope was mostly waterproof, except for the WiFi transmitter, so [Jude] needed to place that end of the device in a waterproof enclosure. He said these are often called “IP rated” enclosures and he figured these could come in handy for any number of outdoor electronics projects so we imagine this might come in handy for a lot of our readers as well.

Mother nature has certainly inspired many projects here at Hackaday and [Jude]’s bird box is no exception. Cool project!

Box with a hole. Camera and Raspberry Pi inside.

A Label Maker That Uses AI Really Poorly

[8BitsAndAByte] found herself obsessively labeling items around her house, and, like the rest of the world, wanted to see what simple, routine tasks could be made unnecessarily complicated by using AI. Instead of manually identifying objects using human intelligence, she thought it would be fun to offload that task to our AI overlords and the results are pretty amusing.

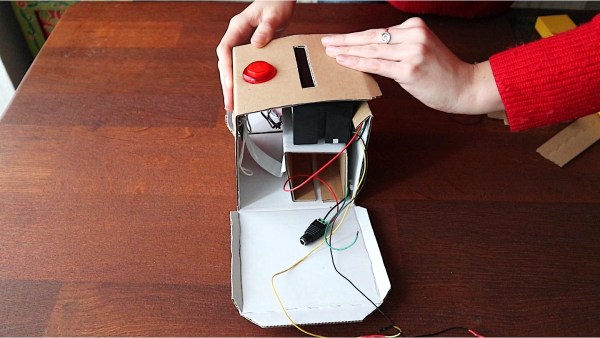
She constructed a cardboard enclosure that housed a Raspberry Pi 3B+, a Pi Camera Module V2, and a small thermal printer for making the labels. The enclosure included a hole for the camera and a button for taking the picture. The image taken by the Pi is analyzed by the DeepAI DenseCap API which, in theory, should create a label for each object detected within the image. Unfortunately, it doesn’t seem to do that very well and [8BitsAndAByte] is left with labels that don’t match any of the objects she took pictures of. In some cases it didn’t even get close, for example, the model thought an apple was a person’s head and a rotary dial phone was a cup. Go figure. It didn’t really seem to bother her though, and she got a pretty good laugh from the whole thing.

It appears the model detects all objects in the image, but only prints the label for the object it was most certain about. So maybe part of her problem is there were just too many objects in the background? If that were the case, you could probably improve the accuracy of the model by placing the object against a neutral background. That may confuse the AI a lot less and possibly give you better results. Or maybe try a different classifier altogether? Or don’t. Then you could just use it as a fun, gag project at your next get-together. That works too.

Cool project [8BitsAndAByte]! Hey, maybe this is a sign the world will still need some human intelligence after all. Who knows?

Continue reading “A Label Maker That Uses AI Really Poorly”

Kamehameha!! PCB Badge

PCB Art has surely captivated us over the past few years and we’re ever intrigued with the intricate detail the community puts into their work. We’re no strangers to [Arnov]’s work and he has impressed, yet again, with his Kamehameha PCB badge.

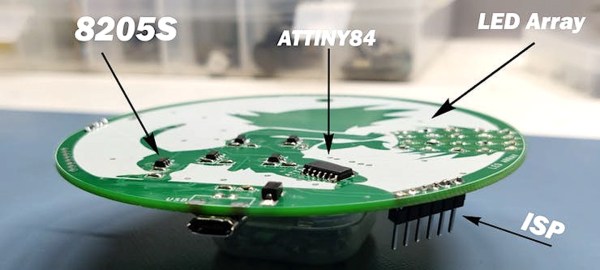
Unfortunately, no 555 timer was used in the making of this project, but don’t let that turn you away. Instead, we have an ATtiny84 microcontroller for implementing the logic to control the LEDs, a MOSFET-based driver for driving current through the LEDs, and, of course, the LEDs to give the “turtle destruction wave” its devastating glow. Pay really close attention to the detail [Arnov] put into the silkscreen as you can see that’s a pretty crucial part of this build.

Aside from marveling at [Arnov]’s work, fans of the OrCAD PCB designing software will learn how to import an image file into their project as [Arnov] walks through that step in his tutorial. He even has some pretty good reflow soldering tips if you’re looking to try your hand at SMD soldering.

Another cool build [Arnov]. Keep it up!

Continue reading “Kamehameha!! PCB Badge”

flow chart for Assessment of the Feasibility of Using Noninvasive Wearable Biometric Monitoring Sensors to Detect Influenza and the Common Cold Before Symptom Onset paper

Wearables Can Detect The Flu? Well…Maybe…

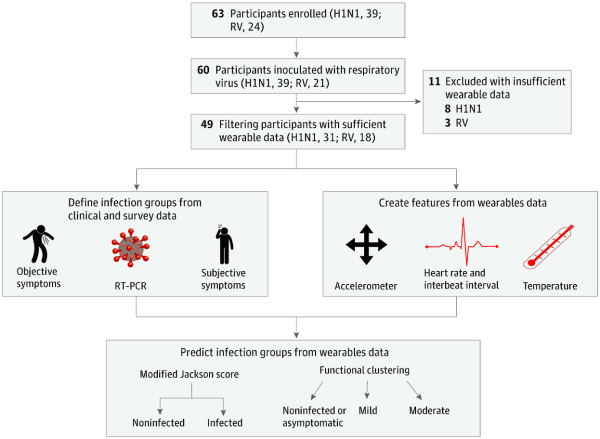
Surprisingly there are no pre-symptomatic screening methods for the common cold or the flu, allowing these viruses to spread unbeknownst to the infected. However, if we could detect when infected people will get sick even before they were showing symptoms, we could do a lot more to contain the flu or common cold and possibly save lives. Well, that’s what this group of researchers in this highly collaborative study set out to accomplish using data from wearable devices.

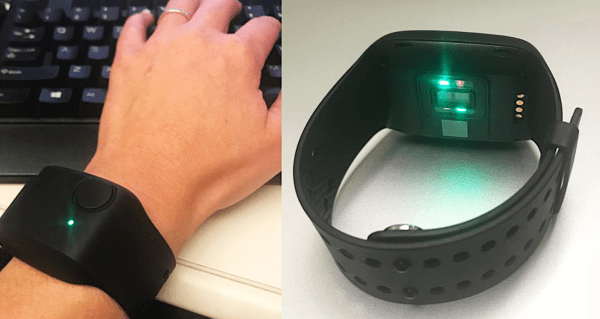
Participants of the study were given an E4 wristband, a research-grade wearable that measures heart rate, skin temperature, electrodermal activity, and movement. They then wore the E4 before and after inoculation of either influenza or rhinovirus. The researchers used 25 binary, random forest classification models to predict whether or not participants were infected based on the physiological data reported by the E4 sensor. Their results are pretty lengthy, so I’ll only highlight a few major discussion points. In one particular analysis, they found that at 36 hours after inoculation their model had an accuracy of 89% with a 100% sensitivity and a 67% specificity. Those aren’t exactly world-shaking numbers, but something the researchers thought was pretty promising nonetheless.

One major consideration for the accuracy of their model is the quality of the data reported by the wearable. Namely, if the data reported by the wearable isn’t reliable itself, no model derived from such data can be trustworthy either. We’ve discussed those points here at Hackaday before. Another major consideration is the lack of a control group. You definitely need to know if the model is simply tagging everyone as “infected” (which specificity does give us an idea of, to be fair) and a control group of participants who have not been inoculated with either virus would be one possible way to answer that question. Fortunately, the researchers admit this limitation of their work and we hope they will remedy this in future studies.

Studies like this are becoming increasingly common and the ongoing pandemic has motivated these physiological monitoring studies even further. It seems like wearables are here to stay as the academic research involving these devices seems to intensify each day. We’d love to see what kind of data could be obtained by a community-developed device, as we’ve seen some pretty impressive DIY biosensor projects over the years.

Comfortable, wearable packaging for biometric device for monitoring physiological data and pushing the data to the cloud

A DIY Biometric Device With Some Security Considerations

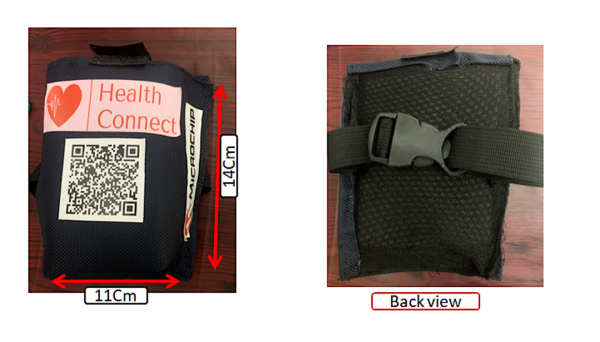
Biohacking projects are not new to Hackaday and it’s certainly a genre that really piques our interest. Our latest biohacking device comes courtesy of [Manivannan] who brings his flavor of a wearable biosensor with some security elements built-in through AWS.

The hardware is composed of some impressive components we have seen. He has an AD8232 electrocardiogram front end, the MAX30102 integrated pulse oximeter IC for determining blood oxygen and heart rate, and the ever-popular LM35 for measuring body temperature. Either of these chips would be perfect for your next DIY biosensor project though you might try the MAX30205 body temperature sensor given its 0.1-degree Celsius accuracy. However, what really piqued our interest was the use of Microchip’s AVR-IoT WA Development Board. Now we’ve talked about this board before and also mentioned you could probably do all the same things with an ESP-device, but perhaps now we get to see the board a bit more in action.

[Manivannan] walks the reader through the board’s setup and everything looks to be pretty straightforward. He ultimately rigged together a very primitive dashboard for viewing all his vitals in real-time, demonstrating how you could put together your own patient dashboard for remote monitoring of vitals or other sensor signals. He emphasizes that all this is powered through AWS, giving him some added security layers that are critical for protecting his data from unwanted viewers.

Though [Manivannan’s] security implementation doesn’t rise to the standard of medical devices, maybe it will serve as a case study in the growing open-source medical device movement.

Continue reading “A DIY Biometric Device With Some Security Considerations”

Naruto PCB Art

Ninja Art: PCB Nightlight Jutsu!

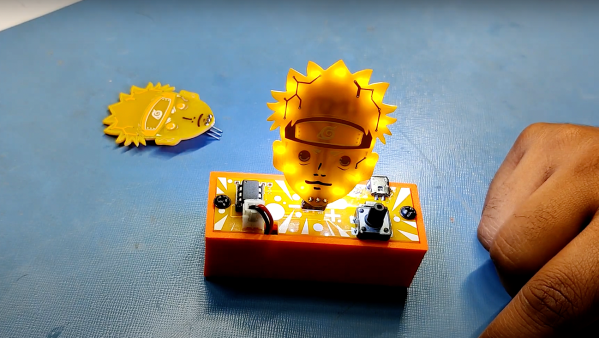
This latest PCB artwork comes to you courtesy of [Arnov]. His Naruto nightlight is definitely going to get your anime-loving friends’ attention.

The LED illumination styles are controlled by an ATtiny13A microcontroller. He probably could have opted for a 555 timer with this one, but maybe he wanted easily programmable blinking patterns. He also programmed the ATtiny to read a small button which he used to cycle through different illumination styles. Finally, a small LiPo battery makes this project pretty portable, so you can reposition it freely around your work area as you might like.

With all that being said, the meat of this project is in the physical dimensional design of the PCB. [Arnov] was able to design the circuit board in the shape of Naruto’s head, with pretty good detail for his hair, eyes, and headband. If you’ve ever tried your own PCB art, you know that it can be a fairly onerous task. He creatively used the copper traces as features within the PCB, in this case, Naruto’s ninja headband. We thought the subtle decision of putting the LEDs on the backside of the PCB was smart as well. By doing so, he used the solder mask as a natural light defuser which really gave the PCB a cool, yellow glow. Carefully removing the copper layer and not using a copper pour really aided in the aesthetic. He was also smart to opt for yellow solder mask since Naruto’s hair is yellow.

All in all, two thumbs up [Arnov]. While you’re here, check out some other great PCB art around Hackaday.

Continue reading “Ninja Art: PCB Nightlight Jutsu!”

E4 Empatica device for measuring location, temperature, skin conductance, sleep, etc. on arm

Wearable Sensor For Detecting Substance Use Disorder

Oftentimes, the feature set for our typical fitness-focused wearables feels a bit empty. Push notifications on your wrist? OK, fine. Counting your steps? Sure, why not. But how useful are those capabilities anyway? Well, what if wearables could be used for a more dignified purpose like helping people in recovery from substance use disorder (SUD)? That’s what the researchers at the University of Massachusetts Medical School aimed to find out.

In their paper, they used a wrist-worn wearable to measure locomotion, heart rate, skin temperature, and electrodermal activity of 38 SUD patients during their everyday lives. They wanted to detect periods of stress and craving, as these parameters are possible triggers of substance use. Furthermore, they had patients self-report times during the day when they felt stressed or had cravings, and used those reports to calibrate their model.

They tried a number of classification models such as decision trees, discriminant analysis, logistic regression, and others, but found the most success using support vector machines though they failed to discuss why they thought that was the case. In the end, they found that they could detect stress vs. non-stress with an accuracy of 81.3% and craving vs. no-craving with an accuracy of 82.1%. Not amazing accuracy, but given the dire need for medical advancements for SUD, it’s something to keep an eye on. Interestingly enough, they found that locomotion data alone had an accuracy of approximately 75% when it came to indicating stress and cravings.

Much ado has been made about the insufficient accuracy of wearable devices for medical diagnoses, particularly of those that measure activity and heart rate. Maybe their model would perform better, being trained on real-time measurements of cortisol, a more accurate physiological measure of stress.

Finally, what really stood out to us about this study was how willing patients were to use a wearable in their treatment strategy. It’s sad that society oftentimes has a very negative perception of SUD patients, leading to fewer treatment options for patients. But hopefully, with technological advancements such as this, we’re one step closer to a more equitable future of healthcare.