Comfortable, wearable packaging for biometric device for monitoring physiological data and pushing the data to the cloud

A DIY Biometric Device With Some Security Considerations

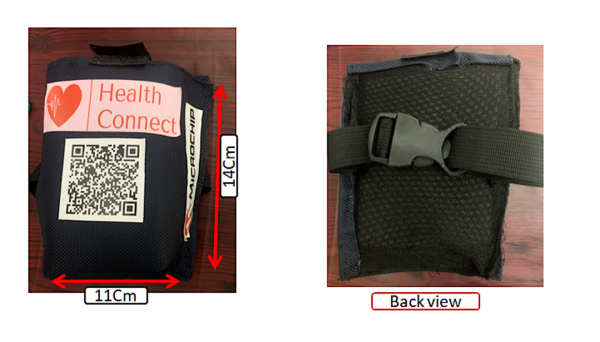
Biohacking projects are not new to Hackaday and it’s certainly a genre that really piques our interest. Our latest biohacking device comes courtesy of [Manivannan] who brings his flavor of a wearable biosensor with some security elements built-in through AWS.

The hardware is composed of some impressive components we have seen. He has an AD8232 electrocardiogram front end, the MAX30102 integrated pulse oximeter IC for determining blood oxygen and heart rate, and the ever-popular LM35 for measuring body temperature. Either of these chips would be perfect for your next DIY biosensor project though you might try the MAX30205 body temperature sensor given its 0.1-degree Celsius accuracy. However, what really piqued our interest was the use of Microchip’s AVR-IoT WA Development Board. Now we’ve talked about this board before and also mentioned you could probably do all the same things with an ESP-device, but perhaps now we get to see the board a bit more in action.

[Manivannan] walks the reader through the board’s setup and everything looks to be pretty straightforward. He ultimately rigged together a very primitive dashboard for viewing all his vitals in real-time, demonstrating how you could put together your own patient dashboard for remote monitoring of vitals or other sensor signals. He emphasizes that all this is powered through AWS, giving him some added security layers that are critical for protecting his data from unwanted viewers.

Though [Manivannan’s] security implementation doesn’t rise to the standard of medical devices, maybe it will serve as a case study in the growing open-source medical device movement.

Continue reading “A DIY Biometric Device With Some Security Considerations”

We All Live In A PVC Submarine

We doubt you could really live in [Pena’s] PVC submarine, but now the song’s stuck in our head anyway. Although the post is in Portuguese, you can get a pretty good idea of how it works, and translation software is better than ever. Transcending the language barrier, there are videos of just about every step of the construction. We didn’t, however, find a video of the vehicle in the water.

The plumber’s delight has modified motors for thrusters, and a camera as well. Epoxy potting keeps things waterproof. We’ve seen candle wax used for the same purpose in other builds.

Continue reading “We All Live In A PVC Submarine”

Vacuum Forming With 3D Printer Filament

Even if they don’t have one themselves, we’d wager the average Hackaday reader is at least vaguely aware of how a vacuum former works on a fundamental level. You heat up a plastic sheet until it’s soft, then use a vacuum pump to pull the ductile material down onto an object and hold it there while it cools off. It’s easy to build a vacuum forming rig yourself, but small commercial units are cheap enough that it might not be worth your time. If everything goes to plan, the technique is a quick and effective way of duplicating items around the home and shop.

But we were recently tipped off to a variation of this classic technique that’s certainly worth further research. As demonstrated in a recent video, [Nathan Martinez] shows how 3D printed sheets can be used in place of the 5″ x 5″ squares of thermoplastic film that his imported vacuum former was designed to use. It’s easy enough to do: just model up a square with the appropriate 2D dimensions in your CAD package of choice, and extrude it to a height of about .5 mm.

A printed mesh pattern could be used to form custom shaped filters or strainers.

So what’s the advantage? Well for one thing, it’s cheaper. Though admittedly, not by much. Going rate on Amazon seems to be about 90 cents per sheet for the real stuff, and some back of the envelope math shows the printed version coming in at around 30 cents given nominal filament costs. Whether or not those savings are worth the extra effort is certainly debatable.

But that’s not really the most interesting part. With printed sheets loaded into the vacuum former, you’ve got access to a much wider array of materials to work with. For example, [Nathan] shows off some very interesting flexible pieces he was able to produce using sheets of TPU. You can also experiment with different surface textures. These can not only be used to give your vacuum formed pieces a bit of interesting visual flair, but could actually have some practical applications. In the video we see how a printed mesh could be formed over a piece to create a conformal air vent or filter.

To be sure, there’s some room for improvement here. Not all the pulls were successes, and [Nathan] says getting the printed sheets up to the proper temperature can be tricky. But when it works, it works quite well, and we think there could be some untapped potential in this unexpected melding of new and old methods of at-home plastic production.

Continue reading “Vacuum Forming With 3D Printer Filament”

Getting Familiar With Round Displays

Once upon a time, maker projects were limited to using simple character displays or those salvaged from popular Nokias, largely due to cost. These days, a small OLED or LCD is available for just a few bucks. However, you can go fancier, and [Mr. Volt] does just that with an exploration of nice round displays.

Using round displays doesn’t have to be hard, with plenty of great products on the market. [Mr. Volt] goes through various options, from the cheap bare screens you can hook up to a microcontroller, to larger models designed for direct use with the Raspberry Pi or even straight HDMI inputs. Many are quite high resolution, and look particularly beautiful when driven with appropriate artwork.

However, there are a few tricks that come in handy when you’re going away from traditional rectangular screens. Screen mounts on some models may not be directly aligned with the center of the circular display, which can lead to results that look off if not accounted for.

It’s also important to remember that round displays are still driven like square displays, using Cartesian coordinates. Trying to use software with interface elements around the edges can be trying, as many end up rendered off-screen. Instead, circular displays are best used to display purpose-made content, rather than used with traditional software expecting a rectangular screen.

Fundamentally, round displays are a neat thing to have, as they allow for the construction of elegant projects that don’t have to abstract a circle with cheats like obscuring bezels or housings. Video after the break.

Continue reading “Getting Familiar With Round Displays”

Ordering prototypes like they were fast food

Has DIY Become Click And Buy?

We are living in great times for DIY, although ironically some of that is because of all the steps that we don’t have to do ourselves. PCBs can be ordered out easily and inexpensively, and the mechanical parts of our projects can be ordered conveniently online, fabricated in quantity one for not much more than a song, or 3D printed at home when plastic will do. Is this really DIY if everything is being farmed out? Yes, no, and maybe.

It all depends on where you think the real value of DIY lies. Is it in the idea, the concept, the design? Or in its realization, the manufacturing? I would claim that most of the value actually lies in the former, as much as I personally enjoy the many processes of physically constructing the individual parts of many projects.

For instance, I designed and built a hot-wire CNC foam cutter recently. Or better, I designed a series of improved versions, because I never get anything right on the first try. All along the way, I 3D printed new and improved versions of the plastic parts, ironing as many of the little glitches out as I had patience for. This took probably a good handful of weekends’ time, spread out over a couple months, but in comparison to time spent testing, fixing, and redesigning, very little time or effort was spent in the physical building.

Moreover, I bought most of the parts at the hardware store. The motor controller shield and cheap Arduino clone came from eBay. And even those that I did manufacture myself, the 3D-printed bits, were kind of made by a machine — my experience of the whole process wouldn’t have been any different if I ordered them out.

Of course craftsmanship still exists, and we see that in Hackaday projects all the time. Heck, I’ll admit that I still enjoy a lot of the process of making things with my own hands for its own sake. It’s peaceful. But if there’s one thing that the rapid proliferation of ideas and projects that have been facilitated by 3D printing and cheap short-run PCB services, it’s that the real value of many projects lies in the idea, and the documentation. Which is to say, I gotta get around to writing up that foam cutter…

DIY castellated PCB connectors

Snip Your Way To DIY PCB Castellations

Castellated PCB edges are kind of magical. The plated semicircular features are a way to make a solid, low-profile connection from one board to another, and the way solder flows into them is deeply satisfying. But adding them to a PCB design isn’t always cheap. No worries there — you can make your own castellations with this quick and easy hack.

Scissors cutting a PCB through vias to make castellations[@CoilProtogen] doesn’t include much information in the Twitter thread about design details, but the pictures make it clear what the idea is here. OEM castellations are really just plated areas at the edge of a board that can be used to tack the board down to another one without any added hardware. The hack here is realizing that lining up a bunch of large-diameter vias and cleaving them in half with a sharp pair of scissors will result in the same profile without the added cost. The comments on the thread range from extolling the brilliance of this idea to cringing over the potential damage to the board, but [@CoilProtogen] insists that the 0.6-mm substrate cuts like butter. We’d worry that the plating on the vias would perhaps tear, but that seems not to be the case here.

The benefits of a zero-profile connection are pretty clear in this case, where castellated PCBs were used to replace bulky header-pin connectors on a larger PCB. We can see this technique being generally useful; we’ve seen them used to good effect before, and this is a technique we’ll keep in mind for later.

Controller Swaps Can Save An HDD If You Do It Right

Hard drives are fragile and reliable all at once. It’s entirely possible to have a hard drive fail, even if your data is still in perfect condition on the magnetic platters inside. [Keith Sherry] was recently trying to recover data for a friend off a damaged hard drive, and demonstrated that modern twists on old tricks can still work.

The drive in question was an old 160GB disk that itself was being used as a backup. Of course, a backup you haven’t tested is no backup at all, and this one failed in the hour it was most needed.

The suspicion was that the controller board was the culprit, and that swapping the board out might bring things back to life. Back in the day, this was a common hacker trick. However, it often fails with modern drives, which store a great deal of drive-specific calibration data on the controller board. Without this specific data, another controller will be unable to access the data on the drive, and could even cause damage.

However, as [Keith] demonstrates, there is a way around this. A controller from a similar drive was sourced, albeit from a SATA version of the drive versus the original which used USB. A single chip is then removed from the original controller, containing the calibration data specific to that drive. Soldering this chip onto the new controller got everything up and running, and the files could be recovered.

If your data is invaluable, it’s likely worth paying a professional. As [Keith] demonstrates though, the old tricks can still come in handy as long as your techniques are up to date. DIYing your own data recovery can be done, it’s just risky is all.

Oh, and don’t forget — once you’ve recovered the files, throw the drive away. Don’t keep using it! Video after the break.

Continue reading “Controller Swaps Can Save An HDD If You Do It Right”