DIY Optic Lens

One Small Step For Magnification, One Giant Leap For Home Lens Manufacturing

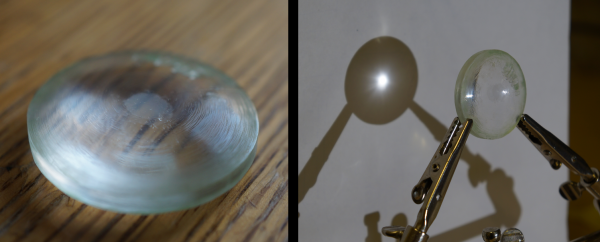
There are some types of projects that we see quite often here on Hackaday; 3D Printers, Development Boards and Video Game Hardware to name a few. Once in a while we see an optics-based project but those use pre-made lenses. [Peter] felt it was time to give home lens manufacturing a shot and sent in a tip about his experience.

The typical lens manufacturing process starts off by taking a piece of glass and manipulating it into a rough lens shape, either by removing material or heating the glass and forming it in a mold. These lens blanks are then lapped using progressively finer grits of abrasives until the final lens shape and surface finish are achieved. The tool used to lap the lens is very specialized and specific to one lens contour shape. This lapping process can be very time consuming (and therefore expensive) depending on the quality and size of the lens being made.

Continue reading “One Small Step For Magnification, One Giant Leap For Home Lens Manufacturing”

CD Drive CNC Machine

CD Drive CNC Machine Steals Matt Groening’s Job, Says ‘Ha Ha’

DIY CNC Machines are fun to build. There are a lot of different designs all over the internet. Some are large and some small. Some are made from new material and others from recycled parts. [Leonardo’s] newest project is at the absolute far end of the small and recycled spectra. His CNC Machine is made from CD Drives and can draw a mean Nelson.

First, the CD Drives were disassembled to gain access to the carriages. These were then mounted to a quick and dirty wooden frame. Notice the Y Axis carriage is mounted with bolts and nuts that allow for leveling of the bed, not a bad idea. A Bic pen mounted to the Z axis carriage is responsible for the drawing duties.

[Leonardo] does something a little different for generating his g-code. First he takes a bitmap image and converts it to monochrome using MS Paint. The image is then imported into Cadsoft Eagle and using a modified import_bmp.ulp script. The bitmap is converted into what Eagle considers wire traces and then outputted as x and y coordinates for each wire complete with a command for lifting and lowering the pen.

A PC sends the move commands via USB, through a PL2303HX USB-Serial TTL Converter, to a PIC16F628A which, in turn, sends step and direction signals to the three Easy Driver stepper motor drivers. The stepper motor drivers are connected directly to the original CD Drive motors.

Check out the video after the break….

Continue reading “CD Drive CNC Machine Steals Matt Groening’s Job, Says ‘Ha Ha’”

Move Over Humans And Things, Flowers Now On The ‘Net

Tweeting Poppy Plants

The ‘Internet of Flowers’ is upon us thanks to an artist named [Adrian]. He has designed a project that not only monitors the growth of Poppy Flowers but also monitors the soil, air and surrounding activity.

The entire project is based on a Raspberry Pi mounted in a purpose-built enclosure made from laser cut birch plywood. The enclosure is mounted in a window of an adjacent building that has a view of the flower bed. An internally mounted camera was carefully aligned so its field of view was mostly of the plants and would limit taking photos of unknowing passersby. The camera takes a snap shot every 5 minutes, see the time lapse video below.

Tweeting Poppy Plants
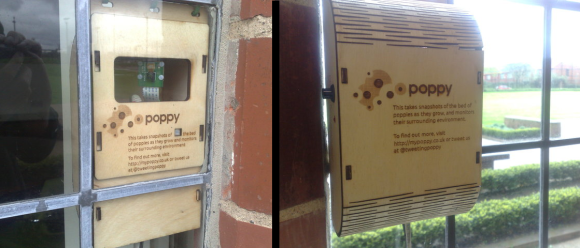
A box containing sensors is installed in the flower bed. The intent of this project was not to have the Raspberry Pi spit out hard factual data regarding soil moistness, temperature and ambient noise, but to instead take that data from the sensors and send out a story-like narrative that makes the communication feel more personal. To receive these comments from the poppies, you can follow them on Twitter: @tweetingpoppy.

Continue reading “Move Over Humans And Things, Flowers Now On The ‘Net”

Another Ball Sucking Machine Leaves You Wanting More

Pneumatic Sponge Ball Accelerator

[Niklas] told us about his newest art project that he is calling a Pneumatic Sponge Ball Accelerator. This isn’t a home workshop type of project, it is a full fledged art exhibit displayed at the Tschumi Pavilion in Groningen / The Netherlands. One-thousand black sponge balls move from a big glass ball-reservoir bubble to another via a 150 meter long track of clear plastic tubing. The balls move up to an impressive 4 meters a second. Admirers of the installation can operate the machine and its airflow from outside the pavilion by pressing their hand up to a touch sensor installed on the wall of the exhibit.

All of the ball movement is powered by an ordinary home vacuum. Since it would be a short display if all the balls traveled in one direction, ending up in just one of the glass bubbles, [Niklas] came up with a simple yet functional valve that reverses the flow of air in the tube. This is done by a rotatable disk with two holes in it. Depending on its position, it connects one of the two bubble to the vacuum, leaving the other vented to outside atmosphere. Since the vacuum side of the path is low pressure and the ambient atmosphere is relative high pressure, the air travels towards the vacuum bringing the foam balls with it. No balls get sucked into the vacuum because the outlet tube is at the top of each bubble.

Pneumatic Sponge Ball Accelerator


Find two videos after the break, they are well worth watching.

Continue reading “Another Ball Sucking Machine Leaves You Wanting More”

DIY Headphone Tube Amp Builds On Existing Design

DIY Tube Headphone Amp

[Simon] wrote in to tell us about a headphone tube amp that he just built. It is based on schematics at diyaudioprojects.com that were actually featured on Hackaday in the past. [Simon’s] design adds an on board regulated power supply and a volume control for the input. Effort was made to keep the PCB single sided to facilitate making this at home.

DIY Tube Headphone Amp
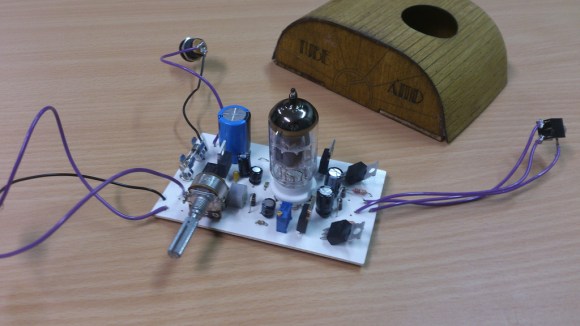
The 12AU7 is popular due to its ruggedness and tolerance for low operational voltages. This amp design uses a plate voltage of 12, although the 12AU7 can handle up to about 330.  Since the 12AU7 is of the Twin Triode variety, one tube can be used to amplify both a left and right audio channel.

The case for the amplifier is laser cut plywood. The top piece is kerfed so that it can bend around the radii of the front and rear panels. The top also has a hole cut in it to allow the tube to peek out through.The pieces look nice but, unfortunately, he doesn’t show the case and amp in an assembled state.

If you’re interested in building one of these, [Simon] made all of the Eagle and Case files available. The total cost of the project was £25, about $43 US. To learn more about how tube amplifiers work, check out this Retrotechtacular from earlier in the year.

Retro Gaming Console, Now With Internet Radio

RaspPi Retro Gaming Console with Internet Radio

Do you ever miss your gaming system of yesteryear? [yv3] did so he built a retro gaming console. Even though [yv3] likes his old school games, he didn’t want to be stuck listening to old school 8-track tapes while playing those games. The solution for him was to build a retro gaming console with integrated internet radio.

The gaming portion of the build relies on RetroPie. The RetroPie disk image contains all of the software and emulators needed to turn a Raspberry Pi into a dedicated retro gaming system. The RetroPie project supports a lot of gaming systems, [yv3] chose to include Atari, Sega Master System and Genesis, NES, SNES, and Turbografx-16.

Raspberry Pi Internet Radio manages the radio portion of this project and is set up to start playing automatically when the unit is powered on. There are 5 buttons to change the station, volume and settings. The radio stations are managed by a text file residing on the SD card. Audio from the radio can be directed to either the HDMI or the analog out of the RaspPi.

Continue reading “Retro Gaming Console, Now With Internet Radio”

Laser Piano Worthy Of The Band ‘Wyld Stallyns’

Laser Piano uses Arduino

[Robi] and [Kathy] from elecfreaks have put together a how-to article about a Laser Piano they just built. Instead of keys, the user breaks beams of laser light to trigger the sounds.

Several laser pointer diodes are wired in parallel and mounted in a box, cardboard in this case. The laser diodes are aimed at photocells that reside on the other side of the box. Each photocellis connected to a digital input pin on an Arduino. When the Arduino senses a state change from one of the photocell, meaning the beam of light has been interrupted, it plays the appropriate wave file stored on an external JQ6500 sound module.

[Robi] admits that there are some improvements to be made, specifically the trigger response time and the piano sounding too monotonous. If you have any ideas, please leave them in the comments section.

Continue reading “Laser Piano Worthy Of The Band ‘Wyld Stallyns’”