Art-O-Matic Is Spirograph’s Young Hip Offspring

Art-O-Matic automatic spirograph

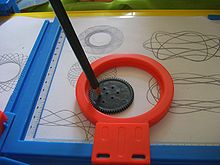
Some of our more senior experienced readers may remember a toy called the Spirograph. In case you don’t, it’s a geometric shape drawing toy. The way it works is a plastic disc with gear teeth around the perimeter and various holes on its face is spun around a plastic ring with gear teeth on the inside. A pencil is inserted in one of the holes in the disc and, when spun around the inside of the ring, draws different complex shapes called hypotrochoids.

 Art-O-Matic automatic Spirograph

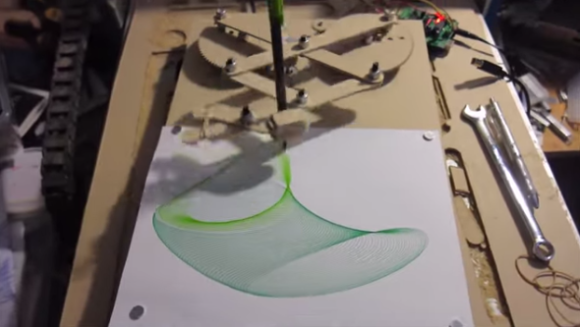
This was fun enough to keep a kid entertained for a few minutes. It took a while to make a complete shape and sometimes it was easy to mess up (especially if the hole chosen for the pencil was near the outside of the disc). [Darcy] thought it would be neat to combine the Spirograph’s drawing style with modern technology. The result is called the Art-O-Matic and it draws some pretty wild art, you guessed it, automatically.

Click past the break for more!

Continue reading “Art-O-Matic Is Spirograph’s Young Hip Offspring”

Super Simple Gimbal For Multi-Rotor Aircraft Laughs In The Face Of Complexity

Super Simple Multi Rotor Gimbal

After the first flight of your newly built multi-copter, you will immediately want to add a camera. This sequence of events follows the laws of physics and is as predictable as gravity. Just strapping a camera on by way of a fixed bracket may technically solve that problem, but it creates another. A multi-copter tilts and rolls as a result of changing flight direction. If the multi-copter tilts and rolls, so does your camera. This is where a gimbal comes in handy, it adjusts the camera in an equal and opposite direction than that of the aircraft. If the aircraft tilts forward, the gimbal tilts the camera backward the same amount. The result is a steady camera for capturing some sweet videography.

Super Simple Multi Rotor GimbalTeam SSG over at rcgroups.com has come up with what they are calling the Super Simple Gimbal. Their vision was a gimbal that would be inexpensive, easy to build and add minimal weight to the aircraft. On a normal gimbal, there are two motors or servos, each one specifically controls a single axis of movement. On the SSG, there are 2 servos but they do not move independently from one another. The camera is mounted to a plate that is supported on one end by a piece of silicone tube which becomes a fulcrum for the system. The other side of this plate is supported by 2 linkages (also made of silicone tube) that are themselves connected to the servos. If both servos move up, the camera is tilted down. If the right servo moves up and the left down, the camera is tilted to the left.

Continue reading “Super Simple Gimbal For Multi-Rotor Aircraft Laughs In The Face Of Complexity”

Physical Keys Not Just For Doors Anymore, Now Available For Windows

Physical Key Locks and Unlocks Windows Computer

If you have ever forgotten your computer password after a long weekend or maybe you can remember it but just can’t seem to type it correctly, [Thomas] has a project for you. It’s a physical key that locks and unlocks your PC.

So how does it work? The heart of the project is an Arduino Leonardo. You may recall that this board is a bit different from the preceding Arduinos as it can enumerate on a host computer as a Human Interface Device (HID), such as a keyboard or mouse. The Arduino sketch continually reads an input pin using an internal pull-up resistor to make it logic high with the key switch connecting the signal to ground. When the Arduino sees the pin change from high to low, it sends out a keyboard command consisting of the Windows Key and “L”, which is the keyboard shortcut for locking the computer.

When the physical key is turned again, the Arduino sees the pin change back to a high state and it again emulates a keyboard but this time enters your password. You do have to include your password in the Arduino sketch for this to work. In addition, there are two LED’s wired up to show if the computer is locked or not, but you’ll be able to tell pretty quick when trying to get back to work.

Continue reading “Physical Keys Not Just For Doors Anymore, Now Available For Windows”

Overkill Phone Charger, Because, Well, Why Not?

ATX Phone Charger

There are times in a tinkerer’s existence where it is convenient to have the ability to plug in and power a lot of USB devices. Sure, you could use a USB hub but this may not be satisfactory if your devices require a lot of current. A computer may work but is not really a stand alone solution.

[Jeff] and the crew over at Make Lehigh Valley ran into this predicament. They were putting on an Adafruit Trinket class and needed a USB power supply to power all of the Trinkets that were going to be used. As any makerspace would do, they built their own USB Power Station, and the final product is certainly overkill for what they needed (that’s not a bad thing).

An old ATX computer power supply is a logical component to use for this type of project. These power supplies are usually available in abundance and will provide all the amperage any reasonable amount of 5v USB devices can ask for. The 5v output from the ATX power supply was wired to 8 USB jacks. Keeping up with the project’s resourcefulness, those USB jacks were scavenged from a couple of old PCI-slot USB hub panels. Not satisfied with only USB outputs, the guys also wired up some banana jacks so that 3.3, 5 and 12 volts were available for whatever project was being worked on. A 3D printed enclosure keeps everything neat and tidy.

This project used a bunch of recycled parts and solved a problem faced by the group. If you’re interested in using an ATX power supply to make a more bench-top style power supply then check out this build.

Abandoned DIY Laser Cutter installed in Ikea Desk

Ikea Desk Laser Cutter Combo

Craigslist can be a good source for finding someone else’s abandoned projects. Besides being extremely jealous, you’ll agree that [Mike’s] find is atypical of the normal Craigslist listings. He scored a 75% complete group of laser cutter parts for $500. That included the XY frame, stepper motors, Gecko motor drivers, optics, and 40 watt CO2 laser tube. He paired the laser parts with another Craigslist find, a $15 desk. A few more parts and 3 weeks of tinkering later, [Mike] had a working DIY mutant Ikea Desk Laser Cutter.

The laser cutter has a 23 x 14 inch work envelope and is controlled via Mach3. The X Axis of the frame had a little bit of wobble in it so [Mike] added a THK linear rail and bearing to stiffen it up. To add a little bit of mistake proofing to the laser, [Mike] put a water flow sensor in the laser tube cooling system. The laser will not turn on unless water is pumping to cool the laser tube. Wrecking your laser tube by accident would be a total bummer!

Continue reading “Ikea Desk Laser Cutter Combo”

Home Depot Brand Boat Costs $29.18

hdboat

It is a common belief (or fact, depending who you talk to) that boats are money pits. Surely, it is a fun past time even for the lucky person flipping the bill, but what if you could build a boat from locally found and purchased items. [Bill] did just this and he did it for a mere $30. His creation is affectionately called Thunder Bucket.

The overall design is a pontoon-based sail boat. You’ll notice from the photo that the pontoons are made from many 5 gallon buckets attached together. The wood frame and deck come courtesy of old pallets that were taken apart. The mast is a fence post and a standard blue tarp rounds out the resourcefulness as it is used for the sail.

Admittedly, this may not be the coolest boat on the waterways but it is a boat, it’s made from non-boat-like items and it works. Believe it or not [Bill] is a professional boat builder. Sometimes ‘why not?’ is the best reason to do something.

electronic drums from 5 gallon buckets

5-Gallon 5-Piece Electronic Drum Set

Who hasn’t wanted to rock out on some drums in the middle of the night? If you have anything that resembles neighbors then a midnight jam session is out of the question. That is unless a set of electronic drums is available… but alas, those are expensive. If you don’t have the spare cash burning a hole in your pocket, then be like [Mike] and build a complete 5 piece e-drum set.

[Mike] started off with 5 gallon buckets that would become the drum shells. On a real drum set, all of the drums are different sizes in order to produce different notes. Drum size doesn’t matter with an electronic drum as a drum module creates the note and sound. Even so, to make this set a little more realistic, each drum was sectioned and pulled back together to change the diameter. A homemade circle cutting jig and a wood router were used to cut top and bottom rim hoops out of 3/4″ plywood. The inner diameter of these hoops were made just a hair larger than the outer diameter of the 5 gallon bucket shells. The bottom of the top hoop was then routed to produce a groove which would allow a standard mesh drum head to fit inside.

Continue reading “5-Gallon 5-Piece Electronic Drum Set”