Innocent TV Imprisoned Behind Mirror

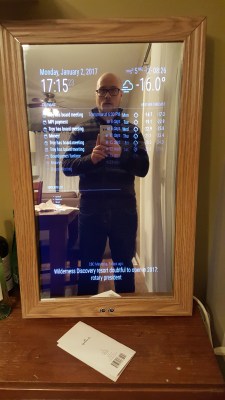
After following along with all the Magic Mirror builds, [Troy Denton] finally caved in and started building one for his girlfriend for Christmas. These popular builds are all pretty much bespoke, and this one is no different.
mirror2His victim TV didn’t have the ability to be switched on and off by the Raspberry Pi using HDMI/CEC, so he came up with an alternative. He got a couple of opto-isolators and soldered one to the on/off button on the TV’s control board. The Pi didn’t know whether it was switching the TV on or off, it just knew it was switching it. To solve this, [Troy Denton] connected another opto-isolator to the TV’s LED, this one the other way around. When the TV is turned on, the Pi now detects it.

The enclosure is fabbed from 2×4 lumber, the mirror is one-way acrylic which runs somewhere in the $75-100 range for this 27-9/16″x15-1/2″ application. The top and bottom rails include lines of holes to encourage airflow to keep things cool. the face plate is picture framing which makes it easy to mount the mirror. An ultrasonic range finder finishes off the build and when someone stands in front of this magic mirror, the Pi senses it and turns the monitor on.

Included in [Troy]’s post are the Python code and shell scripts he wrote as well as a bunch of pictures of the build process. We’ve seen Magic Mirrors builds before, including some small ones. They’re a cool addition to the house and a fairly simple build.

Open Sound Control Of Kitchen Lights

Controlling the Internet of Things is all about passing information around. Realistically, it doesn’t matter what is used, be it MQTT, HTTP, serial data, whatever, and it doesn’t really matter what data is sent as long as the sender and receiver agree on what the data means. MIDI could be used to pass information back and forth, for example and while MIDI is good for some things, Open Sound Control is a more modern alternative and one area where OSC excels over MIDI is Internet connectivity. [Matt] used OSC to control the lighting he installed in his kitchen.

kitchen_controller
ESP8622-1 and Buck Converter

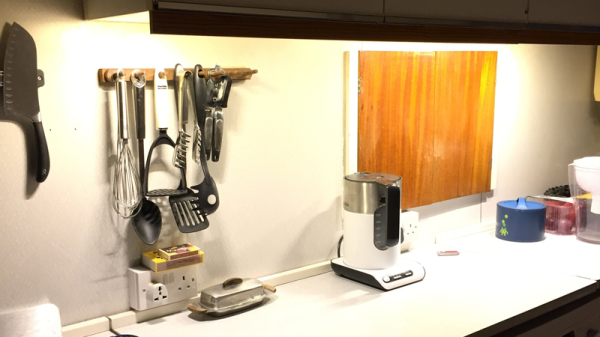
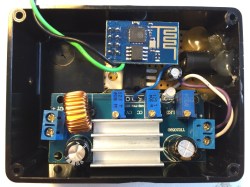
[Matt] had moved in to a new house and wanted some under-cupboard lighting for his kitchen. He got a few cheap warm white LED lights from the Internet and went about wiring them together. For the controller, an ESP8266-1 was used as well as a 12 volt constant-current buck converter. The software runs on the Sming framework, rather than the Arduino framework, and listens for incoming OSC messages. When it receives a command on a specific channel, a callback function turns the lights on and off.  [Matt] also added a switch on the outside of the control box to manually turn the lights on and off.

OSC might not be the right choice for this project, and even [Matt] doesn’t know why he used it, but [Matt] got it working and uses an app on his phone to control it. If he wanted to, he could have used Ableton or another controller to control the lights. (He hasn’t wanted to yet.) OSC is an interesting alternative to MIDI and can also be used with an Arduino without an ethernet shield, or with RFID tags.

Adding An IKEA Wireless Charger To A Project

IKEA sometimes seems like a DIY store disguised as a furniture store. We may go there looking for a new sofa or kitchen table, but, to the DIY enthusiast, it’s a shop full of possibilities. While wandering through the local IKEA, [Erich Styger] noticed they had some Qi wireless chargers and receivers for a very reasonable price, so he bought a few and added wireless charging to his Mikroelektronika Hexiwear.

toothpicking-the-coil
Removing the wireless charger

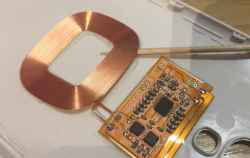
[Erich Styger] didn’t like the clumsiness of the Hexiwear’s USB charging options and, at the price he got the IKEA Vitahult Qi phone case wireless receivers at, he couldn’t resist buying a few for his projects. After carefully separating the circuitry from the phone cases they came in he opening up the Hexiwear. He removed the battery connector and soldered the charger to battery charging circuit. [Erich Styger] then 3D printed a new back to the Hexiwear’s case to fit the new circuitry. A quick test with the IKEA charging pad proved the hack had worked.

IKEA has become something of a DIY enthusiasts go-to shop, with everything from weather stations to a camera slider at a decent price. Walking through the maze inside the store, the DIYer doesn’t see lamps and boxes and shelves, they see light projectors and enclosures and, well, everyone needs shelves.

Finding A Lost Tooth With Science!

Sometimes the hack is a masterwork of circuit design, crafting, 3D printing and programming. Other times, the hack is knowing which tool is right for the job, even when the job isn’t your regular, run-of-the-mill, job. [John]’s son lost his tooth on their gravel driveway, so [John] set out to find it.

socks-fluoresce-under-uv-light-640x480
White socks fluoresce under UV

When [John] set out to help his son and find the tooth, he needed a plan of attack – there was a large area to cover and, when [John] looked over the expanse of gravel the terms “needle” and “haystack” came to mind. Just scanning the ground wasn’t going to work, he needed a way to differentiate the tooth from the background. Luckily, he had a UV flashlight handy and, after testing it on his own teeth, realized that his son’s tooth would fluoresce under UV light and the gravel wouldn’t.

Off [John] went at night to find the tooth with his flashlight. He soon realized that many things fluoresce under UV light – bits of plastic, quartz crystal in the rocks, his socks. [John] eventually found the tooth, and his son is happier now. No soldering was involved, no development on breadboards, no high-voltage, but this is one of those hacks that is more about problem solving than throwing microcontrollers at a situation. In the end, though, everyone’s happy, and that’s what counts.

Jenkins Lights The Christmas Tree

Jenkins is open-source automation software that tries to automate parts of the software development process. When you submit code, for example, Jenkins will grab it, build the project with it and run any tests on it. If you have a large number of people submitting new code or data, Jenkins will wait and grab a bunch of the submissions to build. Depending on the size of the project, this can take a while, and if there’s a problem, you need to know quickly so that people aren’t waiting on a broken build. Email’s fine for this, but [dkt01] saw one of the desktop LED Christmas tree projects on Hackaday, and integrated it into his Jenkins system.

Like the other projects, WS2812b LED rings are used as the tree, and an Arduino Pro Mini runs the show, with an Ethernet LAN Module to communicate with the Python script that monitors the Jenkins build job. The Python script sends commands to the Arduino, which in turn lights up the LEDs. They light up green on a successful build and red if something fails, but during the build process, the LEDs show the current state of the build, tracking Jenkins’ progress as it builds.

Our previous Jenkins post used a big, red LED light that would light up if the build failed. [dkt01]’s build lets you know if the build is successful or has failed, but the build progress is a great addition.

Continue reading “Jenkins Lights The Christmas Tree”

Ceiling Tiles Give It Up For Christmas LED Ornaments

The great thing about holidays is that they always seem to require some shiny things. The modern version of shiny things seems to be LEDs and advances in technology being what they are, we now have amazing programmable LEDs. And programmable LEDs mean animated shiny things! Years ago, [wpqrek] made an LED ornament using discrete components. This year he revisited his ornament and decided to make a new, animated, RGB ornament.

[Wpqrek]’s build is based around five WS2812b strips connected to an Arduino Pro Mini. The ornament itself is a thick styrofoam ceiling tile cut into a star shape with a red-painted wooden frame. Decorated with baubles and stars, the LED strips start in the center and end up at each point in the star. With each strip connected in parallel to the Pro Mini, [wpqrek] used the Arduino Light Animation library to handle the animations.

[Wpqrek] says the result is too big for his tree, so he uses it as a stand-alone ornament. Perhaps using lighter materials would help — or getting a bigger tree! Check out the Arduino lighting controller or the Trompe-l’oeil Menorah for more holiday hacks.

Continue reading “Ceiling Tiles Give It Up For Christmas LED Ornaments”

These Ornaments Measure Christmas Cheer

The ornament projects we post around here tend to be simple, stand-alone projects. We are, however, well into the era of the Internet of Things (like it or not) and holiday ornaments need not be single, unconnected blinking objects. For Christmas this year, [Sean Hodgins]  came up with some connected DIY ornaments that respond to Christmas cheer.

[Sean Hodgins] had some beautiful PCBs done up in festive shapes and he hand-pastes and oven-solders the SMD components on both sides. Each one is battery powered and controlled by an ESP8266. LEDs and a button on the front of each ornament comprise the user interface. When the button is pressed, data is sent to a Phant server and a “Christmas Cheer” counter is incremented. Other ornaments, so long as they can connect to the Phant server, will periodically check the counter. If the Christmas Cheer has increased, the ornaments will play a tune and flash some lights.

The ornaments are open-source — [Sean Hodgins] posted the code and PCB designs on GitHub. They look great, and would be a good way to let people know you’re thinking of them over the holidays. Check out this light-up menorah or these lighted acrylic ornaments for more holiday fun!

Continue reading “These Ornaments Measure Christmas Cheer”