New Possibilities From Fading Lighting Technology

Like the incandescent bulb before it, the compact fluorescent (CFL) bulb is rapidly fading into obscurity as there are fewer and fewer reasons to use them over their LED successors. But there are plenty of things to do with some of the more interesting circuitry that made these relatively efficient light bulbs work, and [mircemk] is here to show us some of them.

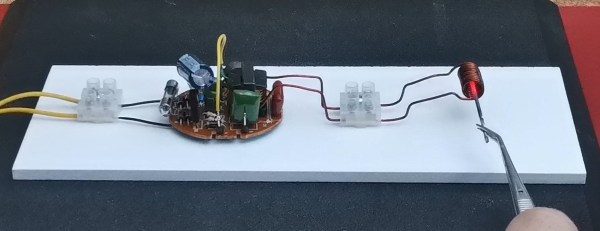
Fluorescent bulbs require a high voltage to work properly, and while this was easy enough for large ceiling installations, it was a while until this hardware could be placed inside a bulb-sized package. When removed, the high voltage driver from the CFL is used in this case to drive a small inductive heating coil circuit, which can then be used to rapidly heat metals and other objects. After some testing, [mircemk] found that the electronics on the CFL circuit board were able to easily handle the electrical load of its new task.

When old technology fades away, there are often a lot of interesting use cases just waiting to be found. [mircemk] reports that he was able to find these light bulbs at an extremely low price due to low demand caused by LEDs, so anyone needing a high voltage driver board for something like a small Tesla coil might want to look at a CFL first.

Fluorescence Microscope On A Hacker’s Budget

Some of biology’s most visually striking images come from fluorescence microscopes. Their brilliant colors on black look like a neon sign from an empty highway. A brand new fluorescence microscope is beyond a hacker’s budget and even beyond some labs’, but there are ways to upgrade an entry-level scope for the cost of a few cups of coffee. [Justin Atkin] of The Thought Emporium published a scope hacking video which can also be seen below. He is becoming a reputed scope modder.

This video assumes a couple of things for the $10 price tag. The first premise is that you already have a scope, a camera adapter, and a camera capable of shooting long exposures. The second premise is that you are willing to break the seals and open the scope to make some reversible mods. Since you are reading Hackaday, maybe that is a given.

The premise is simple compared to the build, which is not rocket surgery, the light source from below illuminates the subject like a raver, and the filter removes any light that isn’t spectacular before it gets to the camera.

Continue reading “Fluorescence Microscope On A Hacker’s Budget”

See Cells In A New Light With A DIY Fluorescence Microscope

Ever since a Dutch businessman peered into the microscopic world through his brass and glass contraption in the 1600s, microscopy has had a long, rich history of DIY innovation. This DIY fluorescence microscope is another step along that DIY path that might just open up a powerful imaging technique to amateur scientists and biohackers.

In fluorescence microscopy, cells are treated with various fluorescent dyes that can be excited with light at one wavelength and emit light at another. But as [Jonathan Bumstead] points out, fluorescence microscopes are generally priced out of the range of biohackers. His homebrew scope levels the playing field a bit. The trick is to use 3D-printed parts to kit out commonly available digital cameras – a USB microscope, a DSLR, or even a smartphone camera. Excitation is provided by a ring of Nexopixel LEDs, while a movable rack holds a filter that blocks the excitation wavelength but allows the emission wavelength to pass through to the camera. He demonstrates the technique by staining some threads with fluorescent ink from a highlighter marker and placing them on a sheet of tissue paper; in conventional bright-field mode, the threads all but disappear into the background, but jump right out under fluorescence.

Ith’s true that the optics are not exactly lab quality, and the microscope is currently only set up to do reflectance imaging as opposed to the more typical transmissive mode where the light passes through the sample. That’s an easy fix, though, and reflectance mode is still useful. We’ve seen fluorescence microscopy get quite complex before, but this simple scope might be enough to get a biohacker started.

Continue reading “See Cells In A New Light With A DIY Fluorescence Microscope”

DIY Illuminator For UV Fluorescence Photography

The image shown is the mineral Hackmanite, which fluoresces under ultraviolet lighting. However, not all UV is created equal, and that makes a difference if you’re into UV imaging. The image for this article is from [David Prutchi] and shows the striking results of using different wavelengths of UV. [David] goes into detail on how to make your own DIY Long, Medium, and Short-wave UV Illuminator complete with part numbers and wiring diagram. The device isn’t particularly complicated; the real work was determining the exact part numbers and models of lamp, filters, and ballasts required to get the correct results. [David] has done that work and shared it for anyone interested in serious UV fluorescence photography, along with a white paper on the process.

We’ve seen [David]’s work before. We featured his DIY short-wave UV imager in the past, and his DOLPi camera project was a 2015 Hackaday Prize finalist. It’s clear he really knows his stuff, and genuinely enjoys sharing his discoveries and work.

Finding A Lost Tooth With Science!

Sometimes the hack is a masterwork of circuit design, crafting, 3D printing and programming. Other times, the hack is knowing which tool is right for the job, even when the job isn’t your regular, run-of-the-mill, job. [John]’s son lost his tooth on their gravel driveway, so [John] set out to find it.

socks-fluoresce-under-uv-light-640x480
White socks fluoresce under UV

When [John] set out to help his son and find the tooth, he needed a plan of attack – there was a large area to cover and, when [John] looked over the expanse of gravel the terms “needle” and “haystack” came to mind. Just scanning the ground wasn’t going to work, he needed a way to differentiate the tooth from the background. Luckily, he had a UV flashlight handy and, after testing it on his own teeth, realized that his son’s tooth would fluoresce under UV light and the gravel wouldn’t.

Off [John] went at night to find the tooth with his flashlight. He soon realized that many things fluoresce under UV light – bits of plastic, quartz crystal in the rocks, his socks. [John] eventually found the tooth, and his son is happier now. No soldering was involved, no development on breadboards, no high-voltage, but this is one of those hacks that is more about problem solving than throwing microcontrollers at a situation. In the end, though, everyone’s happy, and that’s what counts.

Shocking Halloween Decoration

Sure, you could animate some Halloween lights using a microcontroller, some random number generation and some LEDs, and if the decorations are powered by AC, you could use some relays with your microcontroller. What if you don’t have that kind of time? [Gadget Addict] had some AC powered decorations that he’d previously animated with an Arduino and some relays, but this year wanted to do something quicker and simpler.

In another video, he goes over the wiring of a fluorescent starter to create a flickering effect with an incandescent light bulb. A fluorescent starter works because the current heats up a gas discharge tube which causes a bit of metal to bend and touch another, closing the circuit. A fluorescent bulb is a big enough load that the flowing current keeps the starter hot and, therefore, the circuit closed. If you wire the starter in series with a regular incandescent bulb, the starter heats up but the load isn’t big enough to keep the starter hot enough, so it cools down and the circuit breaks, which causes the starter to heat up again. This causes the bulb to flicker on and off. [Gadget Addict] uses two circuits with a fluorescent starter each wired to alternate bulbs in the decoration in order to get the effect to look a bit more random.

Continue reading “Shocking Halloween Decoration”

Shop Lighting: Weighing Cost And Efficiency

[Ben Krasnow] wanted to upgrade his shop lighting but before he made any decisions he decided to educate himself about the options that are out there. Luck for us, he shares the facts about different lighting in terms of cost and efficiency.

His old setup uses fluorescent light fixtures with T12 bulbs. These are rather bulky and inefficient bulbs. Many folks, ourselves included, would think of LED as a logical replacement. [Ben] started by looking into the various high-intensity LED modules that are available. He grabbed a catalog and started doing a couple of different calculations to compare Lumens/dollar for the upfront cost, and Lumens/Watt for the operational costs. Hands down, newer fluorescent bulbs come in cheaper on both counts and provide a wider spectrum of light.

The next decision was between purchasing the newer T5 bulbs which are rated at very high efficiencies, or to go with T8 bulbs which are better than the T12 standard but can use the same fixtures. After doing some digging he found that T5 is not much more efficient than T8, but they use an electronic ballast to boost efficiency. He ended up replacing his old magnetic ballasts with electronic ones to get high T8 efficiency at a cost that was lower than buying new T5 fixtures.

See [Ben’s] own recount of this process in the clip after the break.

Continue reading “Shop Lighting: Weighing Cost And Efficiency”