An Intel 8085 Microprocessor Trainer

The Intel 8085 microprocessor was introduced 40 years back, and along with its contemporaries — the Z80 and the 6502 — is pretty much a dinosaur in terms of microprocessor history. But that doesn’t stop it from still being included in the syllabus for computer engineering students in many parts of the world. The reason why a 40 year old microprocessor is still covered in computer architecture text books instead of computer history is a bit convoluted. But there’s a whole industry that thrives on the requirements of college laboratories and students requiring “8085 Microprocessor Training Kits”. [TisteAndii] just finished college in Nigeria, where these kits are not locally built and need to be imported, usually costing well over a 100 dollars.

Which is why his final year project was a low cost Intel 8085 Microprocessor Trainer. It’s a minimalist design with some basic read/write memory, program execution and register inspection, with no provision for single stepping or interrupts yet. The monitor program isn’t loaded in an EEPROM. Instead, a PIC18 is used and connected to the 8085 address, data and control pins. This makes it easier to write a monitor program in C instead of assembly. And allows use of a 1.8″ LCD with SPI interface instead of the more usual 7-segment displays used for these kind of kits. [TisteAndii] built a 6×4 keyboard for input, but couldn’t solve debounce issues and finally settled on a 5×4 membrane keypad.

Being a rookie, he ended up with a major flaw in his board layout — he missed connecting the SRAM and the PPI devices to the data bus. A bunch of jumper links seemed to solve the issue, but it wasn’t perfect. This, and a few other problems gave him a lot of grief, but towards the end, it all worked, almost. Most importantly, his BoM cost of about $35 makes it significantly cheaper compared to the commercial units available in Nigeria.

While some hackers may consider this a trivial project, it solves a local problem and we hope the next iteration of the design improves the kit and makes it more accessible.

Alexa Keeps Pet Snake Thermoregulated

[Chris Grill] got his hands on a pet boa constrictor, which requires a fairly strict temperature controlled environment. Its enclosure needs to have a consistent temperature throughout, or the snake could have trouble regulating its body temperature. [Chris] wanted to keep tabs on the temp and grabbed a few TTF-103 thermistors and an Arduino Yun, which allowed him to log the temperature on each side of the enclosure. He used some code to get the temp reading to the linux side of an Arduino Yun, and then used jpgraph, a PHP graphing library, to display the results.

snakemainBut that wasn’t good enough. Why not get a little fancy and have Amazon’s Echo read the temps back when you ask! Getting it setup was not so bad thanks to Amazon’s well documented steps to get custom commands set up.

He eventually lost the battle to get the Echo to talk to the web server on the Yun due to SSL issues, but he found an existing workaround by using a proxy.

Continue reading “Alexa Keeps Pet Snake Thermoregulated”

Hackaday Links: January 15, 2017

What’s more expensive than a car and a less useful means of transportation? A 747 flight simulator built in a basement. There’s a project page where a few more details are revealed. There’s a 180 degree wrap-around screen for the main display, a glass cockpit, and the controls and gauges are ‘good enough’ to feel like the real thing. The simulator is running a highly customized version of FS9 (Microsoft’s flight sim from the year 2004).

For the last few years, Google has been experimenting with high altitude balloons delivering Internet to remote populations. This is Project Loon, and simply by the fact that Google hasn’t shuttered this Alpha-bit, we can assume the project is a success. A Project Loon balloon recently crashed in Panama, which means we can get an up-close look at the hardware. These balloon base stations are a lot bigger than you would think.

We’ve seen beautiful PCBs before, but [Blake] is taking this to another level entirely. He’s developed a process to convert bitmaps into files suitable to send to a PCB manufacturer. The results are… strange, and very cool. Check out a video of the process here.

If you want to dial out from behind the great firewall of China, you’re probably going to use a VPN. Here’s an idea that doesn’t work as well as a VPN. Use an acoustic coupler with your iPhone. Will it work? Of course it will – modems have been standardized for fifty years. Will it work well? No, I can speak faster than 300 baud.

Do you sell on Tindie? We have a dog park. Tindie sellers around the world will be meeting up on Hackaday.io next Friday to discuss Tindie and Tindie-related activities. Join in!

A quick aside relating to Hackaday and Tindie swag. 1) The Tindie dog as a stuffed animal. 2) A Hackaday logo t-shirt where the skull is decorated like a Día de Muertos sugar skull. Pick one, leave your response in the comments.

Shmoocon 2017: A Simple Tool For Reverse Engineering RF

Anyone can hack a radio, but that doesn’t mean it’s easy: there’s a lot of mechanics that go into formatting a signal before you can decode the ones and zeros.

At his Shmoocon talk, [Paul Clark] introduced a great new tool for RF Reverse Engineering. It’s called WaveConverter, and it is possibly the single most interesting tool we’ve seen in radio in a long time.

If you wanted to hack an RF system — read the data from a tire pressure monitor, a car’s key fob, a garage door opener, or a signal from a home security system’s sensor — you’ll be doing the same thing for each attack. The first is to capture the signal, probably with a software defined radio. Take this data into GNU Radio, and you’ll have to figure out the modulation, the framing, the encoding, extract the data, and finally figure out what the ones and zeros mean. Only that last part, figuring out what the ones and zeros actually do, is the real hack. Everything before that is just a highly advanced form of data entry and manipulation.

[Paul]’s WaveConverter is the tool built for this data manipulation. Take WaveConverter, input an IQ file of the relevant radio sample you’d like to reverse engineer, and you have all the tools to turn a radio signal into ones and zeros at your disposal. Everything from determining the preamble of a signal, figuring out the encoding, to determining CRC checksums is right there.

All of this is great for reverse engineering a single radio protocol, but it gets even better. Once you’re able to decode a signal in WaveConverter, it’s set up to decode every other signal from that device. You can save your settings, too, which means this might be the beginnings of an open source library of protocol analyzers. If someone on the Internet has already decoded the signals from the keyfob of a 1995 Ford Taurus, they could share those settings to allow you to decode the same keyfob. This is the very beginnings of something very, very cool.

The Github repo for WaveConverter includes a few sample IQ files, and you can try it out for yourself right now. [Paul] admits there are a few problems with the app, but most of those are UI changes he has in mind. If you know your way around programming GUIs, [Paul] would appreciate your input.

Garage Door Opener Logs To Google Drive

A garage door opener is a pretty classic hack around these parts. IR, Bluetooth, WiFi, smartphone controlled, web interfaces — we’ve seen it all.  But if you want to keep track of people going in and out, you need some way of logging what’s happening. You could go ahead and roll up your own SQL based solution, tied into a custom web page. But there’s an easier way; you can build a garage door opener that logs events to Google Drive.

[WhiskeyTangoHotel] was looking for an ESP8266 project, and a garage door opener seemed just the ticket. It’s simple enough to code up, and control over WiFi comes in handy. Interfacing with the garage door was simple enough — the existing opener uses a simple push button, which is easily controlled by wiring up a relay to do the job. Logging is as simple as having the ESP8266 send requests to IFTTT which is set up to make posts to a Google Sheet with status updates.

The project is fairly basic, but there’s room for expansion. By using separate Maker Channel triggers on IFTTT, different users of the garage door could be tracked. It would also be easy to add some limit switches or other sensors to detect the door’s position, so it can be determined whether the door was opened or closed.

There’s always another take on the garage door opener — check out this hack that opens the garage door in response to flashing headlights.

Innocent TV Imprisoned Behind Mirror

After following along with all the Magic Mirror builds, [Troy Denton] finally caved in and started building one for his girlfriend for Christmas. These popular builds are all pretty much bespoke, and this one is no different.

mirror2
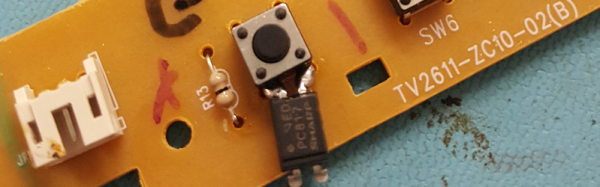
His victim TV didn’t have the ability to be switched on and off by the Raspberry Pi using HDMI/CEC, so he came up with an alternative. He got a couple of opto-isolators and soldered one to the on/off button on the TV’s control board. The Pi didn’t know whether it was switching the TV on or off, it just knew it was switching it. To solve this, [Troy Denton] connected another opto-isolator to the TV’s LED, this one the other way around. When the TV is turned on, the Pi now detects it.

The enclosure is fabbed from 2×4 lumber, the mirror is one-way acrylic which runs somewhere in the $75-100 range for this 27-9/16″x15-1/2″ application. The top and bottom rails include lines of holes to encourage airflow to keep things cool. the face plate is picture framing which makes it easy to mount the mirror. An ultrasonic range finder finishes off the build and when someone stands in front of this magic mirror, the Pi senses it and turns the monitor on.

Included in [Troy]’s post are the Python code and shell scripts he wrote as well as a bunch of pictures of the build process. We’ve seen Magic Mirrors builds before, including some small ones. They’re a cool addition to the house and a fairly simple build.

Fixing Bugs In A 37 Year Old Apple II Game

Emulators are a great way to reminisce about games and software from yesteryear. [Jorj Bauer] found himself doing just that back in 2002, when they decided to boot up Three Mile Island for the Apple II. It played well enough, but for some reason, crashed instantly if you happened to press the ‘7’ key. This was a problem — the game takes hours to play, and ‘7’ is the key for saving and restoring your progress. In 2002, [Jorj] was content to put up with this. But finally, enough was enough – [Jorj] set out to fix the bug in Three Mile Island once and for all.

The project is written up in three parts — the history of how [Jorj] came to play Three Mile Island and learn about Apple IIs in the first place, the problem with the game, and finally the approach to finding a solution. After first discovering the problem, [Jorj] searched online to see if it was just a bad disk image causing the problem. But every copy they found was the same. There was nothing left for it to be but problem in the binary.

Continue reading “Fixing Bugs In A 37 Year Old Apple II Game”