Run Your Own Numbers Station

Numbers stations are shortwave stations that broadcast cryptic messages that are widely assumed to be used for communications between nation states and spies. But who’s to say it’s up to the government to have all the fun? If you’ve always dreamed of running your own spy ring, you’ll need a way to talk to them too. Start with this guide on how to run your own numbers station.

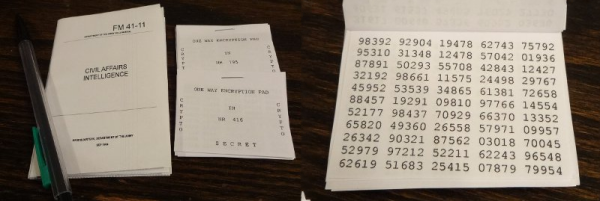
The requirements are simple – you just need random numbers, one time pads for each recipient (available from our store!) and a way to send the audio – ideally a powerful shortwave transmitter, but for an intelligence agency on a budget, online streaming will work. Then you’re ready to send your message. [Jake Zielke] shares techniques on how to easily encode a message into numbers for transmission, and how to encrypt them with one time pad techniques. Done properly, this is an unbreakable form of encryption. [Jake] then rounds out the guide with tips on how to format your station’s transmissions to address multiple secret agents effectively.

It’s a great way to get started in the world of spooky secret radio communications. All the tools needed to get started are available on the page, so you’ll be up and running in no time. Meanwhile, why not do a little more research on the history of numbers stations?

Finding A Lost Tooth With Science!

Sometimes the hack is a masterwork of circuit design, crafting, 3D printing and programming. Other times, the hack is knowing which tool is right for the job, even when the job isn’t your regular, run-of-the-mill, job. [John]’s son lost his tooth on their gravel driveway, so [John] set out to find it.

socks-fluoresce-under-uv-light-640x480
White socks fluoresce under UV

When [John] set out to help his son and find the tooth, he needed a plan of attack – there was a large area to cover and, when [John] looked over the expanse of gravel the terms “needle” and “haystack” came to mind. Just scanning the ground wasn’t going to work, he needed a way to differentiate the tooth from the background. Luckily, he had a UV flashlight handy and, after testing it on his own teeth, realized that his son’s tooth would fluoresce under UV light and the gravel wouldn’t.

Off [John] went at night to find the tooth with his flashlight. He soon realized that many things fluoresce under UV light – bits of plastic, quartz crystal in the rocks, his socks. [John] eventually found the tooth, and his son is happier now. No soldering was involved, no development on breadboards, no high-voltage, but this is one of those hacks that is more about problem solving than throwing microcontrollers at a situation. In the end, though, everyone’s happy, and that’s what counts.

Mod Your Camera With ModBus

Industrial hardware needs to be reliable, tough, and interoperable. For this reason, there are a series of standards used for command & control connections between equipment. One of the more widespread standards is ModBus, an open protocol using a master-slave architecture, usually delivered over RS-485 serial. It’s readily found being used with PLCs, HMIs, VFDs, and all manner of other industrial equipment that comes with a TLA (three letter acronym).

[Absolutelyautomation] decided to leverage ModBus to control garden variety digital cameras, of the type found cluttering up drawers now that smartphones have come so far. This involves getting old-school, by simply soldering wires to the buttons of the camera, and using an Arduino Nano to control the camera while talking to the ModBus network.

This system could prove handy for integrating a camera into an industrial production process to monitor for faults or defective parts. The article demonstrates simple control of the camera with off-the-shelf commercial PLC hardware. Generally, industrial cameras are very expensive, so this hack may be useful where there isn’t the budget for a proper solution. Will it stand up to industrial conditions for 10 years without missing a beat? No, but it could definitely save the day in the short term for a throwaway price. One shortfall is that the camera as installed will only save pictures to its local memory card. There’s a lot to be said for serving the images right to the engineer’s desk over a network.

We’ve seen [Absolutelyautomation]’s work before – check out this implementation of Pong on an industrial controller.

Move A Robotic Hand With Your Nerve Impulses

Many of us will have seen robotics or prosthetics operated by the electrical impulses detected from a person’s nerves, or their brain. In one form or another they are a staple of both mass-market technology news coverage and science fiction.

The point the TV journalists and the sci-fi authors fail to address though is this: how does it work? On a simple level they might say that the signal from an individual nerve is picked up just as though it were a wire in a loom, and sent to the prosthetic. But that’s a for-the-children explanation which is rather evidently not possible with a few electrodes on the skin. How do they really do it?

A project from [Bruce Land]’s Cornell University students [Michael Haidar], [Jason Hwang], and [Srikrishnaa Vadivel] seeks to answer that question. They’ve built an interface that allows them to control a robotic hand using signals gathered from electrodes placed on their forearms. And their write-up is a fascinating read, for within that project lie a multitude of challenges, of which the hand itself is only a minor one that they solved with an off-the-shelf kit.

The interface itself had to solve the problem of picking up the extremely weak nerve impulses while simultaneously avoiding interference from mains hum and fluorescent lights. They go into detail about their filter design, and their use of isolated power supplies to reduce this noise as much as possible.

Even with the perfect interface though they still have to train their software to identify different finger movements. Plotting the readings from their two electrodes as axes of a graph, they were able to map graph regions corresponding to individual muscles. Finally, the answer that displaces the for-the-children explanation.

There are several videos linked from their write-up, but the one we’re leaving you with below is a test performed in a low-noise environment. They found their lab had so much noise that they couldn’t reliably demonstrate all fingers moving, and we think it would be unfair to show you anything but their most successful demo. But it’s also worth remembering how hard it was to get there.

Continue reading “Move A Robotic Hand With Your Nerve Impulses”

Anti-Emulation Tricks On GBA-Ported NES Games

Emulation is a difficult thing to do, particularly when you’re trying to emulate a complex platform like a game console, with little to no public documentation available. Often, you’ll have to figure things out by brute force and dumb luck, and from time to time everything will come unstuck when a random piece of software throws up an edge case that brings everything screeching to a halt.

The Classic NES series was a handful of Nintendo Entertainment System games ported to the Game Boy Advance in the early 2000s. What makes them unique is a series of deliberately obtuse programming decisions that make them operate very differently from other titles. These tricks utilize advanced knowledge of the way the Game Boy Advance hardware operates and appear to have been used to make the games difficult to copy or emulate.

The games use a variety of techniques to confuse and bamboozle — from “mirrored memory” techniques that exploit addressing anomalies, to putting executable code in video RAM and writing to the audio buffers in unusual manners.

Even more confusingly, these techniques only appear to have been used in the Classic NES series of games, and not other Game Boy Advance titles. It’s not obvious why Nintendo went to special effort to protect these ports over other titles; perhaps the techniques used were for other reasons than just an attempt at copy protection. Speculate amongst yourselves in the comments.

This isn’t the first time we’ve discussed emulation of Nintendo systems — check out this effort to reverse engineer the Sony Pocketstation.

[Thanks to [[[Codifies]]] for sending this in!]

These are batteries. Don't put them in your mouth.

PSA: Don’t Let Kids Eat Lithium Batteries

We get a lot of press releases at Hackaday, but this one was horrific enough that we thought it was worth sharing. Apparently, some kids are accidentally eating lithium coin cell batteries. When this happens with bigger cells, usually greater than 20 millimeters (CR2032, CR2025, and CR2016) really bad things happen. Like burning esophaguses, and even death.

The National Capital Poison Center has done some research on this, and found that 14% of batteries swallowed over the past two years came from flameless candles like the ones above. We know some of our readers also deal with batteries in open trays, which are apparently pretty dangerous for children.

The National Capital Poison Center’s website has an entire page dedicated to battery safety, which is probably worth a read if you deal with batteries and small children on a regular basis. Should an incident occur, there’s even a hotline to call for assistance.

So, please, don’t swallow batteries, or let children put them in their mouths. After the break, a Canadian PSA song about not putting things in your mouth.

Continue reading “PSA: Don’t Let Kids Eat Lithium Batteries”

8008 Exposed

[Ken Shirriff] is no stranger to Hackaday. His latest blog post is just the kind of thing we expect from him: a tear down of the venerable 8008 CPU. We suspect [Ken’s] earlier post on early CPUs pointed out the lack of a good 8008 die photo. Of course, he wasn’t satisfied to just snap the picture. He also does an analysis of the different constructs on the die.

Ever wonder why the 8008 ALU is laid out in a triangle shape? In all fairness, you probably haven’t, but you might after you look at the photomicrograph of the die. [Ken] explains why.

Continue reading “8008 Exposed”