YAPZH! (Yet Another Pi Zero Hub)

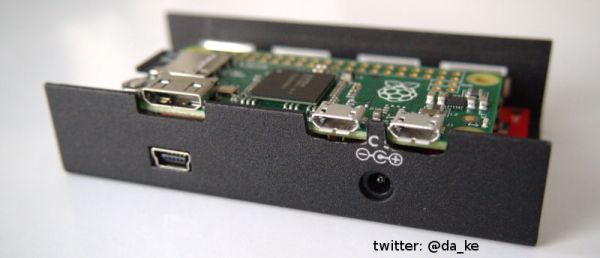
You’d think just about all the permutations of adding a hub to the Raspberry Pi Zero were done. But you’d be wrong. [Daniel’s] approach is to put the Zero inside the existing case for the hub. The LogiLink hub used is in a nice metal case with mounting flanges on the side. It looks robust and not much like a typical consumer hub. This hack would serve well where the Zero and hub might take a few wacks.

Wiring between Zero and Hub

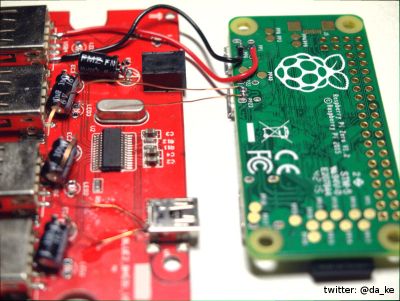
It took some fiddling with the hub components but he made it work. The easy part was wiring the the power and USB test points on the Zero to the hub.

More challenging were the mechanical aspects to physically fit the Zero into the case. Four LEDs were removed since their only purpose was indicating if a cables were plugged into the hub. There are four electrolytic capacitors standing upright that occupied the space needed by the Pi. [Daniel] repositioned them to lie horizontally to provide room for the Zero.

With the Zero able to fit inside the case the next steps are to create mounting holes in the USB board and cut holes in the case to access the HDMI and USB ports and the SD card holder. Some finicky work with a Dremel provided the holes and the cutouts. Fortunately, the mounting holes on the Zero aligned with some open spaces on the USB board. If they don’t, some glue and standoffs might be sufficient.

The only aspect [Daniel] left for you to hack is access to the GPIO port. That would require another cutout to bring out a ribbon cable for controlling your world. After such a nicely detailed writeup with a plethora of pictures, he had to leave something for other hackers to do.

Czech Out Raspberry Pi Riding The Rails

If you were wandering around Prague this Christmas season you may have spotted a Raspberry Pi 2 controlled Christmas tree. But you had to look quick because it was on the back of a special tram car that lubricates the rails around the city to reduce noise. The colors on the tree were determined by a web site that allowed visitors to change the colors. The same system, with a few adjustments, controlled a tree in the entrance hall of Czech Technical University in Prague at Karlovo.

dsc-5786

The adjustments weren’t trival. Power was a problem, for one. The electrical noise from the tram’s drive motors needed to be filtered by using a switching power supply. Cold temperatures might have created a frozen Pi so they added a heater. After all, everyone loves warm Pi. The LEDs on the tree were handled by a WS2811 addressable LED driver chip.

You can catch the tram any time on the web, but the tree will be gone once the Christmas season ends.

Continue reading “Czech Out Raspberry Pi Riding The Rails”

A Raspberry Pi Tidy Tide Tracker Predicts Propitious Promenades

The whims of the tides can make walking near the ocean a less than pleasant experience. A beautiful seascape one day may appear as a dismal, mucky, tidal flat the next. Frustrated over these weary walks, [Average Man] created a tidy tide tracker to predict propitious promenade periods.

A Raspberry Pi A+ pulls tide timing information off the web by scraping a web page using Python code. The time for the high tide, when the estuary will be full of water, is shown on a 4-digit 7-seg display. It’s all sandwiched between two smoked black panels to provide a neat case while still letting the LEDs show through.

The code comes from two projects [Average] recalled from a kickstarter timing project and a 7-seg display project. As he points out:

It’s great to learn programming from others, but it’s even better if you learn them well enough to remember, re-use and combine that code later on as well.

The display chips are mounted on a product of his own, the no longer available ProtoPal board. This is a Pi A+ size board with 288 prototyping holes and the standard connector for mounting on the Pi GPIO header. It keeps the project neat and clean.

Code Craft-Embedding C++: Hacking The Arduino Software Environment

The Arduino software environment, including the IDE, libraries, and general approach, are geared toward education. It’s meant as a way to introduce embedded development to newbies. This is a great concept but it falls short when more serious development or more advanced education is required. I keep wrestling with how to address this. One way is by using Eclipse with the Arduino Plug-in. That provides a professional development environment, at least.

The code base for the Arduino is another frustration. Bluntly, the use of setup() and loop() with main() being hidden really bugs me. The mixture of C and C++ in libraries and examples is another irritation. There is enough C++ being used that it makes sense it should be the standard. Plus a good portion of the library code could be a lot better. At this point fixing this would be a monumental task requiring many dedicated developers to do the rewrite. But there are a some things that can be done so let’s see a couple possibilities and how they would be used.

Continue reading “Code Craft-Embedding C++: Hacking The Arduino Software Environment”

Magic Mirror On The Wall, “Is Pi Or ESP, Fairest Of All?”

“What’s the weather like, honey?” “I don’t know. Let me check the mirror.”  The mirror?

Both [Dylan Pierce] and [squix] have mirror projects that display the weather. They took two different approaches which makes for an interesting comparison. [Dylan] uses a Raspberry Pi with an actual monitor behind the mirror. [squix] puts an OLED behind the mirror driven by a ESP8266.  It appears there is more than one way to hack a mirror, or anything, which is what makes hacking fun.

[squix] started with a picture frame, adding tinting film to the glass so it would reflect. A small section of tint was removed to allow the OLED to be seen. The ESP8266 software connects to the Weather Underground to get the latest information.

The Raspberry Pi version by [Dylan] puts a 27″ monitor behind the mirror. That is either terribly impressive or way over the top but seeing Linux boot behind the mirror makes it worth the effort. The Pi generates a web page which makes this adaptable as a general purpose kiosk.

A video of [squix]’s mirror in operation, after the break.

Continue reading “Magic Mirror On The Wall, “Is Pi Or ESP, Fairest Of All?””

Firing Up A Raspberry Pi Zero

I ordered a Raspberry Pi Zero from Adafruit in their Startup Pack right after they were released. There are a few Greater Than Zero Pis (GTZPi) already on my workbench so my purchase was driven by curiosity, not necessity. With no rush on delivery it eventually got here, and I finally got around to looking at it. My experience with the Pi family began with the Pi B+ and, shortly after that, the Pi 2. The speed difference between them was noticeable so I decided to dive in and further test the performance of the Zero.

Continue reading “Firing Up A Raspberry Pi Zero”

Raspberry Pi Laser Beam Profiler

[Anthony] at UCLA needed to verify the shape of a laser beam. Commercial units for this, as you would expect, are expensive. But a Raspberry Pi with a Pi Noir camera easily handles the task. Not only is the use of the Pi cool but so is the task – they are using lasers to cool molecules to study quantum effects. The Pi camera without the IR filter captures a wide bandwidth making it suitable for use with non-visible lasers. [Anthony] captures the beam along two axes and plots both curves on the LCD touchscreen. That data, based on the pictures, is also available on a host PC. All this in a super compact package with a 7″ touch screen display.

One reason I find this fascinating is I did something similar 1977 at the University of Rochester Laboratory for Laser Energetics. My project was measuring the energy cross-section of a laser beam. The research goal of the Laboratory was the study of inertial confinement laser fusion. While [Anthony] uses an entire camera my project was limited to a 1 dimensional array of charge coupled devices (CCD). The output went to a Tektronix storage terminal and was printed on thermal paper for reference. He uses Python running on the target system. My work used a Z80 development system the size of a tower PC to write my program in assembly language which was then executed on a single board computer. We’ve come a long way. My code is long gone but you can get [Anthony’s] on GitHub.