Latency Meter For Accurate Gaming

The gaming world experienced a bit of a resurgence in 2020 that is still seen in the present day. Even putting aside the effects from the pandemic, the affordability and accessibility has arguably never been better. Building a gaming PC can have its downsides, though, and a challenging issue to troubleshoot is input lag or input latency. This is something that’s best measured with standalone hardware, and if this is an issue on your setup you may want to take a look at this latency meter.

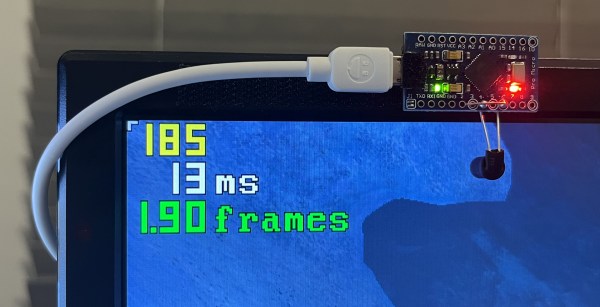
Unlike other measurement devices that use the time between a mouse button input and the monitor’s display of a bullet or shooting event, this one looks at mouse movement and the change in the scene instead. This makes it much more versatile than other methods since it’s independent of specific actions, and can be used in any game without any specific events needed to perform the measurement. A camera phototransistor is placed on the monitor’s top edge and the Arduino-based device sends mouse commands to the computer while measuring the time between those commands and the shift in the image on the monitor.

The project is open source, so with the right hardware it’s possible to build one to troubleshoot latency issues or just to learn more about a particular hardware configuration’s behavior. Arduinos and other microcontrollers have been doing all kinds of things by pretending to be human interface devices like this for a while now. One of our favorites of late was this effects pedal that replicates musical effects on mice and keyboards.

Spin Up To Speed With This Stroboscope

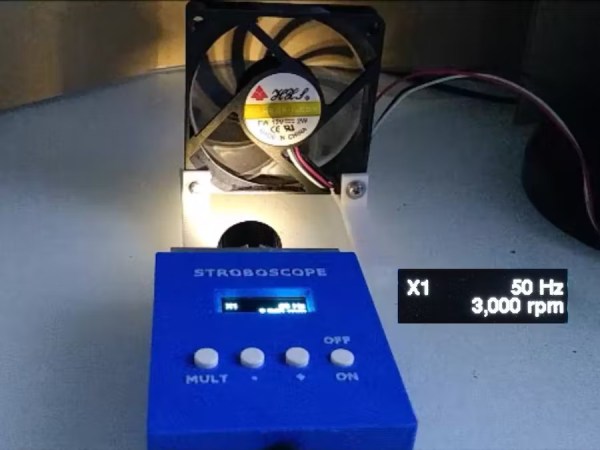
A stroboscope is not the most common tool, and while they can be purchased fairly inexpensively from various online stores, they are straightforward enough tools that plenty of us could build our own mostly from parts laying around. The basic idea is to shine a flashing light on a spinning object, and when it appears stationary the stroboscope will indicate the rotational speed. There are a few specialty parts that might not be in everyone’s parts drawers, though, and [John] shows us the ins-and-outs of his own DIY stroboscope.

The effect relies on extremely precise timing, and as such the most important part of a build like this is making sure to get the LED circuitry correct so its duty cycle and frequency can be tightly controlled. [John] is using a PT4115E driver board for the LED, and is using it to power a 1W white LED which also includes its own heat sink and lens. The controls for the stroboscope are handled by an ATtiny1614 microcontroller which shows its pulse rate on a small screen. The user can control the rate the LED flashes with simple controls, and when the spinning object appears to come to a stop the only thing left to do is read this value off of the screen.

While it might seem like an overly niche tool, stroboscopes have plenty of day-to-day uses. Older cars that used a central distributor made use of a specialty stroboscope called a timing light in order to properly advance the ignition timing of the engine. They also retain some use in medical applications, and plenty of older readers may be familiar with their use adjusting the speed on record players. They can also be used to make sure the shutter speeds on cameras are calibrated correctly.

Continue reading “Spin Up To Speed With This Stroboscope”

Using Google Calendar For Machines To Keep Track Of Human Days

Daily triggers for automation are simple in theory, unless it needs to keep track of the calendar that humans actually live by. Seasonal changes, shifting public holidays, or just being on vacation are all exceptions you may need to account for. [Jeremy Rode] likes using Google Calendar to stay on top of events, so he created CalendarScraper, a simple script to make his machines use it too.

Jeremy needed a timer for his spa heater that would reduce costs by only switching it on when his local time-of-use-based electricity rates were favorable. The rates varied based on the time of day, day of the week, and even seasons and public holidays. Instead of trying to set up everything manually in a cron job, he created a short and easy-to-modify JavaScript script to keep track of events on a Google Calendar.

We’ve seen some other projects that pull data from Google Calendar, including a recycling day reminder, and even a physical desktop calendar.

Understanding Custom Signal Protocols With Old Nintendos

For retro gaming, there’s really no substitute for original hardware. As it ages, though, a lot of us need to find something passable since antique hardware won’t last forever. If a console isn’t working properly an emulator can get us some of the way there, but using an original controller is still preferred even when using emulators. To that end, [All Parts Combined] shows us how to build custom interfaces between original Nintendo controllers and a PC.

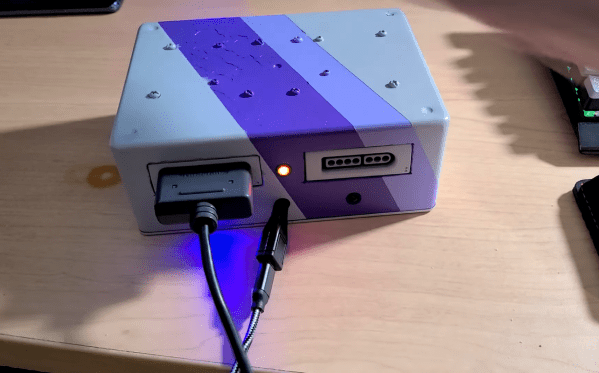
The build starts by mapping out the controller behavior. Buttons on a SNES controller don’t correspond directly to pins, rather a clock latches all of the button presses at a particular moment all at once during each timing event and sends that information to the console. To implement this protocol an Adafruit Trinket is used, and a thorough explanation of the code is given in the video linked below. From there it was a simple matter of building the device itself, for which [All Parts Combined] scavenged controller ports from broken Super Nintendos and housed everything into a tidy box where it can be attached via USB to his PC.

While it might seem like a lot of work to get a custom Nintendo controller interface running just because he had lost his Mega Man cartridge, this build goes a long way to understanding a custom controller protocol. Plus, there’s a lot more utility here than just playing Mega Man; a method like this could easily be used to interface other controllers as well. We’ve even seen the reverse process where USB devices were made to work on a Nintendo 64.

Continue reading “Understanding Custom Signal Protocols With Old Nintendos”

Can The Solenoid Engine Power A Car?

[Emiel] aka [The Practical Engineer] makes all kinds of fun projects in his fully-featured shop, and one of his tangents has been building a series of solenoid engines. These engines mimic the function of an internal combustion engine, with each solenoid acting as a piston. The only problem with [Emiel]’s concept engines, though, was that he never actually put them into a vehicle to prove their effectiveness. This build finally proves that they can work at powering a vehicle.

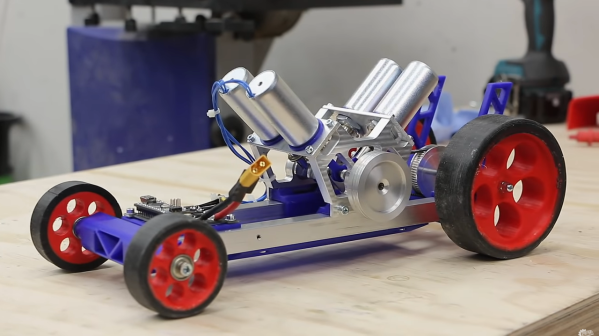
The project starts with a new engine. [Emiel] chose a V4 design using four solenoids and an Arduino-based controller. After some trouble getting it to operate properly, he scavenged a small circuit board he built in his V8 solenoid engine to help with timing. With that installed, the solenoids click away and spin the crankshaft at a single constant speed. The vehicle itself was mostly 3D printed, with two aluminum tubes as support structures to mount the engine. Even the wheels were 3D printed with a special rubber coating applied to them. With a small drive train assembled, it’s off to the races for this tiny prototype.

While the small car doesn’t have steering and only goes at a constant speed, the proof of concept that these tiny electric engines actually work is a welcomed addition to [Emiel]’s collection of videos on these curious engines. Of course they’re not as efficient as driving the wheels directly with an electric motor, but we all know there’s no fun in that. If you haven’t seen his most intricate build, the V8 is certainly worth checking out, and also shows off the timing circuitry he repurposed for this car.

Continue reading “Can The Solenoid Engine Power A Car?”

Happy 50th Birthday To All You Epoch Birthers

Good morning everyone, and what a lovely start to the new year it is, because it’s your birthday! Happy birthday, it’s your 50th! What’s that you say, you aren’t 50 today? (Looks…) That’s what all these internet databases say, because you’ve spent the last decade or so putting 1970-01-01 as your birth date into every online form that doesn’t really need to know it!

It’s been a staple for a subset of our community for years, to put the UNIX epoch, January 1st 1970, into web forms as a birth date. There are even rumours that some sites now won’t accept that date as a birthday, such is the volume of false entries they have with that date. It’s worth taking a minute though to consider UNIX time, some of its history and how its storage has changed over the years.

Continue reading “Happy 50th Birthday To All You Epoch Birthers”

High Precision Analog IO With Digital Pins

Reading the temperature of your environment is pretty easy right? A quick search suggests the utterly ubiquitous DHT11, which speaks a well documented protocol and has libraries for every conceivable microcontroller and platform. Plug that into your Arduino and boom, temperature (and humidity!) readings. But the simple solution doesn’t hit every need, sometimes things need to get more esoteric.

The technique summarized by an image from Microchip Appnote AN685

For years we’ve been watching [Edward]’s heroic efforts to build accessible underwater sensing hardware. When we last heard from him he was working on improving the accuracy of his Arduino’s measurements of the humble NTC thermistor. Now the goal is the same but he has an even more surprising plan, throw the ADC out entirely and sample an analog thermistor using digital IO. It’s actually a pretty simple trick based on an intuitive observation, that microcontrollers are better at measuring time than voltage. 

The basic circuit

The circuit has a minimum of four components: a reference resistor, the thermistor, and a small capacitor with discharge resistor. To sense you configure a timer to count, and an edge interrupt to capture the value in the timer when its input toggles. One sensing cycle consists of discharging the cap through the discharge resistor, enabling the timer and interrupt, then charging it through the value to measure. The value captured from the timer will be correlated to how long it took the cap to charge above the logic-high threshold when the interrupt triggers. By comparing the time to charge through the reference against the time to charge through the thermistor you can calculate their relative resistance. And by performing a few calibration cycles at different temperatures ([Edward] suggests at least 10 degrees apart) you can anchor the measurement system to real temperature.

For all the gory details, including tips for how to save every last joule of energy, check out [Edward]’s post and the Microchip appnote AN685 he references. Besides this series [Edward]’s Cave Pearl Project has already yielded an impressive number of Hackday posts. For more great hardware writeups check out a general hardware build for a single sensing node, or the “temperature sensor” [Edward] made with no external parts at all!