Supercon 2024: Last Call For Display Tech Exhibit

During this year’s Hackaday Supercon, the Supplyframe DesignLab will be playing host to a unique exhibit that catalogs the evolution of display technology. That means showcasing the best and most interesting examples they can find, from the vintage to the ultra-modern. Where are all these wonderful toys coming from, you might ask? Why, the Hackaday community, of course.

This is a rare chance to show off your prized gadgetry to a captive audience of hackers and makers. Whether it’s a custom display you’ve created or some gonzo piece of hardware you’ve been holding onto for years, now’s the time to haul it out. However, there are only a few days left to submit your display for potential inclusion, so if you’ve got something you want the Hackaday community to see, make sure you fill out the form before the September 16th deadline. That’s Monday, if you were wondering.

Continue reading “Supercon 2024: Last Call For Display Tech Exhibit”

Recreating A Popular Faux-Nixie Clock

There’s a good chance you’ve seen “Nixie clocks” on the Internet that replace the classic cold cathode tubes with similarly sized LCD panels. The hook is that the LCDs can show pictures and animations of Nixie tubes — or pretty much anything else for that matter — to recreate the look of the real thing, while being far cheaper and easier to produce. It’s a hack for sure, and that’s the way we like it.

[Trung Tran] liked the idea, but didn’t just want to buy a turn-key clock. So he’s decided to build his own version based on the ESP32-S3. The WiFi-enabled microcontroller syncs up to the latest time via NTP, then uses a PCF8563 real-time clock (RTC) module to keep from drifting too far off the mark. The six displays, which plug into the custom PCB backplane, can then show the appropriate digits for the time. Since they’re showing image files, you can use any sort of font or style you wish. Or you could show something else entirely — the demo video below shows off each panel running the Matrix “digital rain” effect.

Continue reading “Recreating A Popular Faux-Nixie Clock”

Review: IFixit’s FixHub May Be The Last Soldering Iron You Ever Buy

Like many people who solder regularly, I decided years ago to upgrade from a basic iron and invest in a soldering station. My RadioShack digital station has served me well for the better part of 20 years. It heats up fast, tips are readily available, and it’s a breeze to dial in whatever temperature I need. It’s older than both of my children, has moved with me to three different homes, and has outlived two cars and one marriage (so far, anyway).

When I got this, Hackaday still used B&W pictures.

As such, when the new breed of “smart” USB-C soldering irons started hitting the scene, I didn’t find them terribly compelling. Oh sure, I bought a Pinecil. But that’s because I’m an unrepentant open source zealot and love the idea that there’s a soldering iron running a community developed firmware. In practice though, I only used the thing a few times, and even then it was because I needed something portable. Using it at home on the workbench? It just never felt up to the task of daily use.

So when iFixit got in contact a couple weeks back and said they had a prototype USB-C soldering iron they wanted me to take a look at, I was skeptical to say the least. But then I started reading over the documentation they sent over, and couldn’t deny that they had some interesting ideas. For one, it was something of a hybrid iron. It was portable when you needed it to be, yet offered the flexibility and power of a station when you were at the bench.

Even better, they were planning on putting their money where their mouth is. The hardware was designed with repairability in mind at every step. Not only was it modular and easy to open up, but the company would be providing full schematics, teardown guides, and spare parts.

Alright, fine. Now you’ve got my attention.

Continue reading “Review: IFixit’s FixHub May Be The Last Soldering Iron You Ever Buy”

Inkycal Makes Short Work Of E-Paper Dashboards

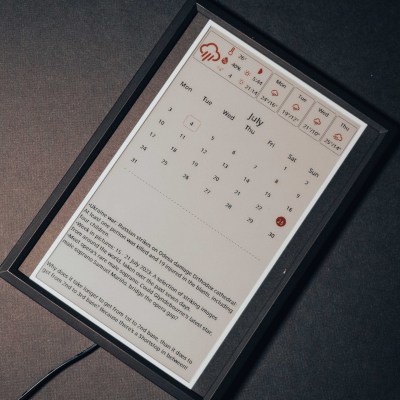
The e-paper “dashboard” is something we’ve seen plenty of times here at Hackaday. Use it to show your daily schedule, the news, weather, maybe the latest posts from your favorite hardware hacking website. Any information source that doesn’t need to be updated more than every hour or so is a perfect candidate. All you’ve got to do is write the necessary code to pull  down said data and turn it into a visually attractive display.

Well, that last part isn’t always so easy. There are plenty of folks who have no problem cobbling together a Raspberry Pi and one of the commercially available e-paper modules, but writing the software to turn it into a useful information center is another story entirely. Luckily, Inkycal is here to help.

This open source project uses Python to pull information from a wide variety of sources and turns it into an e-paper friendly dashboard. It works with Waveshare displays ranging from 4.2 inches all the way up to the massive 12 inch tricolor panels. While it could theoretically be deployed on any operating system running a modern version of Python, it’s primarily developed to be run under Linux and on the Raspberry Pi. All of the versions of the Pi are supported, so no need to spring for the latest and greatest model. In fact, the notoriously pokey Raspberry Pi Zero is their recommended platform thanks to its low power consumption.

With Inkycal on the Pi — they even provide a pre-configured SD card image — and the e-paper display hooked up, all you need to do is pick which sources you want to use from the web-based configuration page. Look ma, no code!

Not feeling like putting the hardware together either? Well, we might wonder how you’ve found yourself on Hackaday if that’s the case. But if you really would rather buy then build, you can get a pre-built Inkcal display right now on Tindie.

Microsoft Sculpt Keyboard Lives Again With RP2040

Hackaday readers are likely the kind of folks that have a favorite keyboard, so you can probably imagine how devastating it would be to find out that the board you’ve sworn by for years is going out of production. Even worse, the board has some internal gremlins that show up after a few years of use, so functional ones in the second-hand market are becoming increasingly rare. So what do you do?

This is the position [TechBeret] recently found himself in with his beloved Sculpt keyboard. When Microsoft decided to step back from the peripheral market last year, he started looking at alternatives. Finding none of them appealing, he decided instead to breathe new life into the ergonomic keyboard with the RP2040. Every aspect of the resurrection is covered in a phenomenally detailed write-up on his blog, making this a valuable case study in modernizing peripherals with the popular microcontroller.

Continue reading “Microsoft Sculpt Keyboard Lives Again With RP2040”

Multi-Material Printing Enables Low Cost Silicone Prototypes

While it’s the ideal choice for mass production, injection molding is simply no good for prototyping. The molds are expensive and time-consuming make, so unless you’ve got the funding to burn tens of thousands of dollars on producing new ones each time you make a tweak to your design, they’re the kind of thing you don’t want to have made until you’re absolutely sure everything is dialed in and ready. So how do you get to that point without breaking the bank?

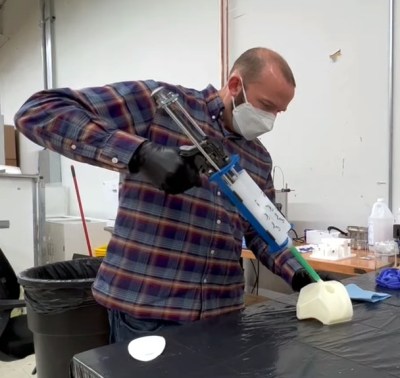
That’s not always an easy question, but if you’re working with silicone parts, the team at OpenAeros thinks they might have a solution for you. As demonstrated through their OpenRespirator project, the team has developed a method of 3D printing single-use molds suitable for large silicone parts that they’re calling Digital-to-Silicone (D2S).

In the video below, [Aaron] and [Jon] explain that they started off by simply printing injection molds in the traditional style. This worked, but the molds can get quite complex, and the time and effort necessary to design and print them wasn’t a great fit for their iterative development cycle. They wanted to be able to do from design to prototype in a day, not a week.

Eventually they realized that if they printed the mold out of a water-soluble filament, they could simplify its design greatly. They’ve documented the design process in detail, but the short version is that you essentially subtract the 3D model of the design you want to produce from a solid shape in your CAD package, and add a few holes for injecting the silicone. Once the silicone has cured, the mold can be dissolved away in warm water to reveal the finished part.

They then took this concept a step further. Thanks to the multi-material capabilities offered by some of the latest 3D printers, it’s possible to print structures within the mold. Once the silicone is injected, these structures can become part of the finished part. For the OpenRespirator, this lets them add PETG stiffening rings around where the filters to snap into the silicone mask body.

Continue reading “Multi-Material Printing Enables Low Cost Silicone Prototypes”

OpenSCAD Library Creates QR Codes On The Fly

If you’ve been reading Hackaday for awhile, you’ll know we’re big fans of OpenSCAD around these parts. There’s a number of reasons it’s a tool we often reach for, but certainly one of the most important ones is its parametric nature. Since you’re already describing the object you want to generate with code and variables, it’s easy to do things like generate an arbitrary number of cloned objects by using a for loop.

There are a number of fantastic OpenSCAD libraries that explore this blurred line between code and physical objects, and one that recently caught our eye is scadqr from [xypwn]. The description says it lets you “Effortlessly generate QR codes directly in OpenSCAD”, and after playing around with it for a bit, we have to agree.

Continue reading “OpenSCAD Library Creates QR Codes On The Fly”