An Easy Z80 And VGA Upgrade For The Apple II

The Apple II was at the forefront of the home computer revolution when it came out in 1977. In its era, nobody really cared about hooking up the Apple II to a VGA monitor, but these days, it’s far easier than sourcing an original monitor. The V2 Analog is a useful tool that will let you do just that, plus some other neat tricks, besides.

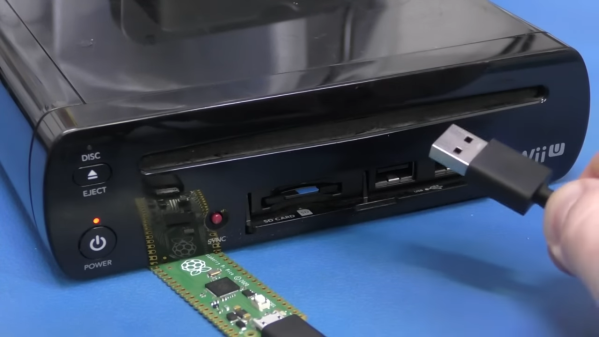
As demonstrated on Youtube by [Adrian’s Digital Basement], The V2 Analog is basically a slot-in video card for the Apple II, II+, and IIe. It’s based upon the AppleII-VGA, which uses a Raspberry Pi Pico to snoop the 6502 CPU bus and copy the video memory. It then outputs a high-quality VGA signal that is far nicer than the usual composite output options.

As a bonus, the V2 Analog can be reconfigured to run as an emulated AppliCard Z80 expansion card instead. This card was originally intended to allow Apple II users to run CP/M applications. The V2 Analog does a great job in this role, though it bears noting it can’t handle VGA output and Z80 emulation at the same time.

Project files are available on Github for the curious. The Apple II may be long out of production, but it’s certainly not forgotten. Video after the break.

Continue reading “An Easy Z80 And VGA Upgrade For The Apple II”

Giant 3D Printer Can Print Life-Sized Human Statues

We’ve seen a few makers 3D scan themselves, and use those to print their own action figures or statuettes. Some have gone so far as building life-sized statues composed of many 3D printed parts. [Ivan Miranda] is no regular maker though, and his custom 3D printer is big enough that he can print himself a life-sized statue in one go.

The printer is a gargantuan thing, using an aluminium frame and a familiar Cartesian layout. It boasts a build volume of 1110 mm x 1110 mm x 2005 mm, making it more than big enough to print human-sized statues. Dogs, cats, and some great apes may be possible, too.

Many of the components are 3D printed, including the various braces and adapters that hold the frame together. The build uses NEMA 23 stepper motors, with Duet3D hardware running the show. Notably, it uses V-wheels for the Z-axis, as linear rails would be prohibitively expensive at the sizes required.

[Ivan] shows off the printer by having it produce a statue of his body at 1:1 scale. It’s not a perfect print, with some layer shifts and an awkward moments where the filament supply was interrupted. It took 108 hours in total, with 76 hours of that being actual print time, and is made up of 4375 layers. Despite its flaws, its an incredibly impressive way to demonstrate the capabilities of the machine.

Eager to build such a printer for yourself? [Ivan] will sell you the design files for a reasonable fee.

[Ivan]’s giant printer was once a large tabletop affair; just look how far it’s come. He’s even come up with a system for using smaller printers to create large-scale construction kits, too. We can’t wait to see what mad project he comes up with next. Video after the break.

Continue reading “Giant 3D Printer Can Print Life-Sized Human Statues”

Smart Powermeter Uses E-Paper Display

In most places around the world, electricity is getting ever more expensive. Cutting back on your usage is one of the easier ways to escape this pain. This smart powermeter from [JGAguagdo] may prove a useful tool to achieve that goal.

The project uses an ESP32-S2 as the brains of the operation. It’s capable of reading up to six current-transformer clamps for measuring current draw in AC devices. It also features an embedded BMP280 temperature and air pressure sensor. Live data is displayed on a 2.9-inch e-Paper display, making it clear and easy to read under normal lighting conditions. By default, it’s set up to display graphs of power usage both over the last 24 hours, and the last ten days. It can even be set up with the prevailing energy rates in your area to display a realistic figure for what you’ll pay for your daily usage.

It can even be set up to work with Home Assistant for more logging and control options. We can imagine that, with a little work, you could even do some fancy plotting of energy use versus temperature to determine the performance and cost of your home HVAC setup.

If you want one with a minimum of fuss, you can score one on Tindie. Alternatively, design files are available on GitHub, too. We’ve featured some other great power meters over the years, and if you’re cooking up your own smart designs, don’t hesitate to let us know!

DIY All-Flash NAS Vs. Commercial Hardware

[Jeff Geerling] has tried building his own network-attached storage before, but found that the Raspberry Pi just wasn’t able to keep pace with his demands. He’s back with a new all-flash NAS build, and put his new design to the test against proper store-bought gear.

His build is based around the ROCK 5 Model B, which is able to truck data around far faster than most other single-board computers. Internally, it can top 1 GB/sec without too much hassle. He decided to build a NAS rig using the board, putting it up against the turn-key ASUSTOR AS-T10G3.

Using OpenMediaVault to run the ROCK 5 as a NAS, [Jeff] was able to get decent performance out of the setup. With a 3-drive RAID 5 configuration, he recorded write and read speeds of 100 MB/sec and 200 MB/sec respectively, over a 2.5 Gbps network connection. There were also some spikes and curious performance wobbles. While speed was better than [Jeff]’s previous Raspberry Pi experiments, it wasn’t capable of double or triple the performance like he’d hoped. In comparison, the ASUSTOR solution was capable of much greater speeds. It topped out at 600 MB/sec write speeds, and 1.2 GB/sec on reads.

If you’re looking to build a high-performance DIY NAS, the ROCK 5 may be a better solution than most Raspberry Pi boards. However, if you want speed over all else, existing commercial NAS solutions really have the edge. Video after the break.

Continue reading “DIY All-Flash NAS Vs. Commercial Hardware”

Solenoid Keyboard Sounds Very Much Like A Typewriter

Mechanical keyboards are muchly adored things. For many of us, they take us back to that loud clickity-clack that was so common before consumer keyboards went to membrane switches. For others, it’s just for the pure joy of the finger-powered symphony. The solenoid edition of the Red Herring keyboard from [Ming-Gih Lam] understands the beauty of this sound intimately. It can be nearly silent if you so desire, or it can clack away with the best of them (via Hackster.io).

It all comes down to the switches used in the design. [Lam] selected the Silent Alpacas from Durock, noted for their quiet operation, particularly when lubricated. You get just a faint slide-and-click noise from the keyboard under regular use.

The joy of the solenoid edition is in, you guessed it, the solenoid. It fires away with every keypress when enabled, creating a sound more akin to a real typewriter than any mechanical keyboard we’ve ever heard. Click-clack fans will love it, while those with sensitive ears will scream at any cube neighbours that dare to buy one and switch it on.

Files are available on Github for the curious. We’ve seen some other great keyboards over the years, like this nifty split-board design. Video after the break.

Continue reading “Solenoid Keyboard Sounds Very Much Like A Typewriter”

Breaking Land Speed Records With An RC Car

Building and running a land speed record car is an expensive business that requires incredibly wealthy benefactors. Doing it on a smaller scale with a radio control car is still pricy, but more within the reach of the individual. [ProjectAir] has been working on just that, and recently set out to break records with a car of his own design.

The car runs a Jetcat 220 engine capable of delivering 220 newtons of thrust, built into a custom aluminium chassis with streamlined bodywork. Early runs saw it reach 112 km/h, but the goal was to push it beyond 150 km/h to break the standing Guinness World Record.

With an RC event running on a local runway, [ProjectAir] had the venue and opportunity to make an attempt. It was tough going, with the car throwing off its nosecose in one run, while rough weather brought further struggles. Strong crosswinds played a role in a violent crash on the car’s fastest pass, which ripped the car apart and destroyed the engine. However, in the end, it had done enough to secure a record at over 152 km/h, even if its later faster efforts didn’t officially count.

It’s clear that the car has come a long way since [ProjectAir’s] initial efforts in 2022, and we can’t wait to see where the project goes next. Video after the break.

Continue reading “Breaking Land Speed Records With An RC Car”

Building The Cheapest MIDI Home Studio From 1988

These days, there is a plethora of cheap hardware and software which you can use to make digital music. Back in the 1980s, though, this was still a nascent field, with new gear changing the game for musicians. In his latest video, [cTrix] puts together a guide to building a budget MIDI home studio like it’s 1988.

The original Atari ST is the star of the show, which sold for around £300 back then. Unlike most contemporary computers, it came with MIDI ports built-in, and it quickly became a popular platform for music sequencing and controlling external synth hardware. It was often spotted in posh studios being used by big-time musicians, but [cTrix] wanted to look at how it was used by more humble users.

While the Atari ST could output some passable chiptunes, it was most powerful when paired with off-board gear. Industry magazines would readily talk up “DIY” setups worth thousands, but [cTrix] aimed for a budget in the low hundreds. In 1988, that might get you something like the 16-channel Yamaha PSS-580, which rocked full MIDI support and a ton of sounds and drumkits built in. It ran an OPL soundchip, and could play multiple instruments at once under MIDI control from software like Dr. T’s MIDI Recording Studio.

Of course, if you’ve ever played a keyboard like the PSS-580, you’ll have noted that the sound output can be more than a little chintzy. A cheap way to level up was to get yourself something like the Roland MT-32, which rocked a far higher-quality sound module. Everything from slap bass to solid electric pianos could be blasted out from the Roland, which also included a decent reverb unit, too. [cTrix] also dives into other budget heroes, like the rich and expansive Kawai K1 and the Yamaha EMT-10.

If you want to make music like it’s 1988 and you’re hunting for your first gold record, you’ll learn a lot here. We can’t wait for Part 2, that explores the next level of sophistication in this era. His previous lessons on how to make 90s dance bangers on the Amiga are a treat, too.

Continue reading “Building The Cheapest MIDI Home Studio From 1988”