A New Educational Robotics Platform

When looking for electronics projects to use in educational settings, there is no shortage of simple, lightweight, and easily-accessible systems to choose from. From robotic arms, drones, walking robots, and wheeled robots, there is a vast array of options. But as technology marches on, the robotics platforms need to keep up as well. This turtle-style wheeled robot called the Trundlebot uses the latest in affordable microcontrollers on a relatively simple, expandable platform for the most up-to-date educational experience.

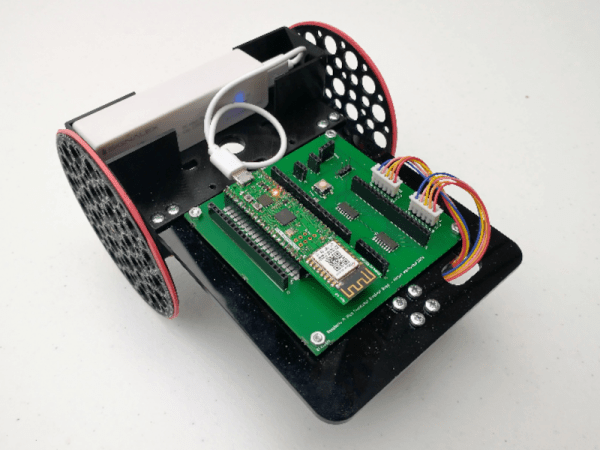
The robot is built around a Raspberry Pi Pico, with two low-cost stepper motors to drive the wheeled platform. The chassis can be built out of any material that can be cut in a laser cutter, but for anyone without this sort of tool it is also fairly easy to cut the shapes out by hand. The robot’s functionality can be controlled through Python code, and it is compatible with the WizFi360-EVB-Pico which allows it to be remote controlled through a web application. The web interface allows easy programming of commands for the Trundlebot, including a drag-and-drop feature for controlling the robot.

With all of these features, wireless connectivity, and a modern microcontroller at the core, it is an excellent platform for educational robotics. From here it wouldn’t be too hard to develop line-follower robots, obstacle-avoiding robots, or maze-solving robots. Other components can easily be installed to facilitate these designs as well. If you’re looking for a different style robot, although not expressly for educational purposes this robotic arm can be produced for under $60.

Educational Robot Teaches With Magnets And Servos

Teaching kids about robotics gives them valuable skills for their futures, and is generally pretty darn fun for all involved, too. However, teaching children often involves taking a bit of a different tack to educating college students, and more of a hand-holding approach is often needed. This robot project is an attempt to do just that, using some classic time-honored techniques and a unique method of propulsion.

The Magnetic Motion Robot, or MMR, is very much a DIY project. Built out of hand-cut plywood and assembled by lacing together individual modules, it’s a low-cost entry into the world of educational robotics. Rather than wheels or motors, it instead uses electromagnets mounted on servo arms to get around. Switching the magnets on and off, and moving the servos in time, allows the robot to pull itself along a ferromagnetic surface.

The robot is outfitted with buzzers and LEDs, and using these features creates further programming challenges for students. Naturally, there’s also a line-following program, which is a great way to begin educating kids about autonomous robot operations. It’s all run from an Arduino Nano, programmed with Makeblock’s special building-block programming software.

While its DIY nature makes assembly a little more involved than the average off-the-shelf kit, it does present its own learning opportunities such as soldering and the integration of hardware. Educational robots will continue to be popular and fun long into the future; we’re a particular fan of sumobots ourselves. Video after the break.

Continue reading “Educational Robot Teaches With Magnets And Servos”

Educational Robot For Under $100

While schools have been using robots to educate students in the art of science and engineering for decades now, not every school or teacher can afford to put one of these robots in the hands of their students. For that reason, it’s important to not only improve the robots themselves, but to help drive the costs down to make them more accessible. The CodiBot does this well, and comes in with a price tag well under $100.

The robot itself comes pre-assembled, and while it might seem like students would miss out on actually building the robot, the goal of the robot is to teach coding skills primarily. Some things do need to be connected though, such as the Arduino and other wires, but from there its easy to program the robot to do any number of tasks such as obstacle avoidance and maze navigation. The robot can be programmed using drag-and-drop block programming (similar to Scratch) but can also be programmed the same way any other Arduino can be.

With such a high feature count and low price tag, this might be the key to getting more students exposed to programming in a more exciting and accessible way than is currently available. Of course, if you have a little bit more cash lying around your school, there are some other options available to you as well.

Nessie, The Educational Robot

At the Lifelong Learning Robotics Laboratory at the Erasmo Da Rotterdam in Italy, robots are (not surprisingly) used to teach all of the fundamentals of robotics. [Alessandro Rossetti] and the students at the lab have been at it for years now, and have finally finished their fifth generation of a robot called Nessie. The big idea is to help teach fundamentals of programming and electronics by building something that actually uses these principles.

The robot is largely 3D printed and uses an FPGA to interact with the physical world through a set of motors and sensors. The robot also uses a Raspberry Pi to hold the robot’s framework. The robot manages the sensors in hardware with readers attached to the CPU AXI bus. The CPU reads their values from memory space, though, so the robot is reported to be quite quick.

The lab is hoping to take their robot to a robotics competition in Bari, Italy. We hope that they perform well there, since we are big fans of any robot that’s designed to teach anyone about robotics and programming. After all, there are robots that help teach STEM in Africa, robots that teach teen girls about robots, and robots that teach everyone.

Hacking Helps Bring Educational Robot Projects In For A Few Dollars

suckerbot-tedx

Meet  [Dr. Thomas Tilley] and his robot Suckerbot which looks very much like a clear-plastic six-axis controller. His presentation at this year’s TEDxChiangMai is made of the stuff that makes us feel warm inside.

[Thomas] has been using joystick hacks to bring smiles to faces of kids in his part of Thailand. The video below covers some that he has done over the years. These include racing cockpits made out of PVC or bamboo which patch into a cheap joystick to control the action on a traditional gaming console. He’s also spun a different take on multiplayer Guitar Hero by splitting up the fret and strum actuators between several different kids.

But the main topic of his presentation is Lollybot, which is an Americanized version of its original moniker: Suckerbot. This was his entry into a 2012 contest which tasked hackers to build a robot that would cost under $10 to replicate in the classroom. That’s quite a challenge but he actually did it with enough to spare for a snack afterwards. Suckerbot is so named because he added a couple of candy suckers to the analog joysticks of a knock-off PlayStation controller. They act as inverted pendulums; when the robot runs into something the suckers shake which can be read by the computer controlling the robot. Food container lids wrapped with rubber act as wheels which are spun by the vibration motors from the joystick. And there’s even a set of line-following sensors built from photoresistors and some LEDs. His calculated cost? Just $8.96!

The hope is that robot projects stemming from this contest will help produce the next generation of hackers in Africa. If this stuff gets you excited you can take part. This year’s challenge deadline has been extended.

Continue reading “Hacking Helps Bring Educational Robot Projects In For A Few Dollars”

Gesture-Controlled Robot Arm Is A Nifty Educational Build

Traditionally, robot arms have been controlled either by joysticks, buttons, or very carefully programmed routines. However, for [Narongporn Laosrisin’s] homebrew build, they decided to go with gesture control instead.

The MeArm robotic arm is built using laser cut acrylic parts, and can be had in a kit if so desired. It features four servo motors, charged with rotating the arm’s base, pushing the arm forwards and backwards, up and down, and actuating its gripper. The servos are under the command of a micro:bit microcontroller board, which itself receives signals from a second micro:bit which is strapped to the human wishing to control the arm. The second micro:bit detects gestures with its accelerometer, and then sends the relevant commands to the robotic arm’s micro:bit over its built-in radio link. The arm controller then commands the servos to execute the maneuver.

It may be a small robotic arm that doesn’t have the capacity to lift much, but that’s not the point. This project is a great way to teach students how to program microcontrollers, work with sensor inputs, and just generally how to solve engineering puzzles. To that end, it looks like [Narongporn] has a great project on hand for teaching their students. Video after the break.

Continue reading “Gesture-Controlled Robot Arm Is A Nifty Educational Build”

Building Robots With A 20×20 Grid

On autonomous robots, the most difficult challenges usually lie in the software and electronic realms, but the mechanics can also be very time consuming. To help address this challenge, [Nikodem Bartnik] is working on the Open Robotic Platform (ORP), a modular robotics chassis system designed to make prototyping as easy and affordable as possible. Video after the break.

The ORP is governed by a set of design rules to maintain interchangeability. Most of the design rules are very open, but the cornerstone of ORP is its standardized mounting plates featuring a 20 mm grid pattern of 3.5 mm mounting holes. These plates can be stacked using connecting rods, creating a versatile foundation upon which various components can be mounted.

[Nikodem] is on a mission to create and collect an entire library of these modular components. From custom 3D-printed holders that accommodate sensors, motors, wheels and dev boards to homemade PCBs that snap directly onto the chassis, everything to get your robot rolling as soon as possible. While manufacturing methods and materials are not limited, 3D printing and laser cutting will likely be the most popular manufacturing technologies for making your own parts.

Continue reading “Building Robots With A 20×20 Grid”