The last time we covered [Dr. Scott M. Baker], he made his Heathkit H8 run on a considerably older processor than it was made for. This time, apparently still not satisfied with the number of 8008 computers, he made an Intel 8008-based single-board computer.
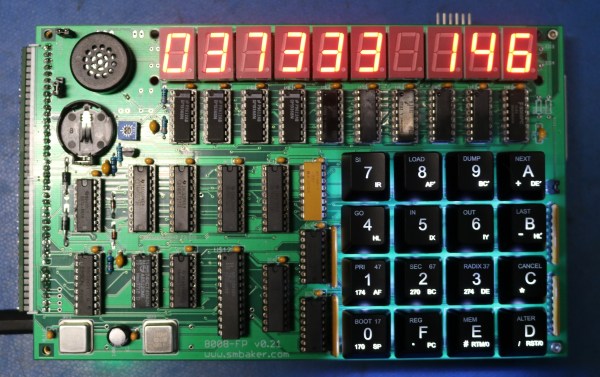
The Mini-08, as [Scott] calls it, is based on his previous endeavour of downgrading the Heathkit H8. Its “CPU board” has even more memory than its predecessor at 128KiB RAM and ROM and an 8251 UART connected to a DB25 serial port. The entirely optional “display board” adds to that 10 digits of 7-segment displays, a backlit Cherry MX Blue hexadecimal keypad, a real-time clock and even a 4-voice sound generator!
[Scott] has also done an impressive job with the software, porting BASIC, FORTH, a clone of Star Trek and some utilities to his Mini-08. He demonstrates both BASIC and FORTH by printing “SCOTT WAS HERE” in a for loop and finishes off by showing how to use some of the display board with FORTH.
Like last time, he published design files and resources for you to enjoy. Overall, an interesting spin on the retro single-board computer concept.
Typically when you’re replacing parts in an old computer it’s either for repairs or an upgrade. Upgrades like adding a more capable processor to an old computer are the most common, and can help bring an old computer a bit closer to the modern era. [Dr. Scott M. Baker] had a different idea, when he downgraded a Heathkit H8 from an 8080 to an 8008.
Despite the very similar numbers, the 8080 runs at four to nearly sixteen times the speed of its predecessor. In addition to this, the 8008 is far less capable on multiple fronts like address space, I/O ports, the stack and even interrupts. The 8008 does have one thing going for it though: the 8008 is widely known as the world’s first 8-bit microprocessor.
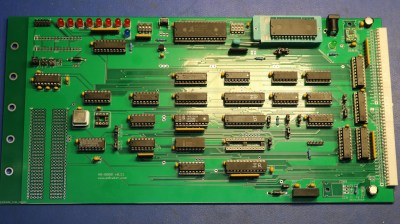
The custom 8008 CPU board for the Heathkit H8.
In the video after the break, [Scott] goes into great detail about the challenges presented in replacing the 8080 with the 8008, starting with the clock. The clock is two-phase, so that what would otherwise be a single oscillator now also has a clock divider and two NAND gates.
Boring clock stuff aside, he does some great hacking using the I/O ports including expanding the I/O port count from 32 to the full 256, bit-banging serial, implementing an interrupt controller and even memory mapping 64 KiB into 16 KiB of address space! With that and a few more special adapter circuits, we think [Scott] has done a great job of downgrading his H8 and the resulting CPU board looks fabulous.
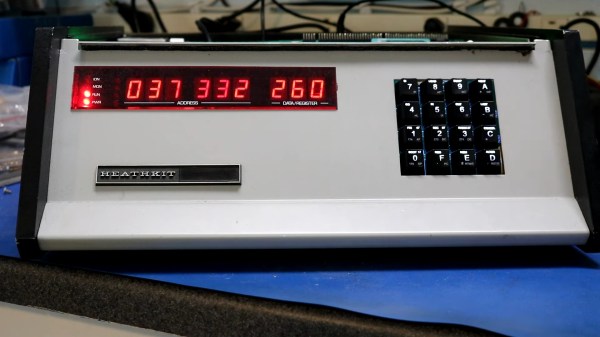
These days, data is as likely as not to be “in the cloud.” Otherwise, it’s probably on a USB flash drive or SD card. But in the old days, paper tape was a widespread way to store and retrieve data. A common way to start the day at the office was to toggle in a few dozen bytes of bootloader code, thread a bigger bootloader tape into your TeleType paper tape reader, and then get your coffee while the more capable bootloader clunked its way into memory. Then you could finish your brew while loading the tape with your compiler or whatever you wanted. [Scott Baker] has a Heathkit H8 and decided using a paper tape machine with it and some of his other gear would be fun.
Instead of a TeleType, [Scott] picked up a used paper tape machine from FANUC intended for the CNC industry. They are widely available on the surplus market, although a working machine might run you $500. [Scott] paid $200, so he had some work to do to make the unit operational.
Paper tape had a few varieties. For computer work, you usually had a tape that could hold eight holes across, one for each bit in a byte. However, there are also 6-bit and 5-bit tapes for special purposes or different encodings (old TeleTypes used 5-bit characters in Baudot). The paper choice varied too. You could get plain paper, oiled paper, which maybe didn’t jam as often, and Mylar, which is less likely to shred up when it does jam.
To make things even more difficult, the machines all worked a little differently as well. Sure, punches almost all use solenoids. But the tape transport was sometimes a pinch roller and sometimes a sprocket-style drive. Reading the holes could be done with mechanical contacts or optically. Some punches left little “hanging chads” on the tape, so you didn’t have to empty a confetti box to throw away the chad.
The repair job was interesting. Inside the machine is an 8051 microcontroller. There was no clock, and the circuit used two custom modules. One was simply a crystal, and the other was an oscillator. Removing both allowed a modern can oscillator to replace both modules. The next problem was a fried serial output driver. Replacing that got things working except for random resets due to a faulty brown-out reset circuit. That was easy to fix, too.
Of course, if you are really cheap, it is easy to make a paper tape reader from 8 phototransistors, and pulling tape through by hand isn’t unheard of. It can even talk USB. We’ve even seen a conference badge that can read tapes.
[Scott M. Baker] wants a paper tape punch for his retrocomputer collection. That’s fine with us, we don’t judge. In fact, these electromechanical peripherals from the past have a lot going for them, especially the noise. But alas, such things are a little hard to come by these days, and rolling one from scratch would be a difficult proposition indeed. What to do?
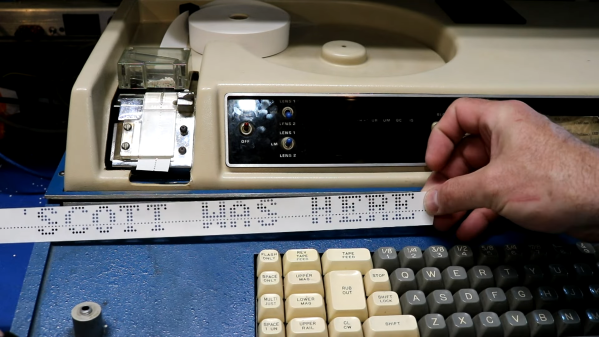
Luckily, we live in the future, and eBay holds all sorts of wonders, including these typesetter keyboards from the 1970s, which [Scott] promptly reverse-engineered. We’ll get to the details in a minute, but first, can we just take a moment to think about the workflow these things were part of? These aren’t terminals — they lack any kind of IO apart from the punched paper tape they spewed out. The operator’s job was to punch in copy without any kind of feedback that they were hitting the right keys, and just sent the paper tap record of the session off to the typesetting machines. And you think your job sucks.
To give this thing an interface, [Scott] first had to revive the power supply, whose capacitors had seen sunnier days. With that out of the way, he set about understanding the CPU-less machine by analyzing its 7400-series logic, as well as planning how to make the native 6-bit output into a more manageable 8-bit. Thankfully, the tape punch already had solenoids for the top two bits, but finding a way to drive them wasn’t trivial.
The solution was to bypass a buffer so that the bits for the desired character can be set with a Raspberry Pi and an ATF22V10 programmable logic device. That’s enough to force the punch to do its thing; actually getting it to talk to something else, perhaps even [Scott]’s Heathkit H-8 computer.
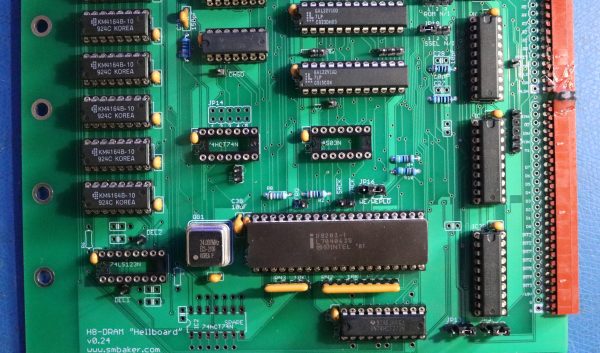
Ask anyone to name a first-generation home computer from the 1970s, and they’ll probably mention the likes of the Altair 8800 and IMSAI 8080. But those iconic machines weren’t the only options available to hobbyists back in the day: Heathkit, famous for its extensive range of electronic devices sold in kit form, jumped on the microcomputer bandwagon with their H8. Though it always remained a bit of an obscure machine, several dedicated enthusiasts kept making H8-compatible hardware and software long after the computer itself went out of production. That tradition continues in 2023, with [Scott M. Baker] producing a brand-new DRAM board that’s compatible with any version of the H8.
Although the Heathkit H8 was designed around the Intel 8080 processor, it could also be equipped with a Z80. [Scott] had built an 8085 based CPU board as well, meaning that any other hardware he developed for the H8 had to support these three processors. For something as timing-critical as a memory board, this turned out to be way harder than he’d expected.
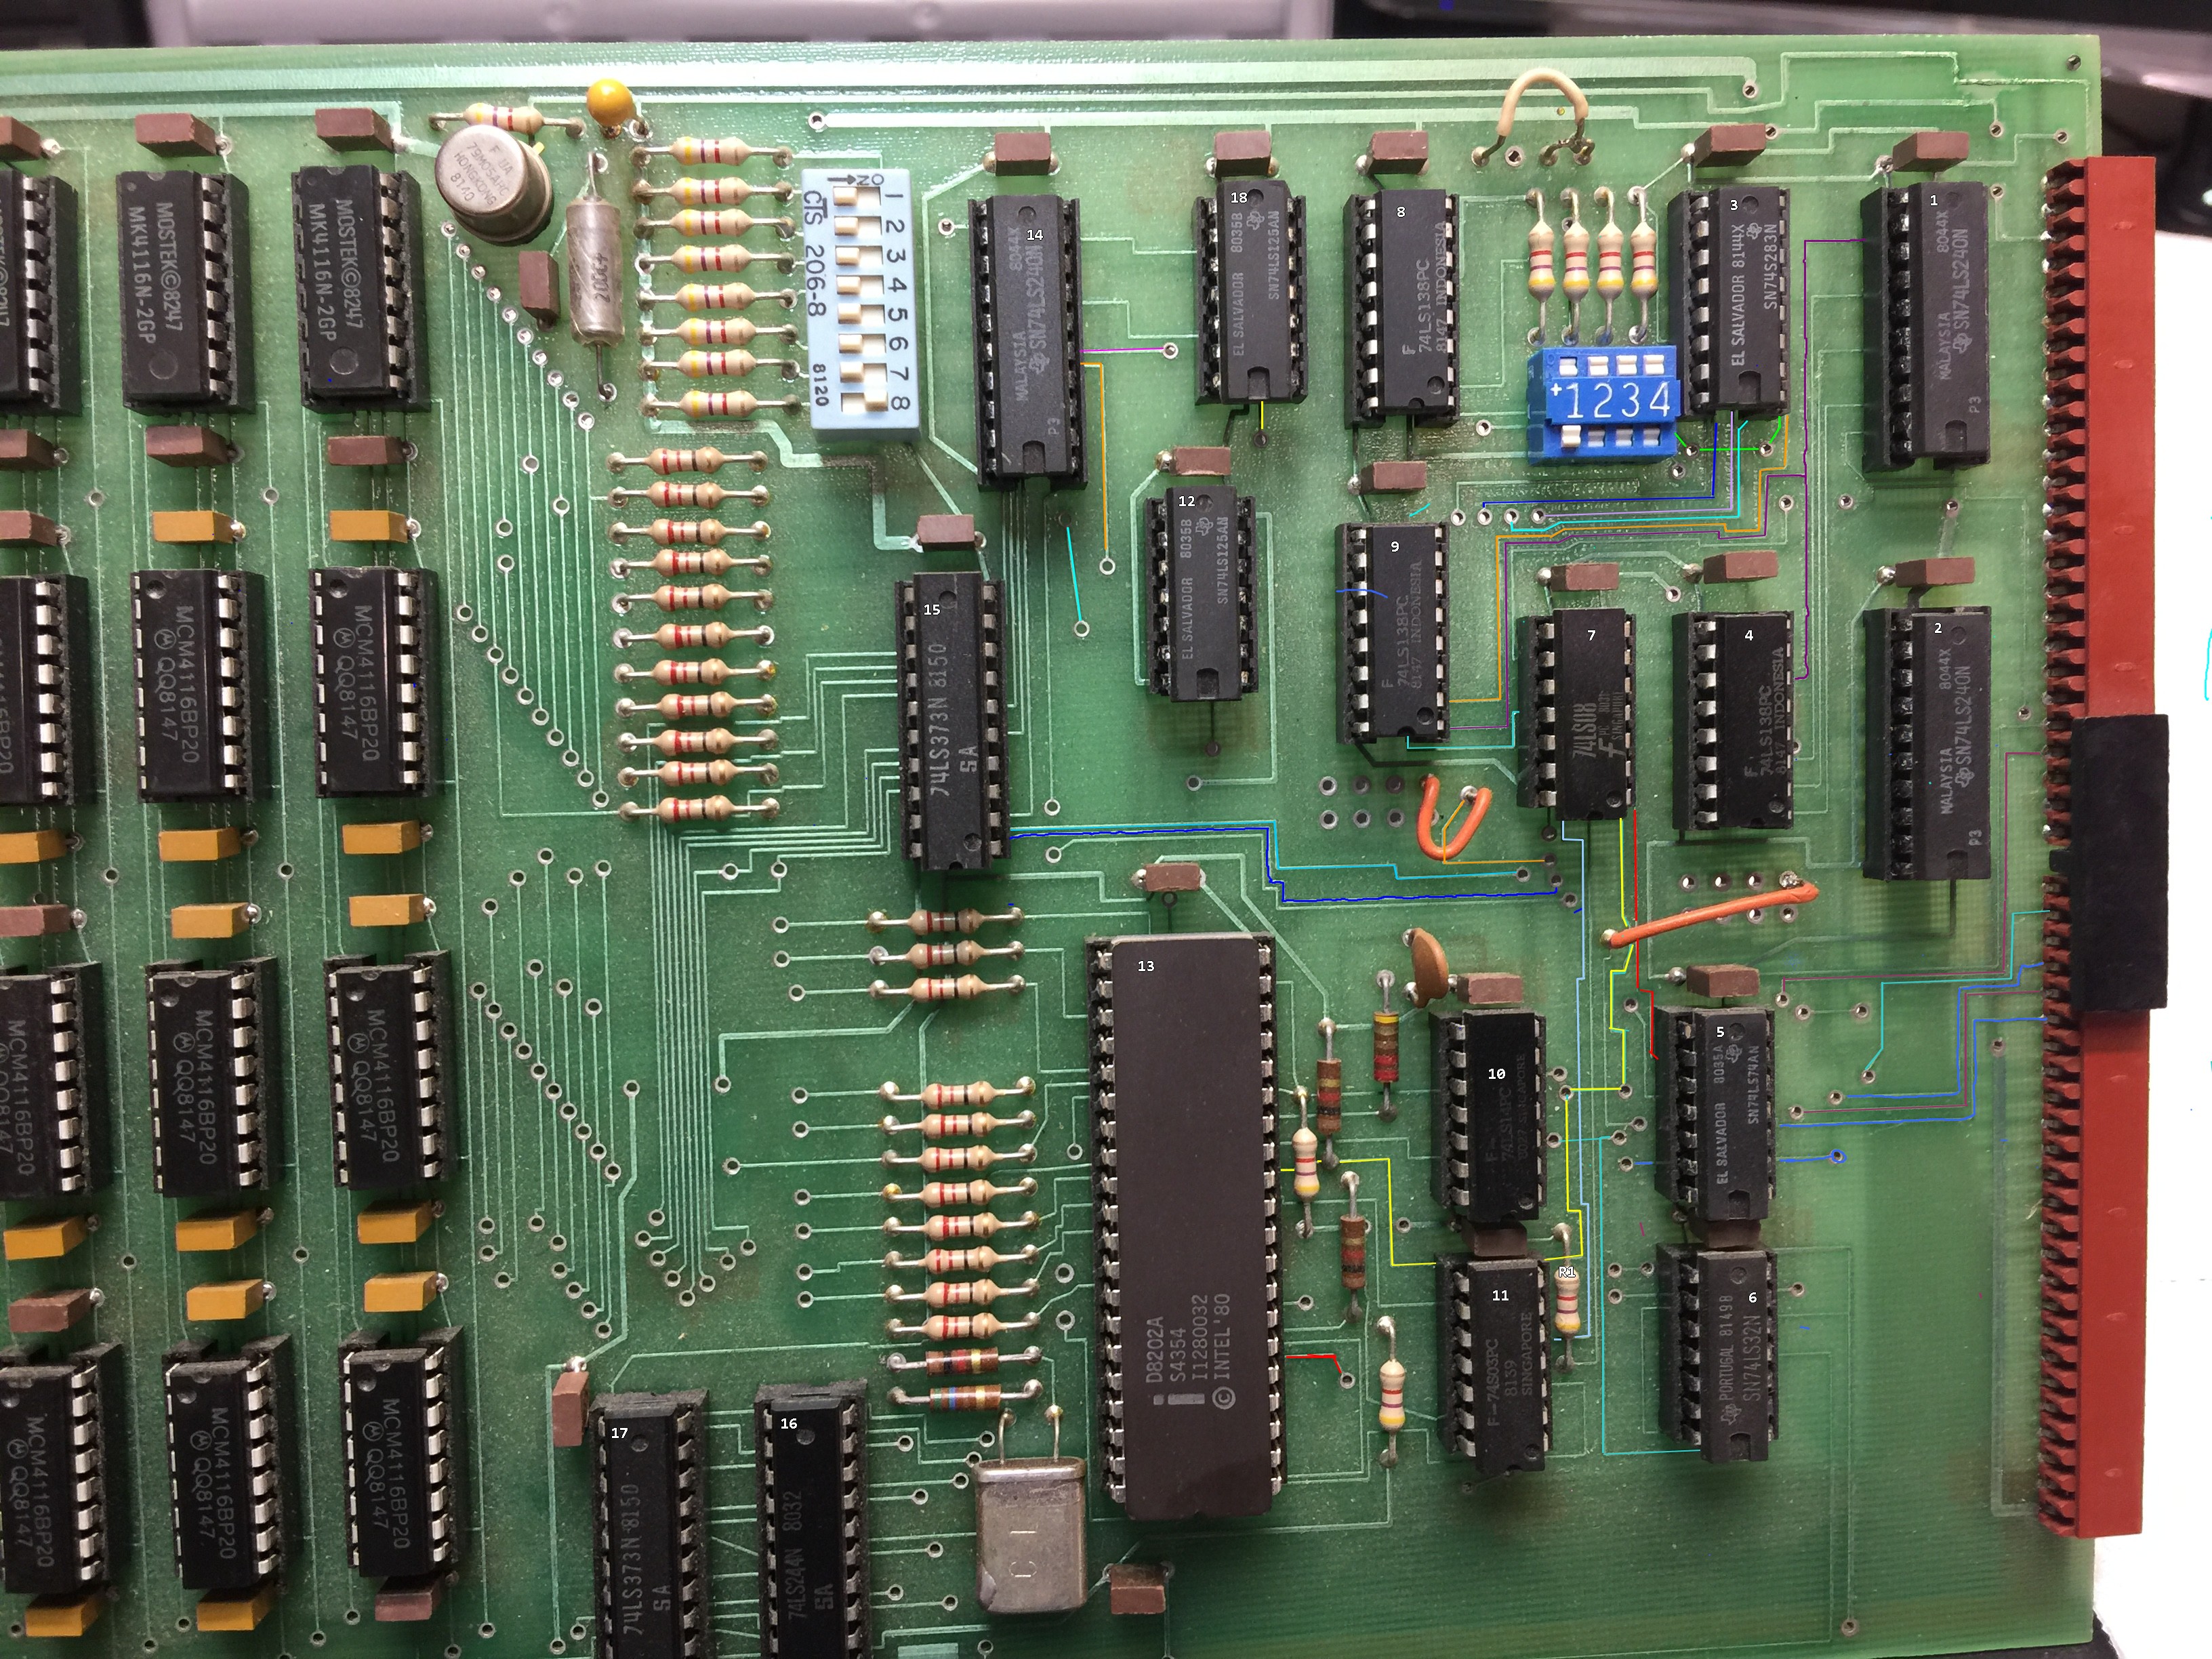
First off, he had already made things difficult for himself by choosing DRAM rather than the simpler SRAM. Whereas SRAM chips can be more or less directly hooked up to the CPU’s address and data buses, a DRAM setup needs refresh circuitry to ensure the data doesn’t leak out of the chips’ internal capacitors. [Scott] decided to use the classic D8203 DRAM controller to do that for him — a solution that was pretty common back in the day.
Getting the timing right for all signals between the CPU and the DRAM controller was not at all trivial, however. The main problem was with two signals, called /SACK and /XACK, which were used to pause memory access during refresh cycles. Depending on which CPU was on the other side, these signals apparently had to be combined with other signals, stored in a flip-flop or delayed by a cycle or two in order to align with the processor’s internal logic. None of this seemed to work reliably, so [Scott] looked elsewhere for inspiration.
Luckily, traces are easy to follow on a two-layer board.
He found this on eBay, where a few vintage H8-compatible DRAM boards were for sale. Although [Scott] didn’t manage to win the auction, the eventual buyer was kind enough to snap some high-resolution pictures of the board which enabled him to reverse-engineer the circuit. The board used the similar D8202 DRAM controller and came with logic that generated the proper signals to interface with the 8080 and 8085 CPUs. For the Z80, [Scott] dived into the documentation for Heathkit’s Z80 option and found a schematic with a few logic gates that would satisfy the Zilog chip as well.
[Scott] combined both of these solutions on a beautiful 1980s-style printed circuit board, with a bunch of 7400 series logic gates and even two GAL22V10 programmable logic devices. With full documentation and Gerber files available on the project’s GitHub page, Heathkit H8 owners can now get their own brand-new memory board — in kit form, as a Heathkit should be.
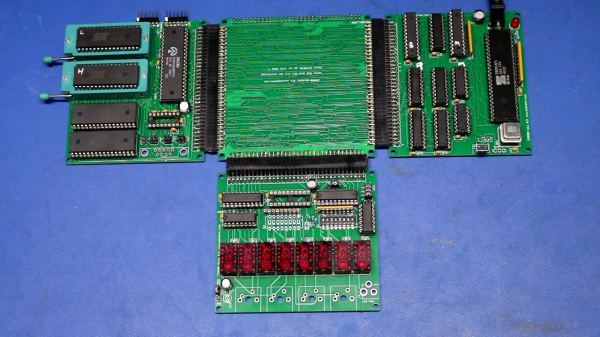
Seeing some old Zilog 16-bit chips on eBay recently, [Scott Baker] was curious enough to snap them up and build himself a Z8000 computer. It started as a two-board solution, then he added a display module. Instead of layering the boards vertically à la a PC/104 stack, [Scott] decided to build them flat. His first backplane was triangular, but he opted for a square to accommodate one more expansion board in the future. The assembled contraption resembles a clover, hence the name Clover Computer.
The Z8000 was Zilog’s first 16-bit microprocessor, introduced in 1979. It was not hugely popular for a variety of reasons (the Z8000 Wikipedia article has some interesting details). The Z8000 was eclipsed in the marketplace by Intel’s 8088 and Motorola’s 32-bit 68000. One interesting point is that the Z8000 did not use microcode, and as a result, its transistor count was significantly less than its contemporaries. The Z8000 was used in some military applications, and despite its limited commercial success, it continued to be available from Zilog and licensed second sources up until 2012.
[Scott]’s design splits the system into a CPU board, a memory and serial board, and a display board. Along the way, he learns 1980’s era tricks from the Olivetti M20, one of the few computer systems designed around the Z8000. He also manages to find a recent Z8000 implementation of CP/M by GitHub user [4sun5bu], which [Scott] forked and adapted to his project (see project repo here). He succeeds in getting everything working, and ports a monitor, Tiny Basic, and Zork.
Check out his project write-up introductory link, and see it in action in the video below the break. Did you ever use or encounter the Z8000? Let us know in the comments!
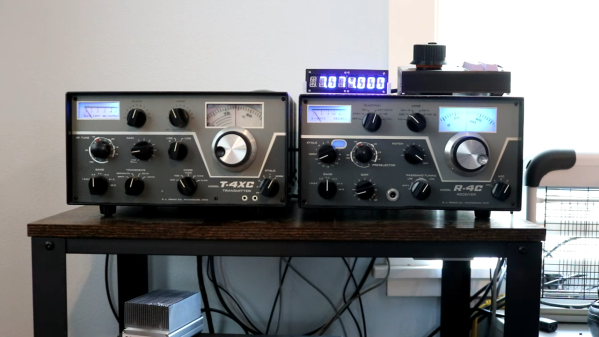
In the ham radio trade, gear such as the old Drake units [Dr. Scott M. Baker] has in his radio shack are often referred to as “boat anchors.” It refers to big, heavy radios that were perhaps a bit overengineered compared to the state of the art at the time they were designed, and it’s actually a shame that the name has taken on something of a pejorative connotation, since some of this gear is rock solid half a century or more after it was built.
But older gear is often harder to use, at least compared to the newer radios with microcontrollers and more stable oscillators inside. To make his 1970s-era Drake “Twins” setup of separate but linked receiver and transmitter a little more fun to use, [Scott] came up with this neat Raspberry Pi-based DDS-VFO project to keep his boat anchors afloat. Compared to the original mechanically tuned variable frequency oscillator in the Drake receiver, the direct-digital synthesis method promises more stability, meaning less knob-nudging to stay on frequency.
The hardware used for the DDS-VFO is actually pretty simple — just a Raspberry Pi Zero W driving an AD9850-based signal-generator module. Sending the signal to the Twins was another matter. That was done by tapping into the injection cable linking both units, which meant a few circuit complications to deal with signal attenuation. [Scott] also added amenities like a digital frequency display, optical encoder with crank-style knob to change frequency, and a host of Cherry MX keyswitches for quick access to different features.
From the look of the video below, the Twins are now rock-solid and a lot easier to use. This project is loosely based on a recent panadapter project [Scott] undertook for the receiver side of the Twins.