A modern DRAM board for the Heathkit H8 computer

Versatile DRAM Board Adds Memory To Any Heathkit H8 Variant

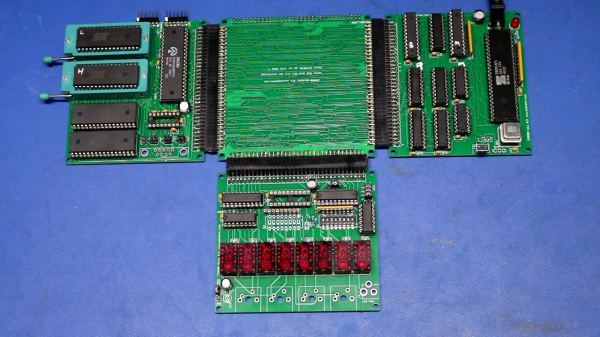
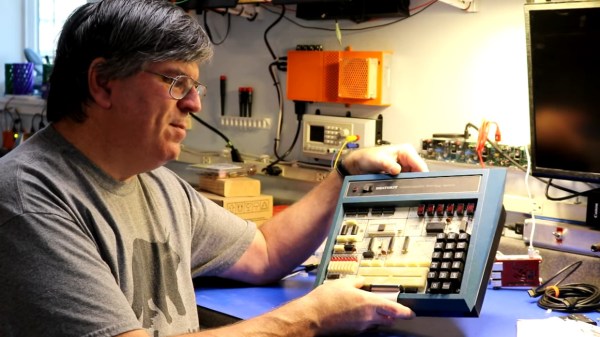
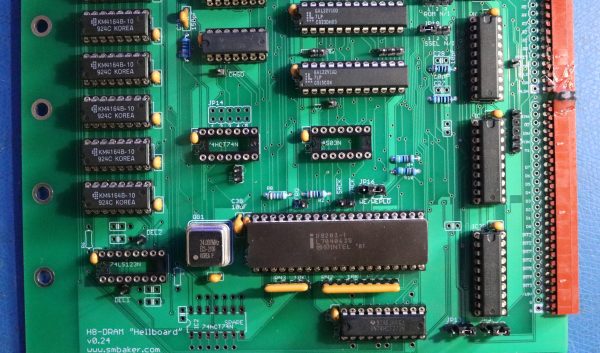
Ask anyone to name a first-generation home computer from the 1970s, and they’ll probably mention the likes of the Altair 8800 and IMSAI 8080. But those iconic machines weren’t the only options available to hobbyists back in the day: Heathkit, famous for its extensive range of electronic devices sold in kit form, jumped on the microcomputer bandwagon with their H8. Though it always remained a bit of an obscure machine, several dedicated enthusiasts kept making H8-compatible hardware and software long after the computer itself went out of production. That tradition continues in 2023, with [Scott M. Baker] producing a brand-new DRAM board that’s compatible with any version of the H8.

Although the Heathkit H8 was designed around the Intel 8080 processor, it could also be equipped with a Z80. [Scott] had built an 8085 based CPU board as well, meaning that any other hardware he developed for the H8 had to support these three processors. For something as timing-critical as a memory board, this turned out to be way harder than he’d expected.

First off, he had already made things difficult for himself by choosing DRAM rather than the simpler SRAM. Whereas SRAM chips can be more or less directly hooked up to the CPU’s address and data buses, a DRAM setup needs refresh circuitry to ensure the data doesn’t leak out of the chips’ internal capacitors. [Scott] decided to use the classic D8203 DRAM controller to do that for him — a solution that was pretty common back in the day.

Getting the timing right for all signals between the CPU and the DRAM controller was not at all trivial, however. The main problem was with two signals, called /SACK and /XACK, which were used to pause memory access during refresh cycles. Depending on which CPU was on the other side, these signals apparently had to be combined with other signals, stored in a flip-flop or delayed by a cycle or two in order to align with the processor’s internal logic. None of this seemed to work reliably, so [Scott] looked elsewhere for inspiration.

A vintage DRAM board for the Heathkit H8 computer
Luckily, traces are easy to follow on a two-layer board.

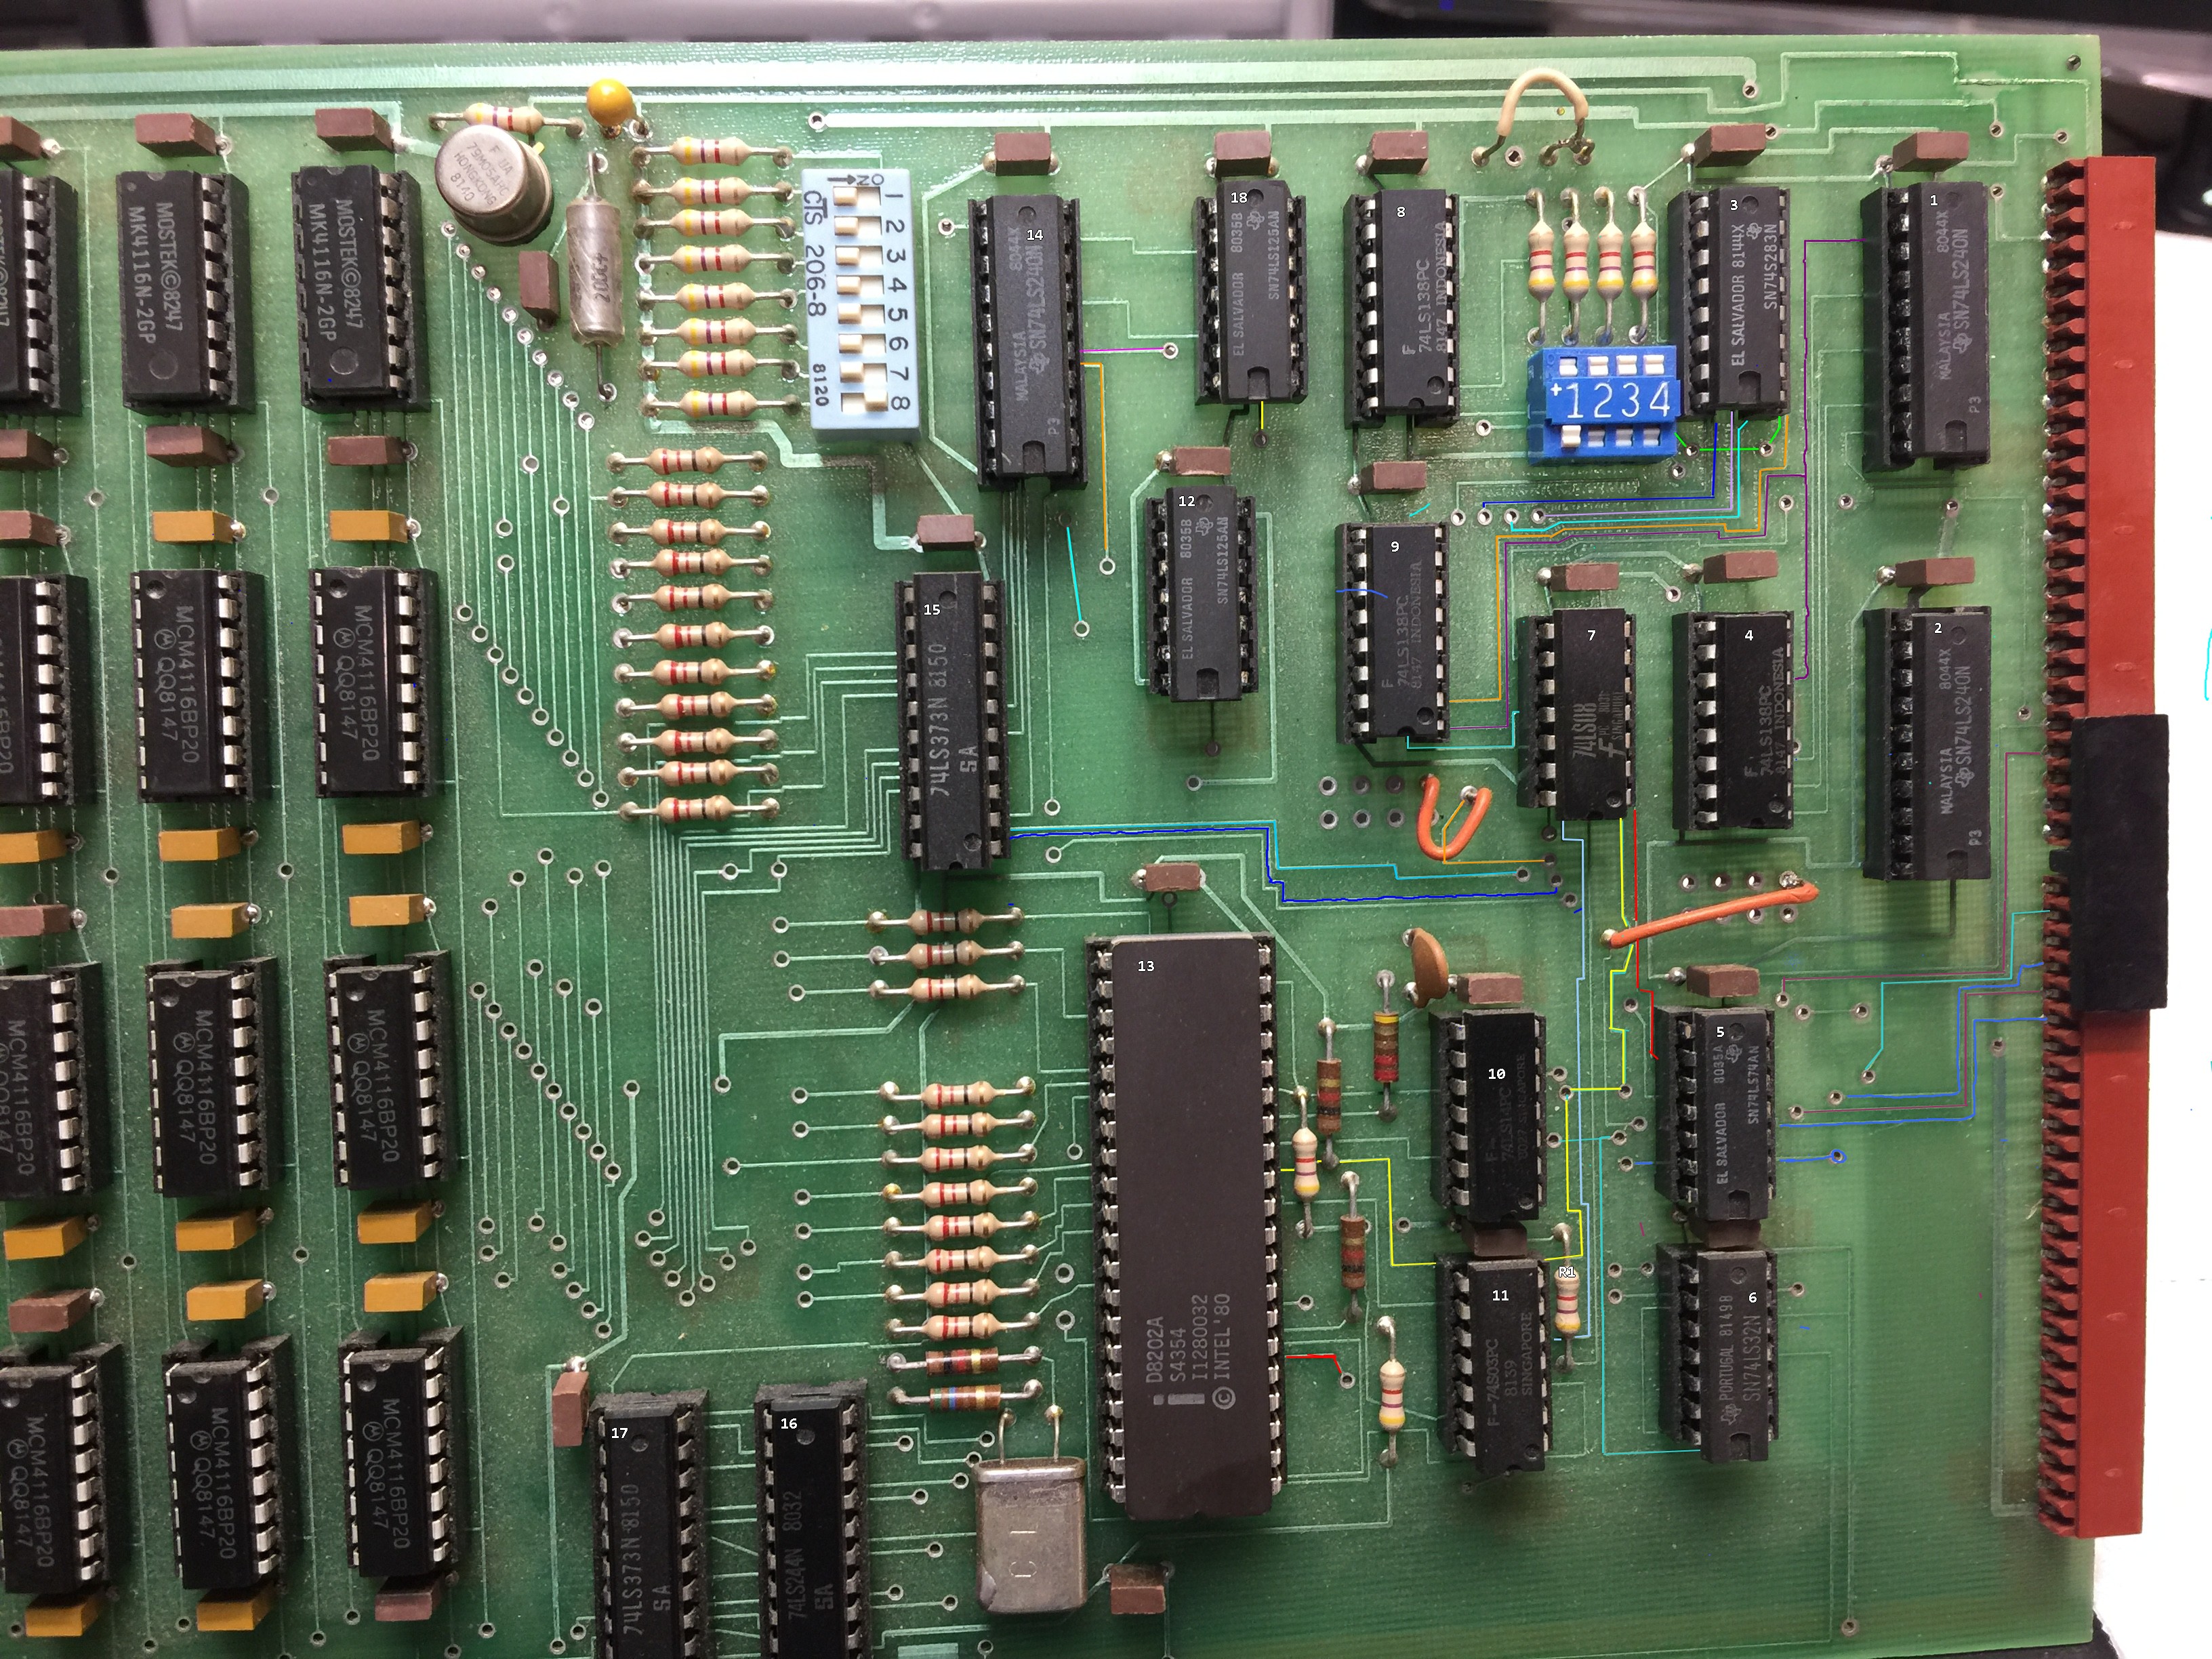
He found this on eBay, where a few vintage H8-compatible DRAM boards were for sale. Although [Scott] didn’t manage to win the auction, the eventual buyer was kind enough to snap some high-resolution pictures of the board which enabled him to reverse-engineer the circuit. The board used the similar D8202 DRAM controller and came with logic that generated the proper signals to interface with the 8080 and 8085 CPUs. For the Z80, [Scott] dived into the documentation for Heathkit’s Z80 option and found a schematic with a few logic gates that would satisfy the Zilog chip as well.

[Scott] combined both of these solutions on a beautiful 1980s-style printed circuit board, with a bunch of 7400 series logic gates and even two GAL22V10 programmable logic devices. With full documentation and Gerber files available on the project’s GitHub page, Heathkit H8 owners can now get their own brand-new memory board — in kit form, as a Heathkit should be.

There are several enthusiasts keeping the various Heathkit computer models up and running, and even producing completely new ones. The Heath Company also still exists, selling electronic kits to this day.

Thanks for the tip, [Adrian]!

Clover Computer: A Modern Z8000 CP/M Machine

Seeing some old Zilog 16-bit chips on eBay recently, [Scott Baker] was curious enough to snap them up and build himself a Z8000 computer. It started as a two-board solution, then he added a display module. Instead of layering the boards vertically à la a PC/104 stack, [Scott] decided to build them flat. His first backplane was triangular, but he opted for a square to accommodate one more expansion board in the future. The assembled contraption resembles a clover, hence the name Clover Computer.

The Z8000 was Zilog’s first 16-bit microprocessor, introduced in 1979. It was not hugely popular for a variety of reasons (the Z8000 Wikipedia article has some interesting details). The Z8000 was eclipsed in the marketplace by Intel’s 8088 and Motorola’s 32-bit 68000. One interesting point is that the Z8000 did not use microcode, and as a result, its transistor count was significantly less than its contemporaries. The Z8000 was used in some military applications, and despite its limited commercial success, it continued to be available from Zilog and licensed second sources up until 2012.

[Scott]’s design splits the system into a CPU board, a memory and serial board, and a display board. Along the way, he learns 1980’s era tricks from the Olivetti M20, one of the few computer systems designed around the Z8000. He also manages to find a recent Z8000 implementation of CP/M by GitHub user [], which [Scott] forked and adapted to his project (see project repo here). He succeeds in getting everything working, and ports a monitor, Tiny Basic, and Zork.

Check out his project write-up introductory link, and see it in action in the video below the break. Did you ever use or encounter the Z8000? Let us know in the comments!

Continue reading “Clover Computer: A Modern Z8000 CP/M Machine”

Boat Anchor Twins Get A Little Digital Help Staying On Frequency

In the ham radio trade, gear such as the old Drake units [Dr. Scott M. Baker] has in his radio shack are often referred to as “boat anchors.” It refers to big, heavy radios that were perhaps a bit overengineered compared to the state of the art at the time they were designed, and it’s actually a shame that the name has taken on something of a pejorative connotation, since some of this gear is rock solid half a century or more after it was built.

But older gear is often harder to use, at least compared to the newer radios with microcontrollers and more stable oscillators inside. To make his 1970s-era Drake “Twins” setup of separate but linked receiver and transmitter a little more fun to use, [Scott] came up with this neat Raspberry Pi-based DDS-VFO project to keep his boat anchors afloat. Compared to the original mechanically tuned variable frequency oscillator in the Drake receiver, the direct-digital synthesis method promises more stability, meaning less knob-nudging to stay on frequency.

The hardware used for the DDS-VFO is actually pretty simple — just a Raspberry Pi Zero W driving an AD9850-based signal-generator module. Sending the signal to the Twins was another matter. That was done by tapping into the injection cable linking both units, which meant a few circuit complications to deal with signal attenuation. [Scott] also added amenities like a digital frequency display, optical encoder with crank-style knob to change frequency, and a host of Cherry MX keyswitches for quick access to different features.

From the look of the video below, the Twins are now rock-solid and a lot easier to use. This project is loosely based on a recent panadapter project [Scott] undertook for the receiver side of the Twins.

Continue reading “Boat Anchor Twins Get A Little Digital Help Staying On Frequency”

Homemade Panadapter Brings Waterfall To Old Radio

Ham radio operators can be pretty selective about their gear. Some are old-school tube purists who would never think of touching a rig containing transistors, and others are perfectly happy with the small Software Defined Radio (SDR) hooked up to their PC. The vast majority, though, of us are somewhere in between — we appreciate the classic look and feel of vintage radios as well as the convenience of modern ones. Better yet, some of us even like to combine the two by adding a few modern bells and whistles to our favorite “boat anchor.”

[Scott Baker] is one such Ham. He’s only had his license for a few months now and has already jumped into some great projects, including adding a panadapter to an old Drake R-4B Receiver. What’s a panadapter, you may ask? As [Scott] explains in his excellent writeup and video, a panadapter is a circuit that grabs a wideband signal from a radio receiver that typically has a narrowband output. The idea is that rather than just listen to somebody’s 4kHz-wide transmission in the 40m band, you can listen to a huge swath of the spectrum, covering potentially hundreds of transmissions, all at the same time.

Well, you can’t actually listen to that many transmissions at once — that would be a garbed mess. What you can do with that ultrawide signal, however, is look at it. If you take an FFT of the signal to put it in the frequency domain (by using a spectrum analyzer, or in [Scott]’s case, an SDR), you can see all sorts of different signals up and down the spectrum. This makes it a heck of a lot easier to find something to listen to — rather than spinning the dial for hours, hoping to come across a transmission, you can just see where all of the interesting signals are.

This isn’t the first (or even the twentieth) time that [Scott]’s work has graced our pages, so make sure to check some of his other incredible projects in our archives!

Continue reading “Homemade Panadapter Brings Waterfall To Old Radio”

A Floppy Controller For The Raspberry Pi

The Raspberry Pi is the darling single board computer that is everything to everyone. It even has lit up the eyes of the older set with the Pi 400 mimicking the all-in-one keyboard computer design so popular in the 1980s. Another project that harkens back to that golden era is this Raspberry Pi floppy controller board from [Dr. Scott M. Baker].

[Scott] is no stranger to floppy controllers, having worked with the popular WD37C65 floppy controller IC before with the RC2014 homebrew Z80 computer. Thus, it was his part of choice when looking to implement a floppy interface on the Raspberry Pi. The job was straightforward, and done with just the IC itself. Despite the Pi running at 3.3 V and the controller at 5 V, [Scott] has found no problems thus far, implementing just a resistor pack to try and limit damage from the controller sending higher voltage signals back to the Pi. With that said, he plans to implement a proper level shifter down the road to ensure trouble-free operation long term.

The project is rounded out with a bunch of Python tools used to interface with the controller, available on Github. Performance is limited by the non-realtime nature of the Raspberry Pi’s user mode operation, which [Scott] notes could be fixed with a kernel module. With that said, if you’re looking for performance, floppies aren’t it anyway.

We do love the Pi put to use in retro tasks; it can even be a SCSI Swiss Army Knife if you need one. Video after the break.

Continue reading “A Floppy Controller For The Raspberry Pi”

A Super UPS For The Pi

One of the problems with using a Raspberry Pi or most other systems in a production environment is dealing with sudden shutdowns due to power loss. Modern operating systems often keep data in memory that should be on disk, and a sudden power cycle can create problems. One answer is an uninterruptible power supply, but maintaining batteries is no fun. [Scott] wanted to do better, so he built a UPS using supercapacitors.

A supercapacitor UPS is nearly ideal. The caps charge quickly and don’t wear out as a battery does. The capacitors also don’t care if they stay in storage for a long time. The only real downside is they don’t have the capacity that batteries can have, but for a small computer like a Pi Zero it is pretty easy to gang up enough capacitors to do the job.

Continue reading “A Super UPS For The Pi”

Retro Computer Trainer Gets A Raspberry Pi Refit

We know what you’re thinking: this is yet another one of those “Gut the retro gear for its cool old case and then fill it up with IoT junk” projects. Well, rest assured that extending and enhancing this 1970s computer trainer is very much an exercise in respecting the original design, and while there’s a Pi inside,  it doesn’t come close to spoiling the retro goodness.

Like many of a similar vintage as [Scott M. Baker], the Heathkit catalog was perhaps only leafed through marginally less than the annual Radio Shack catalog. One particularly desirable Heathkit item was the ET-3400 microcomputer learning system, which was basically a 6800-based computer surrounded by a breadboarding area for experimentation. [Scott] got a hold of one of these, but without the optional expansion accessory that would allow it to do interesting things such as running BASIC or even supporting a serial port. So [Scott] decided to roll his own expansion board.

The expansion card that [Scott] designed is not strictly a faithful reproduction, at least in terms of the original BOM. He turned to more modern — and more readily available — components, but still managed to provide the serial port, cassette interface, and RAM/ROM expansion of the original unit. The Raspberry Pi is an optional add-on, which just allows him to connect wirelessly if he wants. The card fits into a 3D-printed case that sits below the ET-3400 and maintains the original trainer’s look and feel. The longish video below shows the build and gives a tour of the ET-3400, both before and after the mods.

It looks as though trainers like these and other artifacts from the early days of the PC revolution are getting quite collectible. Makes us wish we hadn’t thrown some things out.

Continue reading “Retro Computer Trainer Gets A Raspberry Pi Refit”