An ASCII Terminal Like It’s 1974

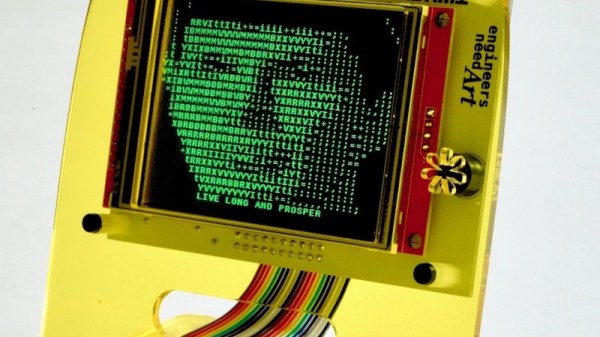
It’s quite probable that any of you who have built a keyboard will have done so using a matrix of keys connected to a microcontroller, or if you are old-school, a microprocessor. A CPU can scan the keyboard matrix with ease, and pass whatever is typed either to whatever software it is running, or to a host computer. There was a time however when available CPUs were not considered powerful enough to do all this and also perform a useful task, so a keyboard would have its own decoder chip that would output ASCII over a parallel interface. It’s an era [John Calhoun] harks back to with Adam74, a little ASCII terminal which takes its input from that 7-bit parallel port.

In the place of a forest of TTL chips which might have graced the originals, within that attractive curved laser cut acrylic case is an LCD display and a Teensy microcontroller board. There’s a level shifter for the classic 5 volt logic, and of course a small buzzer for the essential BEL character. In these days when a parallel interface is relatively rare, he describes the rediscovery of alternate earth lines in a ribbon cable to minimize cross-talk. Should you wish to try your own, everything can be found on GitHub.

All in all it’s a fun way to rediscover an old idea.

Better 3D Printing Via Chemistry?

If you have problems getting a 3D print to stick to the bed, you might consider using glue to — hopefully temporarily — attach the print to the bed. In addition, some plastics glue together well if you use a solvent. [Stefan] asks the question: What if you use solvent to glue each layer of a 3D print to the previous layer? The answer is in the video below.

If you know [Stefan], he is always meticulous, so the first test was with normal ABS parts. Then he used a solvent to glue two broken parts together to show how a single layer does with bonding.  Then he moved toward trying the solvent for each layer.

Continue reading “Better 3D Printing Via Chemistry?”

Hackaday Links Column Banner

Hackaday Links: August 21, 2022

As side-channel attacks go, it’s one of the weirder ones we’ve heard of. But the tech news was filled with stories this week about how Janet Jackson’s “Rhythm Nation” is actually a form of cyberattack. It sounds a little hinky, but apparently this is an old vulnerability, as it was first noticed back in the days when laptops commonly had 5400-RPM hard drives. The vulnerability surfaced when the video for that particular ditty was played on a laptop, which would promptly crash. Nearby laptops of the same kind would also be affected, suggesting that whatever was crashing the machine wasn’t software related. As it turns out, some frequencies in the song were causing resonant vibrations in the drive. It’s not clear if anyone at the time asked the important questions, like exactly which part of the song was responsible or what the failure mode was on the drive. We’ll just take a guess and say that it was the drive heads popping and locking.

Continue reading “Hackaday Links: August 21, 2022”

Drastic Plastic: Enclosure Rebuild Uses Donor Material

Although 3D printers are great, people tend to use them as a universal hammer wherein almost everything becomes a nail that’s just begging to be struck. So as hacker appetites become finicky with the same old fare, it’s refreshing to see an enclosure restoration done in such an old-school fashion. To wit: [Doidão Santos]’ classic repair of the crumbling side fairings on a vintage amplifier.

Yes, instead of designing replacement pieces, printing them, and hiding the layered evidence with paint or an acetone blur, [Doidão] called upon a broken sound system whose chassis bore a relief in the corners similar to that of the amplifier.

After cutting out two matched pieces of donated plastic, [Doidão] taped them together and welded ’em with a soldering iron outfitted with a curved-but-flattened spade tip that looks ideal for this purpose. Although the donor enclosure provided much-needed relief, one corner was lacking in this aesthetic, so [Doidão] cast a little bit of molten plastic using the relief as a mold.

Once the pieces were tacked together, [Doidão] filed them down, sanded them, polished them to a nice shine, and installed them on the amplifier. They look great, and no one will be the wiser. But if we were in [Doidão]’s shoes, we’d tell everyone what we’d done. Be sure to check it out after the break.

Ready for more fantastic plastic resto-hacks? Let us introduce you to [drygol].

Continue reading “Drastic Plastic: Enclosure Rebuild Uses Donor Material”

Knight Rider Keeps On Truckin’

[AJ] and [Joe], collectively the [Knight Rider Historians] are bringing back one of the most iconic vehicles of the 1980’s. Everyone remembers KITT driving into the F.L.A.G. truck. Even the Mythbusters re-enacted the stunt back in 2007. The duo managed to track down the original tractor and trailer from the show for restoration, and part of that process means uncovering the Hollywood hacks used to make the car-driving-into-trailer stunt work.

Back in the ’80s when a movie or TV show wrapped up, the props were often re-used in other productions or sold off. The 1975 Dorsey trailer used on Knight Rider was eventually purchased, stripped down, and painted white. It spent the last 30 years serving as a racing trailer. Carrying cars, and tools, and serving as a mobile shop at the track.

Unsurprisingly, most of the custom parts from Knight Rider are gone – but some hints remain. Specifically, [KRH] are trying to figure out how the drive-up door operated. Originally they assumed it was a hydraulic ram system that pulled the cables. However, above a dropped ceiling they found a welded hard mount and a 24-foot rail running down the trailer roof.

They believe the hard mount was for a winch, and the rail was used as a cable guide for two winch cables.  A set of pulleys just behind the door directed these cables down to the ramp itself.

Continue reading “Knight Rider Keeps On Truckin’”

Clover Computer: A Modern Z8000 CP/M Machine

Seeing some old Zilog 16-bit chips on eBay recently, [Scott Baker] was curious enough to snap them up and build himself a Z8000 computer. It started as a two-board solution, then he added a display module. Instead of layering the boards vertically à la a PC/104 stack, [Scott] decided to build them flat. His first backplane was triangular, but he opted for a square to accommodate one more expansion board in the future. The assembled contraption resembles a clover, hence the name Clover Computer.

The Z8000 was Zilog’s first 16-bit microprocessor, introduced in 1979. It was not hugely popular for a variety of reasons (the Z8000 Wikipedia article has some interesting details). The Z8000 was eclipsed in the marketplace by Intel’s 8088 and Motorola’s 32-bit 68000. One interesting point is that the Z8000 did not use microcode, and as a result, its transistor count was significantly less than its contemporaries. The Z8000 was used in some military applications, and despite its limited commercial success, it continued to be available from Zilog and licensed second sources up until 2012.

[Scott]’s design splits the system into a CPU board, a memory and serial board, and a display board. Along the way, he learns 1980’s era tricks from the Olivetti M20, one of the few computer systems designed around the Z8000. He also manages to find a recent Z8000 implementation of CP/M by GitHub user [], which [Scott] forked and adapted to his project (see project repo here). He succeeds in getting everything working, and ports a monitor, Tiny Basic, and Zork.

Check out his project write-up introductory link, and see it in action in the video below the break. Did you ever use or encounter the Z8000? Let us know in the comments!

Continue reading “Clover Computer: A Modern Z8000 CP/M Machine”

Why Didn’t We Think Of Making A Remote Trigger Button?

One of the many functions a digital oscilloscope offers over its analog ancestors is a trigger button. Alongside the usual electronic means of triggering the instrument, you can reach over and press a button to “freeze-frame” the action and preserve the trace. Sometimes doing it repeatedly it can become a chore to reach for the ‘scope. That’s where [Kevin Santo Cappuccio]’s remote trigger button comes in.

The button itself is about as simple a hack as it gets. The ‘scope was carefully dissected and some fine wires laid from the contacts within the front panel to a connector on the case. From there a cable goes to a box with a momentary action button switch. Plug in the box, and you can trigger the ‘scope from a distance!

We have to admit to rather admiring this hack, as needing to trigger the ‘scope is a well-known problem here. It’s easy to stab the wrong button and lose what you are looking for, so we’re rather surprised we didn’t think of this one ourselves. But then again from another viewpoint, it involves dissecting an expensive instrument which is best left unmolested. Perhaps manufacturers should consider adding this functionality.

This may be the most straightforward oscilloscope hack we’ve shown you, but it’s certainly not the first.