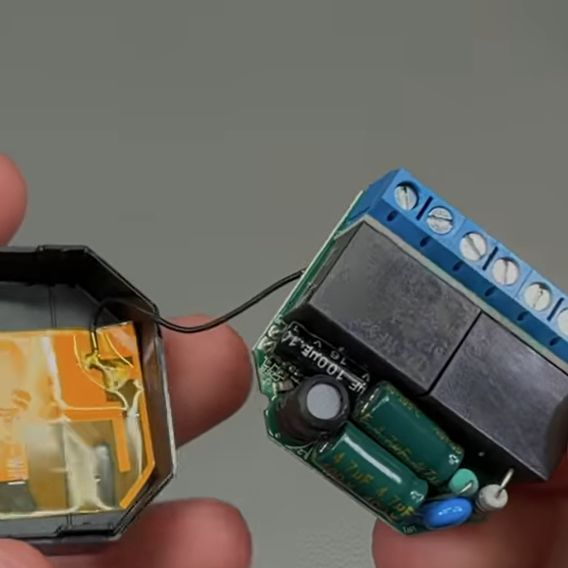
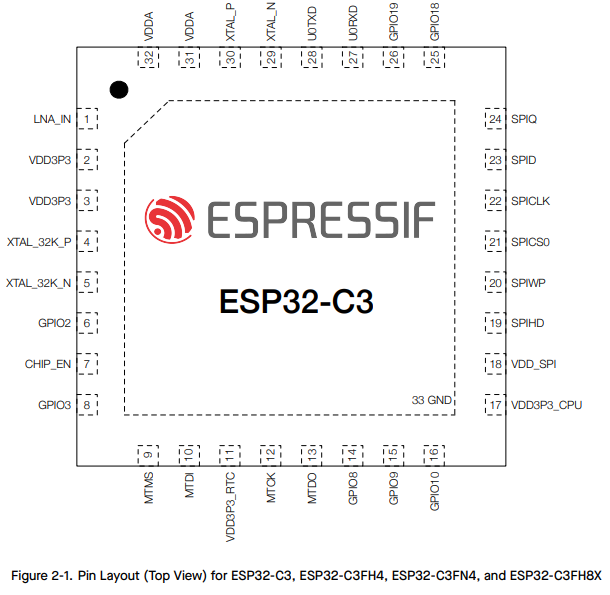
Using The Wind And Magnets To Make Heat

On the face of it, harnessing wind power to heat your house seems easy. In fact some of you might be doing it already, assuming you’ve got a wind farm somewhere on your local grid and you have an electric heat pump or — shudder — resistive heaters. But what if you want to skip the middleman and draw heat directly from the wind? In that case, wind-powered induction heating might be just what you need.

Granted, [Tim] from the Way Out West Blog is a long way from heating his home with a windmill. Last we checked, he didn’t even have a windmill built yet; this project is still very much in the experimental phase. But it pays to think ahead, and with goals of simplicity and affordability in mind, [Tim] built a prototype mechanical induction heater. His design is conceptually similar to an induction cooktop, where alternating magnetic fields create eddy currents that heat metal cookware. But rather than using alternating currents through large inductors, [Tim] put 40 neodymium magnets with alternating polarity around the circumference of a large MDF disk. When driven by a drill press via some of the sketchiest pullies we’ve seen, the magnets create a rapidly flipping magnetic field. To test this setup, [Tim] used a scrap of copper pipe with a bit of water inside. Holding it over the magnets as they whiz by rapidly heats the water; when driven at 1,000 rpm, the water boiled in about 90 seconds. Check it out in the video below.

It’s a proof of concept only, of course, but this experiment shows that a spinning disc of magnets can create heat directly. Optimizing this should prove interesting. One thing we’d suggest is switching from a disc to a cylinder with magnets placed in a Halbach array to direct as much of the magnetic field into the interior as possible, with coils of copper tubing placed there.
Continue reading “Using The Wind And Magnets To Make Heat”

One-handed PS-OHK Keyboard Doesn’t Need Chording Or Modifier Keys

Most one-handed keyboards rely on modifier keys or chording (pressing multiple keys in patterns) to stretch the functionality of a single hand’s worth of buttons. [Dylan Turner]’s PS-OHK takes an entirely different approach, instead putting 75 individual keys within reach of a single hand, with a layout designed to be practical as well as easy to get used to.

We can’t help but notice Backspace isn’t obvious in the prototype, but it’s also a work in progress.

The main use case of the PS-OHK is for one hand to comfortably rest at the keyboard while the other hand manipulates a mouse in equal comfort. There is a full complement of familiar special keys (Home, End, Insert, Delete, PgUp, PgDn) as well as function keys F1 to F12 which helps keep things familiar.

As for the rest of the layout, we like the way that [Dylan] clearly aimed to maintain some of the spatial relationship of  “landmark” keys such as ESC, which is positioned at the top-left corner of its group. Similarly, arrow keys are grouped together in the expected pattern.

One-handed keyboards usually rely on modifier keys or multi-key chording and it’s interesting to see work put into a different approach that doesn’t require memorizing strange layouts or input patterns.

Want to make your own? The GitHub repository has everything you need. Accommodating the 75 physical keys requires a large PCB, but it’s a fairly straightforward shape and doesn’t have any oddball manufacturing requirements, which means getting it made should be a snap.

How The CD-ROM Lost The Multimedia Dream To The Internet

High-tech movie guides on CD-ROM; clearly the future had arrived in 1994.

In the innocent days of the early 90s the future of personal computing still seemed to be wide open, with pundits making various statements regarding tis potential trajectories. To many, the internet and especially the World Wide Web didn’t seem to be of any major significance, as it didn’t have the reach or bandwidth for the Hot New Thingtm in the world of PCs: multimedia. Enter the CD-ROM, which since its introduction in 1985 had brought the tantalizing feature of seemingly near-infinite storage within reach, and became cheap enough for many in the early 90s. In a recent article by [Harry McCracken] he reflects on this era, and how before long it became clear that it was merely a bubble.

Of course, there was a lot of good in CD-ROMs, especially when considering having access to something like Encarta before Wikipedia and broadband internet was a thing. It also enabled software titles to be distributed without the restrictions of floppy disks. We fondly remember installing Windows 95 (without Internet Explorer) off 13 1.44 MB floppies, followed by a few buckets of Microsoft Office floppies. All pray to the computer gods for no sudden unreadable floppy.

Inevitably, there was a lot of shovelware on CD-ROMs, and after the usefulness of getting free AOL floppies (which you could rewrite), the read-only CD-ROMs you got in every magazine and spam mailing were a big disappointment. Although CD-ROMs and DVDs still serve a purpose today, it’s clear that along with the collapse of the Internet Bubble of the late 90s, early 2000s, optical media has found a much happier place. It’s still hard to beat the sheer value of using CD-R(W)s and DVD-/+R(W)s (and BD-Rs) for offline backups, even if for games and multimedia they do not appear to be relevant any more.

If you’re interested in another depiction of this period, it’s somewhere we’ve been before.

A PCB business card that plays tic-tac-toe with red and blue LEDs.

2024 Business Card Challenge: Go Tic-Tac-Toe-to-Toe With Them

There is perhaps no more important time to have a business card than when you’re in college, especially near the end when you’re applying for internships and such. And it’s vital that you stand out from the crowd somehow. To that end, Electrical & Computer Engineer [Ryan Chan] designed a tidy card that plays tic-tac-toe.

Instead of X and O, the players are indicated by blue and red LEDs. Rather than having a button at every position, there is one big control button that gets pressed repeatedly until your LED is in the desired position, and then you press and hold to set it and switch control to the other player. In addition to two-player mode, the recipient of your card can also play alone against the ATMega.

The brains of this operation is an ATMega328P-AU with the Arduino UNO bootloader for ease of programming. Schematic and code are available if you want to make your own, but we suggest implementing some type of changes to make it your own. Speaking of, [Ryan]  has several next steps in mind, including charlieplexing the LEDs, using either USB-C or a coin cell for power, upgrading the AI, and replacing the control button with a capacitive pad or two. Be sure to check it out in action in the two videos after the break.

Continue reading “2024 Business Card Challenge: Go Tic-Tac-Toe-to-Toe With Them”

An Easy Transparent Edge Lit Display

Displays are crucial to modern life; they are literally everywhere. But modern flat-panel LCDs and cheap 7-segment LED displays are, well, a bit boring. When we hackers want to display the progress of time, we want something more interesting, hence the plethora of projects using Nixie tubes and various incantations of edge-lit segmented units. Here is [upir] with their take on the simple edge-lit acrylic 7-segment design, with a great video explanation of all the steps involved.

Engraving the acrylic sheets by hand using 3D printed stencils

The idea behind this concept is not new. Older displays of this type used tiny tungsten filament bulbs and complex light paths to direct light to the front of the display. The modern version, however, uses edge-lit panels with a grid of small LEDs beneath each segment, which are concealed within a casing. This design relies on the principle of total internal reflection, created by the contrast in refractive indices of acrylic and air. Light entering the panel from below at an angle greater than 42 degrees from normal is entirely reflected inside the panel. Fortunately, tiny LEDs have a wide dispersion angle, so if they are positioned close enough to the edge, they can guide sufficient light into the panel. Once this setup is in place, the surface can be etched or engraved using a CNC machine or a laser cutter. A rough surface texture is vital for this process, as it disrupts some of the light paths, scattering and directing some of it sideways to the viewer. Finally, to create your display, design enough parallel-stacked sheets for each segment of the display—seven in this case, but you could add more, such as an eighth for a decimal point.

How you arrange your lighting is up to you, but [upir] uses an off-the-shelf ESP32-S3 addressable LED array. This design has a few shortcomings, but it is a great start—if a little overkill for a single digit! Using some straightforward Arduino code, one display row is set to white to guide light into a single-segment sheet. To form a complete digital, you illuminate the appropriate combination of sheets. To engrave the sheets, [upir] wanted to use a laser cutter but was put off by the cost. A CNC 3018 was considered, but the choice was bewildering, so they just went with a hand-engraving pick, using a couple of 3D printed stencils as a guide. A sheet holder and light masking arrangement were created in Fusion 360, which was extended into a box to enclose the LED array, which could then be 3D printed.

If you fancy an edge-lit clock (you know you do) check out this one. If wearables are more your thing, there’s also this one. Finally, etched acrylic isn’t anywhere near as good as glass, so if you’ve got a vinyl cutter to hand, this simple method is an option.

Continue reading “An Easy Transparent Edge Lit Display”

Build Your Own Core Rope Memory Module?

[Luizão] wanted to create some hardware to honour the memory of the technology used to put man on the moon and chose the literal core of the project, that of the hardware used to store the software that provided the guidance. We’re talking about the magnetic core rope memory used in the Colossus and Luminary guidance computers. [Luizão] didn’t go totally all out and make a direct copy but instead produced a scaled-down but supersized demo board with just eight cores, each with twelve addressable lines, producing a memory with 96 bits.

The components chosen are all big honking through-hole parts, reminiscent of those available at the time, nicely laid out in an educational context. You could easily show someone how to re-code the memory with only a screwdriver to hand; no microscope is required for this memory. The board was designed in EasyEDA, and is about as simple as possible. Being an AC system, this operates in a continuous wave fashion rather than a pulsed operation mode, as a practical memory would. A clock input drives a large buffer transistor, which pushes current through one of the address wires via a 12-way rotary switch. The cores then act as transformers. If the address wire passes through the core, the signal is passed to the secondary coil, which feeds a simple rectifying amplifier and lights the corresponding LED. Eight such circuits operate in parallel, one per bit. Extending this would be easy.

Continue reading “Build Your Own Core Rope Memory Module?”

Inside NFC

[Ken Shirriff] likes to take chips apart and this time his target is an NFC chip used in Montreal transit system tickets. As you might expect, the tickets are tiny, cheap, and don’t have any batteries. So how does it work?

The chip itself is tiny at 570 µm × 485 µm. [Ken] compares it to a grain of salt. The ticket has a thin plastic core with a comparatively giant antenna onboard.

Continue reading “Inside NFC”