Modern tech is great, but we have to admit that we sometimes miss when electronic things looked complicated. A modern computer looks dull compared to, say, an IBM 360. Control rooms now look no different than a stock trading room, instead of being full of indicators, knobs, and buzzers. [BorisDigital] must have some of those same feelings. He built a very cool control panel for his Home Assistant setup. He based it somewhat on a jet cockpit and a little on a nuclear plant control room, and the result, as you can see in the video below, is great.
This is less of a how-to video and more of an inspirational one. After all, you won’t have the same setup, but there are many details about how it was constructed with a Raspberry Pi, 3D printing, and control of the Home Assistant via web services.
Iron Man was the film that kicked off the Marvel craze, and is widely regarded to be better than a lot of the movies that followed. If you’re a big fan of the OG, you’re probably already drowning in Iron Man helmets and arc reactor doo-dads, but here’s one more for you. After all, you probably don’t have an arc reactor clock yet.
The build comes to us from [jerome95]. It starts with an off-the-shelf ring of addressable LEDs, which serves as the basic defining dimension for the project. The ring gets a 3D printed support structure and some non-functional copper coils to complete the basic “arc reactor” look. Inside the center sits a small 7-segment display which displays the time under the command of an ESP32. It uses a network time server so it’s always on the dot. Meanwhile, if you’re not a fan of the 7-segment version, you can always try the OLED variant of the build instead.
It’s not a complicated build; that could have been easily achieved, though. The builder could have displayed the time by making the LEDs flash different colors, instead of using a 7-segment display. However, that would have made a far more confounding clock. As it is, this design would make an excellent gift for any Marvel fan. Particularly those that acknowledge the supremacy of the film that started it all.
The host of problems to deal with when you’re feeling the need for FDM speed are many and varied, but high on the list is figuring out how to melt filament fast enough to accommodate high flow rates. Plus, the filament must be melted completely; a melty outside and a crunchy inside might be good for snacks, but not for 3D printing. Luckily, budget-minded hobbyists can build a drop-in booster to increase volumetric flow using only basic tools and materials.
[aamott]’s booster, which started life as a copper screw, is designed to replace the standard spacer in an extruder, with a bore that narrows as the filament gets closer to the nozzle to ensure that the core of the filament melts completely. Rather than a lathe, [aamott]’s main tool is a drill press, which he used to drill a 0.7 mm bore through the screw using a PCB drill bit. The hole was reamed out with a 10° CNC engraving bit, generating the required taper. After cutting off the head of the screw and cleaning up the faces, he cut radial slots into the body of the booster by threading the blade of a jeweler’s saw into the bore. The result was a bore wide enough to accept the filament on one end, narrowing to a (roughly) cross-shaped profile at the other.
Stacked up with a couple of knock-off Bondtech CHT nozzles, the effect of the booster was impressive — a 50% increase in flow rate. It’s not bad for a prototype made with simple tools, and it looks a little easier to build than [Stefan]’s take on the same idea.
As practical SD cards are, they lack much of what made floppy disks and cartridges so awesome: room for art and a list of contents, as well as the ability to not be lost in shaggy carpet or down a pet’s gullet. In a fit of righteous nostalgia, [Abe] decided that he’d turn SD cards into cartridges in the best way possible, and amazingly managed to not only finish the project after two years, but also make it look snazzy enough to have come straight out of the 1980s. The resulting cartridges come both with fixed (256 MB) and removable micro SD card storage, which are mounted on a PCB that passively connects to pogo pins in the custom, 3D printed reader.
Front of an SD-card-turned-cartridge with and without decal. (Credit: Abe’s Projects, YouTube)
The inspiration for this project kicked in while [Abe] was working on a floppy drive conversion project called the Floppy8, which crammed an MCU into an external floppy drive along with a rough version of these SD card-based cartridges that used the physical card’s edge connector to connect with a micro SD slot inside the converted floppy drive. The problem with this setup was that alignment was terrible, and micro SD cards would break, along with a range of other quality of life issues.
Next, the SD card was put into a slot on the carrier PCB that featured its own edge connector. This improved matters, but the overly complicated (moving) read head in the reader turned out to be very unreliable, in addition to FDM printed parts having general tolerance and durability issues. Eventually a simplified design which takes these limitations in mind was created that so far seems to work just fine.
Although SD cards in cartridges are not a new idea, using them purely as a data carrier is far less common. One could argue about the practicality of turning a fingernail-sized micro SD card into something much larger, but in terms of aesthetics and handleability it definitely gets an A+.
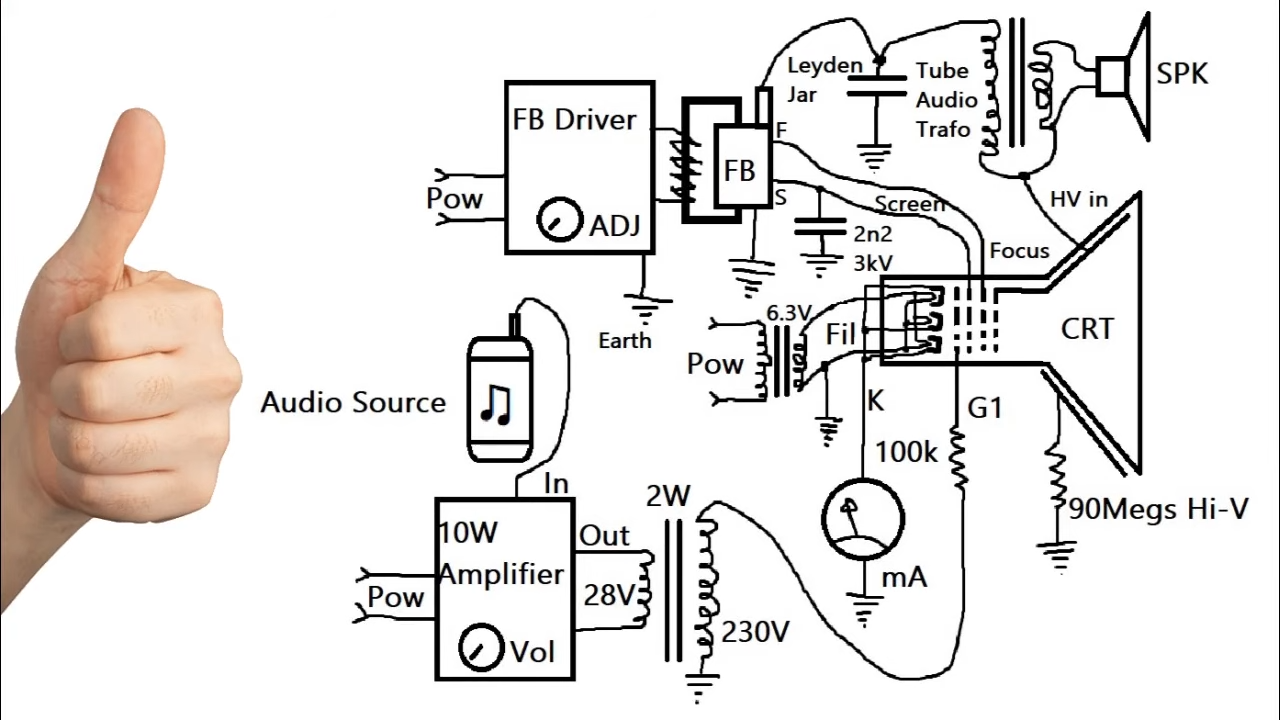
When we talk about audio amplifier tubes, we’re normally talking about the glass little blobby things you might find in a guitar amplifier. We’re not normally talking about big ol’ color CRTs, but apparently they can do the job too. That’s what [Termadnator] is here to show us.
The CRT in question is a 14″ unit from a common garden variety Philips color TV. [Termadnator] pulled out the TV’s original circuitry, and replaced much of it with his own. He had to whip up a high-voltage power supply with a 555 and a laptop power supply, along with a bunch of fake MOSFETs pressed into service. He also had to build his own Leyden jar capacitor, too. The specifics of converting it to audio operation get a bit messy, but fear not—[Termadnator] explains the idea well, and also supplies a schematic. Perhaps the coolest thing, though, is the crazy color pattern that appears on the display when it’s working as an amp.
Sound output isn’t exactly loud, and it’s a little distorted, too. Still, it’s amusing to see an entire TV instead doing the job of a single amplifier tube. Video after the break.
Although commonly referred to as a ‘timer IC’, the venerable NE555 and derivatives are in fact not timer ICs. This perhaps controversial statement is the open door that gets kicked in by [PKAE Electronics] over at YouTube, as he explains with excellent diagrams and simulations how exactly these ICs work, and what it takes to make it actually do timer things. For anyone who has ever used one of these chips there is probably nothing too mind-blowing, but it’s an infinitely better way to wrap your way around an NE555 and kin than a datasheet.
At its core, the 555 contains three 5 kOhm resistors as a voltage divider, which has been incorrectly postulated to be the source of the chip’s name. This voltage divider controls two comparators, which in turn control an SR flipflop. These comparators are used for the voltage trigger and threshold inputs, which in turn toggle the flipflop, respectively setting and resetting it. This by itself just means that the 555 can be used as a threshold detector, with settable control voltage. How a 555 becomes a timer is when the discharge, trigger and threshold pins are combined with external resistors and a capacitor, which creates a smooth square wave on the 555’s output pin.
There are many ways to make basic components into an oscillator of some type, but the 555 is a great choice when you want something more refined that doesn’t involve using an entire MCU. That said, there’s far more that the 555 can be used for, as [PKAE] alludes to, and we hope that he makes more excellent videos on these applications.
We have to admit that we often think about building unusual things, but we hadn’t really considered building our own hydroelectric dam before. [Mini Construction] did, apparently, and there’s a timelapse of the build in the video below.
We wished this was more of a how-to video, although if you are handy with brickwork, the mechanical construction seems straightforward. Presumably, you’d need to understand how much force the water had but we don’t know if there was math involved or just seat-of-the-pants design.