NFC Ring Unlocks Your Phone

NFC Ring

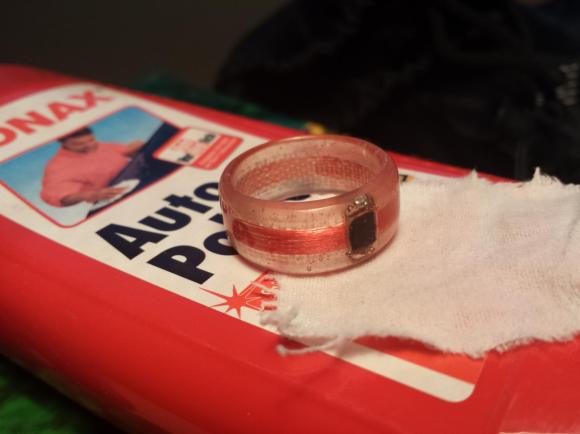
This little ring packs the guts of an NFC keyfob, allowing [Joe] to unlock his phone with a touch of his finger.

The NFC Ring was inspired by a Kickstarter project for a similar device. [Joe] backed that project, but then decided to build his own version. He took apart an NFC keyfob and desoldered the coil used for communication and power. Next, he wrapped a new coil around a tube that was matched to his ring size. With this assembly completed, epoxy was used to cast the ring shape.

After cutting the ring to size, and quite a bit of polishing, [Joe] ended up with a geeky piece of jewelry that’s actually functional. To take care of NFC unlocking, he installed NFC LockScreenOff. It uses Xposed, so a rooted Android device is required.

We’ll have to wait to see how [Joe]’s homemade solution compares to his Kickstarter ring. Until then, you can watch a quick video of unlocking a phone with the ring after the break.

Continue reading “NFC Ring Unlocks Your Phone”

Repairing Dead USB Flash Drives

Over the last few years, [Tobias] has repaired a number of USB Flash drives. This strikes us as a little odd, given small capacity Flash drives are effectively free in the form of conference handouts and swag, but we’re guessing [Tobias] has had a few too many friends lose their thesis to a broken Flash drive.

In all his repairs, [Tobias] found one thing in common The crystal responsible for communicating with the USB controller is always broken. In a way, this makes a lot of sense; everything else on a Flash drive is silicon encased in an epoxy package, where the crystal is a somewhat fragile piece of quartz. Breaking even a small part of this crystal will drastically change the frequency it resonates at making the USB controller throw a fit.

[Tobias]’ solution for all his Flash drive repairs is to desolder and change out the crystal, bringing the drive back to life. Some of the USB Flash drives even have multiple pads for different crystal packages, making it easy to kludge together a solution should you need to repair a Flash drive five minutes ago.

Trinket Contest Update #3

trinket-update-3

We’re still receiving tons of Trinket contest entries (here’s a link to the last update). After the break you’ll find another dozen that were sent in. If you’re waiting to see your own appear here please be patient as we’ve got a lot to wade through. If you haven’t sent in an offering yet you’ve got to get it in before Friday!

The contest asks you slap the Hackaday logo onto something for a chance at winning one of 20 Trinket dev boards donated by Adafruit for this contest.

Continue reading “Trinket Contest Update #3”

The Trials Of Repairing A MacBook

mac

As a favor to a friend, [Phil] traded a unibody MacBook logic board for one with a broken headphone jack, a busted keyboard controller, and a nonfunctional fan. Not one to let bad hardware go to waste, he set off to repair this now-broken laptop by scavenging parts wherever he could. The whole thing ended up working, and became a very impressive display of soldering skill in the process.

The first step for the keyboard transplant was to cut a properly sized hole in the newer unibody MacBook for an older, pre-unibody MacBook Pro 17″ keyboard. This was done by cutting out the keyboard pan of the pre-unibody case and very carefully epoxying it into the unibody chassis. The MBP had a separate keyboard and trackpad controller, so of course [Paul] needed to find some space inside the chassis for these new electronics. This space was found next to the internal hard drive, and a liberal application of hot glue held everything together.

In the future, [Phil] plans on adding more LEDs, a 3.5 mm jack, and a USB to TTL converter – a necessity for any true ‘hacker’ laptop. It’s still a wonderful piece of work, and an incredible amount of effort and skill to get it where it is today.

Homemade Bocce Balls

homemade-bocce-balls

For those unfamiliar with it, Bocce Ball is an outdoor game played with a set of heavy grapefruit-sized balls. We’ve never really thought of making our own set, but as you can see above, it can be done. These are six Bocce balls produced at home by [Horvitz444].

It seems the commercially available balls have a cement or clay core covered in a layer of high-impact epoxy. [Horvitz444] was able to recreate this starting with some vacuum forming. He built his own former out of peg board and a shop vac. The plastic stock he used was a light panel from the home store. After heating it up in the oven he formed a mold using what looks like two halves of Bocce balls. The mold halves were melted together using a soldering iron. After pouring in the secret concoction of cement ingredients and letting them harden, he removed the orbs from the molds and ground down the seams until smooth. They were covered in epoxy and painted. Most of these details were gleaned from his comments in the Reddit thread.

Turning A 600 Mil Chip To 300 Mil

We’ve seen a few builds featuring NXP’s LPC1114 microcontroller before. This chip – the only breadboard friendly ARM microcontroller available – comes in a ‘still a little too large for prototyping’ 600 mil, 28 pin package. We won’t hazard a guess why NXP chose this rather large package, but the good news is it’s possible to shave this chip down to the more common 300 mil, 28-pin package used by AVRs and PICs.

In the video tutorial of this procedure, the chip is first taped down to a desktop CNC mill. 150 mil on each side of the die are removed, exposing the very cool-looking pattern of leads coming out of the chip. This isn’t enough area to solder, so the chip had to be further milled to expose some of the internal wiring.

After soldering everything to a set of pins, the new 300 mil package is covered in epoxy putty, milled down again into a nice cube shape and painted. Yes, the modified chip does work, and no, we can’t figure out why NXP chose a 600 mil package for this microcontroller over the far more common 300 mil chip.

Video after the break. Tip ‘o the hat to [Ian] for sending this one in.

Continue reading “Turning A 600 Mil Chip To 300 Mil”

Spring Clamp Tripod Mount Has Potential

Admittedly this post is flirting with flamebait, but we think the concept of using a spring clamp as an iPhone tripod mount has a lot of hacking potential. Hear us out, and if we havn’t made our case you can rant about it in the comments.

[Joe] wanted an easy way to mount his iPhone on a standard tripod. We’ve seen some creative solutions for this, like using Sugru to make a removable bracket. But he went a different route, using a cheap spring clamp to grip the phone body. These plastic clamps are like over-powered clothespins, and use a screw as the pivot point. [Joe] replaced the stock screw with a longer one, then used a coupling nut which will attach to the tripod. A bit of foam on the pads of the clamp protect your device from the plastic teeth.

It’s a fine solution (if you don’t mind putting that pressure on your smart phone). But we think this would be a great way to build your own heavy-duty third hand. It would be right at home with this modular solder platform. See [Joe’s] how-to video embedded after the break.

Continue reading “Spring Clamp Tripod Mount Has Potential”