Why 56k Modems Relied On Digital Phone Lines You Didn’t Know We Had

If you came of age in the 1990s, you’ll remember the unmistakable auditory handshake of an analog modem negotiating its connection via the plain old telephone system. That cacophony of screeches and hisses was the result of careful engineering. They allowed digital data to travel down phone lines that were only ever built to carry audio—and pretty crummy audio, at that.

Speeds crept up over the years, eventually reaching 33.6 kbps—thought to be the practical limit for audio modems running over the telephone network. Yet, hindsight tells us that 56k modems eventually became the norm! It was all thanks to some lateral thinking which made the most of the what the 1990s phone network had to offer.

Continue reading “Why 56k Modems Relied On Digital Phone Lines You Didn’t Know We Had”

The Future We Never Got, Running A Future We Got

If you’re familiar with Java here in 2025, the programming language you know is a world away from what Sun Microsystems planned for it in the mid-1990s. Back then it was key to a bright coffee-themed future of write-once-run-anywhere software, and aside from your web browser using it to run applications, your computer would be a diskless workstation running Java bytecode natively on the silicon.

What we got was slow and disappointing Java applets in web pages, and a line of cut-down SPARC-based JavaStations which did nothing to change the world. [FatSquirrel] has one of these machines, and a quarter century later, has it running NetBSD. It’s an interesting journey both into 1990s tech, and some modern-day networking tricks to make it happen.

These machines suffer as might be expected, from exhausted memory backup batteries. Fortunately once the serial port has been figured out they drop you into an OpenBoot prompt, which, in common with Apple machines in the ’90s, gives you a Forth interpreter. There’s enough info online to load the NVRAM with a config, and the machine stuttered into life. To do anything useful takes a network with RARP and NFS to serve an IP address and disk image respectively, which a modern Linux machine is quite happy to do. The resulting NetBSD machine maybe isn’t as useful as it could be, but at risk of angering any Java enthusiasts, perhaps it’s more useful than the original JavaOS.

We remember the promise of a Java-based future too, and tasted the bitter disappointment of stuttering Java applets in our web pages. However, given that so much of what we use now quietly runs Java in the background without our noticing it, perhaps the shade of Sun Microsystems had the last laugh after all. This isn’t the first ’90s machine that’s been taught new tricks here, some of them have received Java for the first time.

Closeup of a rackmounted custom HiFi setup

Rackmount All The Things, Hi-Fi Edition

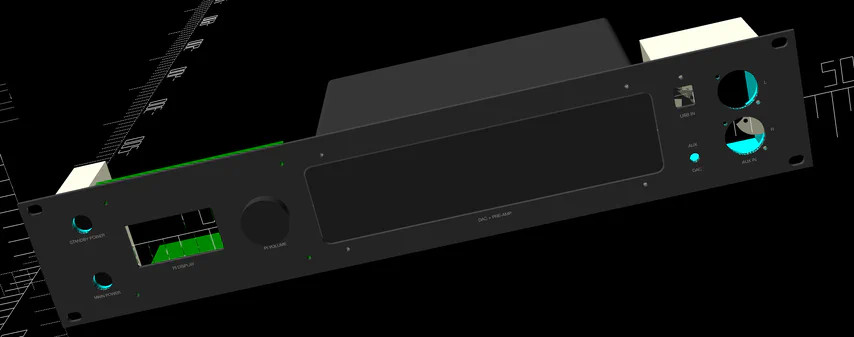
For those who love systems and structure, owning a 19-inch rack with just one slot filled is just not it. But what if the rest of your gear isn’t 19-inch? Well, then you go out and make it so, just like [Cal Bryant] did recently.

The goal was to consolidate multiple devices — DAC, input selector, streamer, and power routing — into a single 2U rackmount unit. His first attempts involved drilling 1U panels to attach gear with removable faceplates. That worked, but not all devices played nice. So his next step became a fully custom enclosure with CAD-modeled brackets and front panels.

OpenSCAD turned out to be a lifesaver, letting [Cal] design modular mounting solutions. Exporting proper circles for CNC turret punching however appeared to be a nightmare. It was FreeCAD to the rescue for post-processing. After some sanding and auto-shop painting, the final faceplate looked factory-made.

Custom switch boxes for power and audio routing keep things tidy, housing everything from USB to XLR inputs. A 4-pole switch even allows seamless swapping between his DAC and DJ controller, while UV-printed graphics bring the finishing touch to this project. For those looking to clean up their Hi-Fi setup (or just love modding for the sake of it), there’s a lot to learn from this build.

If buying a rack is not within your budget, you could start with well-known IKEA LACK furniture.

A TV With Contrast You Haven’t Seen For Years

It’s something of a surprise, should you own a CRT TV to go with your retrocomputers, when you use it to view a film or a TV show. The resolution may be old-fashioned, but the colors jump out at you, in a way you’d forgotten CRTs could do. You’re seeing black levels that LCD screens can’t match, and which you’ll only find comparable on a modern OLED TVs. Can an LCD screen achieve decent black levels? [DIY Perks] is here with a modified screen that does just that.

LCD screens work by placing a set of electronic polarizing filters in front of a bright light. Bright pixels let through the light, while black pixels, well, they do their best, but a bit of light gets through. As a result, they have washed-out blacks, and their images aren’t as crisp and high contrast as they should be. More modern LCDs use an array of LEDs as the backlight which they illuminate as a low resolution version of the image, an approach which improves matters but leaves a “halo” round bright spots.

The TV in the video below the break is an older LCD set, from which he removes the backlight and places the electronics in a stand. He can show an image on it by placing a lamp behind it, but he does something much cleverer. An old DLP projector with its color wheel removed projects a high-res luminance map onto the back of the screen, resulting in the coveted high contrast image. The final result uses a somewhat unwieldy mirror arrangement to shorten the distance for the projector, but we love this hack. It’s not the first backlight hack we’ve seen, but perhaps it give the best result.

Continue reading “A TV With Contrast You Haven’t Seen For Years”

Ptychography For High Resolution Microscopy

Nowadays, if you have a microscope, you probably have a camera of some sort attached. [Applied Science] shows how you can add an array of tiny LEDs and some compute power to produce high-resolution images — higher than you can get with the microscope on its own. The idea is to illuminate each LED in the array individually and take a picture. Then, an algorithm constructs a higher-resolution image from the collected images. You can see the results and an explanation in the video below.

You’d think you could use this to enhance a cheap microscope, but the truth is you need a high-quality microscope to start with. In addition, color cameras may not be usable, so you may have to find or create a monochrome camera.

Continue reading “Ptychography For High Resolution Microscopy”

A 3D-printed, hand-cranked, toy conveyor belt designed after the transporter belts in Factorio.

Designing A Toy Conveyor Belt For Fun And Profit

[Hope This Works] wants to someday build a tiny factory line in the garage, with the intent of producing some simple widget down the line. But what is a tiny factory without tiny conveyor belts? Not a very productive one, that’s for sure.

As you may have noticed, this is designed after the transporter belts from the game Factorio. [Hope This Works] ultimately wants something functional that’s small enough to fit in one hand and has that transporter belt aesthetic going. He also saw this as a way to level up his CAD skills from approximately 1, and as you’ll see in the comprehensive video after the break, that definitely happened.

And so [Hope This Works] started by designing the all-important sprockets. He found a little eight-toothed number on McMaster-Carr and used the drawing for reference. From there, he designed the rest of the parts around the sprockets, adding a base so that it can sit on the desk or be held in the hand.

For now, this proof-of-concept is hand-cranked. We especially love that [Hope This Works] included a square hole for the crank handle to stand in when not in use. Be sure to check out the design/build video after the break to see it in action.

How happy would you be to see Factorio come up in a job interview?

Continue reading “Designing A Toy Conveyor Belt For Fun And Profit”

Piggyback Board Brings Touch Sensing To USB Soldering Iron

The current generation of USB-powered soldering irons have a lot going for them, chief among them being portability and automatic start and stop. But an iron that turns off in the middle of soldering a joint is a problem, one that this capacitive-touch replacement control module aims to fix.

The iron in question is an SJ1 from Awgem, which [DoganM95] picked up on Ali Express. It seems well-built, with a sturdy aluminum handle, a nice OLED display, and fast heat-up and cool-down. The problem is that the iron is triggered by motion, so if you leave it still for more than a second or two, such as when you’re soldering a big joint, it turns itself off. To fix that,[DoganM95] designed a piggyback board for the OEM controller with a TTP223 capacitive touch sensor. The board is carefully shaped to allow clearance for the existing PCB components and the heater cartridge terminals, and has castellated connections so it can connect to pads on the main board. You have to remove one MOSFET from the main board, but that’s about it for modifications. A nickel strip makes contact with the inside of the iron’s shell, turning it into the sensor plate for the TTP223.

[DoganM95] says that the BA6 variant of the chip is the one you want, as others have a 10-second timeout, which would defeat the purpose of the mod. It’s a very nice bit of design work, and we especially like how the mod board nests so nicely onto the OEM controller. It reminds us a little of those Quansheng handy-talkie all-band mods.