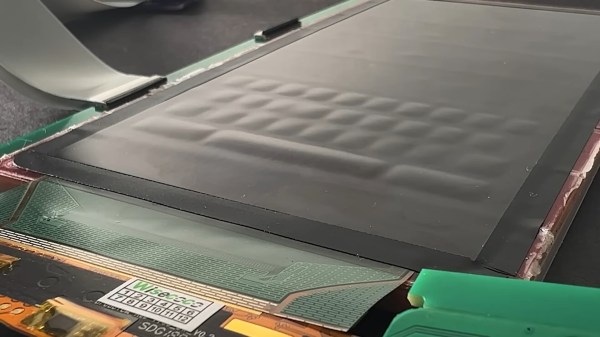
An image of a powered-off device screen. Part of the screen is raised in the configuration of a mobile keyboard. A ribbon cable extends from the left of a PCB underneath the screen and the PCB extends below the bottom edge of the screen with a sticker that has a stylized manufacturer logo that may read "Wisecoco."

Electroosmotic Haptics For More Tactile Touch Devices

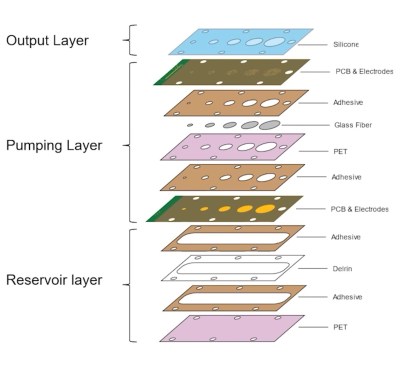
If you’re like us, one of the appeals of retro tech is the tactile feedback you get from real buttons. Researchers at Carnegie Mellon have developed a new method for bringing haptic feedback to touchscreen devices.Labeled exploded view of the device stackup. The individual layers from top (output) to bottom (reservoir) are labeled Silicone, PCB & Electrodes, Adhesive, Glass Fiber, PET, Adhesive, PCB & Electrodes, Adhesive, Delrin, Adhesive, and PET. It also shows the different parts as sections of Output Layer (silicone), Pumping Layer, and Reservoir Layer (Adhesive, Delrin, Adhesive, PET).

Using an array of miniaturized electroosmotic pumps, the current prototype devices offer 5 mm of displacement from a 5 mm stackup which is a significant improvement over previous technologies which required a lot more hardware than the displacement provided. When placed under a flexible screen, notifications and other user interactions like the keyboard can raise and lower as desired.

Each layer is processed by laser before assembly and the finished device is self-contained, needing only electrical connections. No need for a series of tubes carrying fluid to make it work. Interaction surfaces have been able to scale from 2-10 mm in diameter with the current work, but do appear to be fixed based on the video (below the break).

You might find applications for haptics in VR or want to build your own Haptic Smart Knob.

Continue reading “Electroosmotic Haptics For More Tactile Touch Devices”

Tactile Feedback In VR, No Cumbersome Gloves Or Motors Required

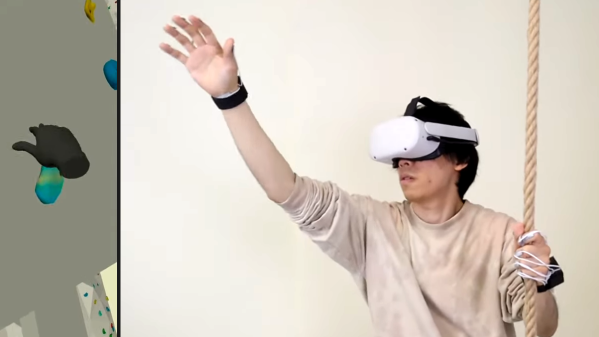
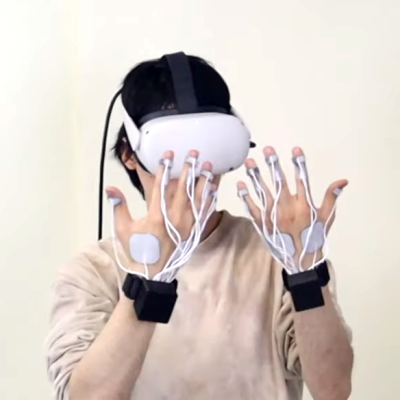
This clever research from the University of Chicago’s Human Computer Integration Lab demonstrates a fascinating way to let users “feel” objects in VR, without anything getting in the way of using one’s hands and fingers normally. Certainly, the picture here shows hands with a device attached to them, but look closely and you’ll see that it’s on the back of the hand only.

There’s hardware attached to the hands, yes, but only to the backs. Hands and fingers can be used entirely normally while receiving tactile feedback.

The unique device consists of a control box, wires, and some electrodes attached to different spots on the back of the hand and fingers. Carefully modulated electrical signals create tactile sensations on the front, despite originating from electrodes on the back. While this has clear applications for VR, the team thinks the concept could also have applications in rehabilitation, or prosthetics.

Continue reading “Tactile Feedback In VR, No Cumbersome Gloves Or Motors Required”

Learn To Play Guitar, Digitally

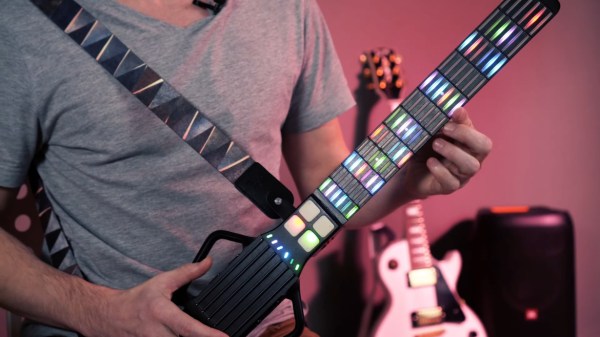
Learning to play a musical instrument takes a major time commitment. If you happened to be stuck inside your home at any point in the last two years, though, you may have had the opportunity that [Dmitriy] had to pick up a guitar and learn to play. Rather than stick with a traditional guitar, though, [Dmitriy] opted to build his own digital guitar which is packed with all kinds of features you won’t find in any Fender or Gibson.

The physical body of this unique instrument is entirely designed by [Dmitriy] out of 3D printed parts, and uses capacitive touch sensors for each of the notes on what would have been the guitar’s fretboard. The strings are also replaced with a set of six switches that can be strummed like a regular guitar, and are used to register when to play a note. After a few prototypes, everything was wired onto a custom PCB. The software side of this project is impressive as well; it involved creating custom firmware to register all of the button presses and transmit the information to a MIDI controller so that the guitar can communicate digitally with anything that supports MIDI.

To finish off the project, [Dmitriy] also added a wireless device as well as some other bonus features like an accelerometer, which can be used to augment the sound of the guitar in any way he can think of to program them. It’s one of the most innovative guitars we’ve seen since the prototype Noli smart guitar was unveiled last year, and this one is also on its way from prototype to market right now.

Continue reading “Learn To Play Guitar, Digitally”

Guitar Pickguard Adds MIDI Capabilities

For a standard that has been in use since the 1980s, MIDI is still one of the most dominant forces on the musical scene even today. It’s fast, flexible, and offers a standard recognized industry-wide over many different types of electronic instruments. Even things which aren’t instruments can be turned into musical devices like the infamous banana keyboard via the magic of MIDI, and it also allows augmentation of standard instruments with other capabilities like this guitar with a MIDI interface built into the pick guard.

[Ezra] is the creator of this unique musical instrument which adds quite a few capabilities to his guitar. The setup is fairly straightforward: twelve wires run to the pick guard which are set up as capacitive sensors and correspond with a note on the chromatic scale. Instead of using touchpads, using wires allows him to bend away the “notes” that he doesn’t need for any particular piece of music. The wires are tied back to an Adafruit Feather 32u4 microcontroller behind the neck of the guitar which also has a few selectors for changing the way that the device creates tones. He can set the interface to emit single notes or continuously play notes, change the style, can change their octave, and plenty of other features as well.

One of the goals of this project was to increase a guitar player’s versatility when doing live performances, and we would have to agree that this gives a musician a much wider range of abilities without otherwise needing a lot of complex or expensive equipment on stage. We’ve seen a few other MIDI-based builds focused on live performances lately, too, like this one which allows a band to stay in sync with each other.

Continue reading “Guitar Pickguard Adds MIDI Capabilities”

Haptics Hack Chat With Nanoport Technology

Join us on Wednesday, April 7 at noon Pacific for the Haptics Hack Chat with Tim Szeto and Kyle Skippon!

Of all our senses, the sense of touch is perhaps the most underappreciated. We understand and accept the tragedy that attends loss of vision or hearing, and the impact on the quality of life resulting from olfactory and gustatory sensations can be severe. But for some reason, we don’t give a second thought to our sense of touch, which is indeed strange given that we are literally covered with touch sensors. That’s a bit of a shame, since touch can reveal so much about the world around us, and our emotional well-being is so tightly tied to the tactile senses that those deprived of it in infancy can be scarred for life.

Haptics is the technology of tactile feedback, which seeks to leverage the human need for tactile experiences to enrich the experience of dealing with the technological world. Haptic feedback devices are everywhere now, and have gone far beyond the simple off-balance motor used since the days when a pager was a status symbol. To help us sort out what’s new in the haptics world, Tim and Kyle from Nanoport Technology will stop by the Hack Chat. Nanoport is a company on the cutting edge of haptics, so they’ll have a wealth of details about what haptics are, where the field is going, and how you can start thinking about making touch a part of your projects.

join-hack-chatOur Hack Chats are live community events in the Hackaday.io Hack Chat group messaging. This week we’ll be sitting down on Wednesday, April 7 at 12:00 PM Pacific time. If time zones have you tied up, we have a handy time zone converter.

Click that speech bubble to the right, and you’ll be taken directly to the Hack Chat group on Hackaday.io. You don’t have to wait until Wednesday; join whenever you want and you can see what the community is talking about.
Continue reading “Haptics Hack Chat With Nanoport Technology”

Control A Motor With A Touchpad

There are a surprising wealth of parts inside of old laptops that can be easily scavenged, but often these proprietary tidbits of electronics will need a substantial amount of work to make them useful again. Obviously things such as hard drives and memory can easily be used again, but it’s also possible to get things like screens or batteries to work with other devices with some effort. Now, there’s also a way to reuse the trackpad as well.

This build uses a PS/2 touchpad with a Synaptics chip in it, which integrates pretty smoothly with an Arduino after a few pins on the touchpad are soldered to. Most of the work is done on the touchpad’s built in chip, so once the Arduino receives the input from the touchpad it’s free to do virtually anything with it. In this case, [Kushagra] used it to operate a stepper motor in a few different implementations.

If you have this type of touchpad lying around, all of the code and schematics to make it useful again are available on the project page. An old laptop in the parts bin is sure to have a lot of uses even after you take the screen off, but don’t forget that your old beige PS/2 mouse from 1995 is sure to have some uses like this as well.

Continue reading “Control A Motor With A Touchpad”

DIY Piano: Look, Ma, No Moving Parts

[Michael Sobolak] has a penchant for pianos, concern for capacitive touch, and special sentiment for solid state. This alliterate recipe results in a DIY PCB piano that leaves out the levers and is barren of buttons unless you count the stock RESET button on the Teensy. A real stickler might point out that speakers have moving cones. Beyond these tangential parts, which have motionless options, it is an electronic instrument with no moving parts.

The heart of the project is a Teensy 3.2 which natively supports twelve capacitive touch sensors. The infamous demo board is mounted to a homemade PCB featuring twelve keys but is actually an incomplete octave plus another key one octave above the first. If you look sharp, you already noticed the missing and extra touchpads. PCB traces were made in Illustrator because if you have a familiar tool, you use what you know and you cannot argue that it works. The design was transferred to a copper board using the old magazine page trick that we love and reliable old ferric acid.

We couldn’t help but notice that the posts of the Teensy were soldered to the top of the board, rather than drilling through, IMT-style. Again, the results speak, even if there is room for improvement. Reportedly, there is a second version on the way which includes every expected key.

Continue reading “DIY Piano: Look, Ma, No Moving Parts”