‘Tiny Wake-Up Light Is Hugely Bright

Let’s face it — waking up is rough no matter what time of year it is. But the darkness of fall and winter makes it so much worse. In the past, [Maarten] has used music with increasing volume, but depending on the setup, it can be dodgy if you want to hear a different song each day and don’t have all your files volume-leveled.

Wake Up Bright is the latest in a line of wake-up widgets [Maarten] has made to help rouse them in the morning. Their write-up covers all ideas they’ve had on the subject over the years, as well as the electronics, firmware, debugging, and all the upgrades made after using it for awhile.
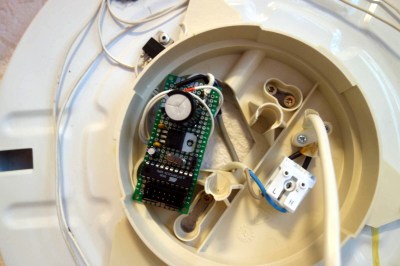
The inner workings of an AVR-based artificial sunrise.Slowly brightening an LED doesn’t have to be difficult or expensive. [Maarten] originally used an Atmel 90S2313 AVR and later upgraded to an ATtiny 2313, which was easy because the two are pin-compatible. The 2313 outputs PWM, which duty-cycles the LED to create a nice fade-in of white light that is way more gentle than that classic 1980s alarm clock buzz-beep.

Over time, this project went from one IKEA enclosure to another. We really like the newer one, which looks like it was designed for people to hack into a wake-up light.

Our eyes perceive brightness increases logarithmically, but PWM is linear. We can get around this by multiplying the PWM value by some factor every so often, but the problem is that this AVR never learned its multiplication tables. So how, then? [Maarten]’s answer is byte shifting using a 16-bit register — one byte for PWM, and the other as a scratch pad to do logarithmic math. [Maarten] multiplies the 16-bit register by 1/256 every couple of seconds, which results in a logarithmic increase of brightness. It’s calculated for a 15-minute sunrise, which required some experimentation to get right.

Whereas [Maarten] started with a 3 W RGB LED, the current version has three 10 W LEDs and uses a power supply from an old monitor. Daylight Saving Time is coming to an end in the US, and it’s gonna get worse quickly. Lucky for you, this project is completely open source down to the firmware.

You think that 1980s alarm clock buzz-beep is bad? How about some repeated slaps to the face to wake up?

Groovin’ With A Gesture-Controlled MP3 Player

Touchscreens are great, but they’re not always the perfect solution. Trying to operate one with gloves on (even alleged “touchscreen-friendly” ones) can be cumbersome at best, and if the screen is on a publicly-shared device, such as a checkout kiosk it can easily become a home for bacteria, viruses and all sorts of other nasty stuff.

That’s what [Norbert Zare] was thinking when he built his gesture-controlled MP3 player. It uses a PAJ7620U2 gesture sensor to register a few intuitive hand motions including finger twirls to control the volume, hand swipes to skip forward and backwards, and a flat hand to play and pause the song. It even has a motorized knob and cute cutout music notes that move to provide some visual feedback for the gestures, which you can see in-action in the video below. If this seems familiar, it’s because on Tuesday we took a look at the camera-based, glance-to-skip-tracks controller he built.

To actually play some music, he gutted an old MP3 player and hooked the solder pads from the control buttons up to an Arduino, which reads gesture information from the sensor and emulates the MP3 player’s buttons by setting the appropriate pins to HIGH and LOW. Finally, he topped the whole thing off with an LCD screen and a case.

The great thing about [Norbert]’s approach is that it isn’t just limited to an MP3 player — it can be extended to replace the buttons on pretty much any device. Because the Arduino only needs to be connected to the button inputs of the device, it should be relatively easy to adapt most existing tactile interfaces to be touch-free. Paired with this gesture-tracking macro keyboard we saw earlier in the year, the days of actually having to touch our tech may soon be behind us.

Continue reading “Groovin’ With A Gesture-Controlled MP3 Player”

Separating Ideas From Words

We covered Malamud’s General Index this week, and Mike and I were talking about it on the podcast as well. It’s the boldest attempt we’ve seen so far to open up scientific knowledge for everyone, and not just the wealthiest companies and institutions. The trick is how to do that without running afoul of copyright law, because the results of research are locked inside their literary manifestations — the journal articles.

The Index itself is composed of one-to-five-word snippets of 107,233,728 scientific articles. So if you’re looking for everything the world knows about “tincture of iodine”, you can find all the papers that mention it, and then important keywords from the corpus and metadata like the ISBN of the article. It’s like the searchable card catalog of, well, everything. And it’s freely downloadable if you’ve got a couple terabytes of storage to spare. That alone is incredible.

What I think is most remarkable is this makes good on figuring out how to separate scientific ideas from their prison — the words in which they’re written — which are subject to copyright. Indeed, if you look into US copyright law, it’s very explicit about not wanting to harm the free sharing of ideas.

“In no case does copyright protection for an original work of authorship extend to any idea, procedure, process, system, method of operation, concept, principle, or discovery, regardless of the form in which it is described, explained, illustrated, or embodied in such work.”

But this has always been paradoxical. How do you restrict dissemination of the papers without restricting dissemination of the embodied ideas or results? In the olden days, you could tell others about the results, but that just doesn’t scale. Until today, only the richest companies and institutions had access to this bird’s eye view of scientific research — similar datasets gleaned from Google’s book-scanning program have trained their AIs and seeded their search machines, but they only give you a useless and limited peek.

Of course, if you want to read the entirety of particular papers under copyright, you still have to pay for them. And that’s partly the point, because the General Index is not meant to destroy copyrights, but give you access to the underlying knowledge despite the real world constraints on implementing copyright law, and we think that stands to be revolutionary.

A GPU card with a home-made fan assembly

3D-printed Fan Mount Keeps Server GPU Cool In Desktop Case

Most readers of Hackaday will be well aware of the current shortages of semiconductors and especially GPUs. Whether you’re planning to build a state-of-the art gaming PC, a mining rig to convert your kilowatt-hours into cryptocoins, or are simply experimenting with machine-learning AI, you should be prepared to shell out quite a bit more money for a proper GPU than in the good old days.

Bargains are still to be had in the second-hand market though. [Devon Bray] chanced upon a pair of Nvidia Tesla K80 cards, which are not suitable for gaming and no longer cost-effective for mining crypto, but ideal for [Devon]’s machine-learning calculations. However, he had to make a modification to enable proper thermal management, as these cards were not designed to be used in regular desktop PCs.

The reason for this is that many professional-grade GPU accelerators are installed in rack-mounted server cases, and are therefore equipped with heat sinks but no fans: the case is meant to provide a forced air flow to carry away the card’s heat. Simply installing the cards into a desktop PC case would cause them to overheat, as passive cooling will not get rid of the 300 W that each card pumps out on full load.

[Devon] decided to make a proper thermal solution by 3D printing a mount that carries three fans along with an air duct that snaps onto the GPU card. In order to prevent unnecessary fan noise, he added a thermal control system consisting of a Raspberry Pi Pico, a handful of MOSFETs, and a thermistor to sense the GPU’s temperature, so the fans are only driven when the card is getting hot. The Pi Pico is of course way more powerful than needed for such a simple task, but allowed [Devon] to program it in MicroPython, using more advanced programming techniques than would be possible on, say, an Arduino.

We love the elegant design of the fan duct, which enables two of these huge cards to fit onto a motherboard side-by-side. We’ve seen people working on the opposite problem of fitting large fans into small cases, as well as designs that discard the whole idea of using fans for cooling.

Continue reading “3D-printed Fan Mount Keeps Server GPU Cool In Desktop Case”

A one-string bass violin made from two washtubs, some plywood, a Louisville Slugger, and some weed whacker line.

Louisville Slugger Puts This Bass On Base

One of the most recognizable instruments in both jug band and American folk music has got to be the washtub bass. Also known as gutbuckets, these instruments tend to use an old broom for a neck and usually have a single string.

A nifty DIY wooden tool for turning a wingnut with ease.We would argue that the design of [goaly]’s single-string double gutbucket owes something to the double bass of the violin family as well, with its figure eight shape. On top of those tubs is a plywood soundboard, which is screwed into a series of wood blocks around the lip of the tubs.

For the combination neck and fretboard, [goaly] called up a vintage Louisville Slugger, which is way more interesting than some old broom handle. [goaly] extended the backbone through the body with scrap lengths of 2″x2″, and this spine runs through both tubs and acts as a peg on the bottom. In lieu of a tailpiece, the string is tied to a board that the player secures with their foot.

Although [goaly] experimented with steel cable, clothesline rope, nylon rope, and paracord first, the string is made from weed whacker trimmer line. At the top, the string is attached through the neck — it’s held down with a couple of bent fender washers and pulled taut with a wingnut. We love that [goaly] even fashioned a wooden tool to make it easy to turn the wingnut. And we also love the DIY bridge, which looks like a little person.

There are a couple of ways to make sounds with this thing. Fretting and plucking work, of course, but so does bending the whole thing backward to change the pitch. For a good time, do both. We think it sounds nice and thump-y, and it even makes great percussive sounds on the front and back. Check it out in action after the break.

Don’t have a washtub? A wheelbarrow works too, and it comes with its own stand.

Continue reading “Louisville Slugger Puts This Bass On Base”

Unique Pomodoro Timer Displays Quotes While You Work

[zorbash] came up with a great side project while designing a way to read notes and highlighted sections from e-books without having to use Good Reads or the Amazon tool: build a gadget to display a parade of quotes from favorite authors and their books. The project is called Brain because it’s built on an IoT platform called Nerves.

As a bonus, the gadget functions as a Pomodoro timer of sorts — that’s the time management method where you work for 25-minute periods and take 5-minute breaks in between, with a longer break every four Pomodoros. Brain displays a quote for 25 minutes and then flashes the screen to draw [zorbash]’s attention to the fact that time is up. We think this is a nice, unobtrusive way to do things. There are no breaks built in, but that’s just how [zorbash] rolls.

The quotes are fetched using Bookworm, a script [zorbash] wrote that’s available on GitHub. It uses a Raspberry Pi 2 B, an SD card to store the JSON’d quotes, and a Wi-Fi dongle to allow the fetching. If you’re wondering about the enclosure, it’s made of clay.

If you like your Pomodoro timers a little more physical, here’s one that starts as soon as you plug it in to a USB port.

The Linux X86 Journey To Main()

Have you ever had a program crash before your main function executes? it is rare, but it can happen. When it does, you need to understand what happens behind the scenes between the time the operating system starts your program and your first line of code in main executes. Luckily [Patrick Horgan] has a tutorial about the subject that’s very detailed. It doesn’t cover statically linked libraries but, as he points out, if you understand what he does cover, that’s easy to figure out on your own.

The operating system, it turns out, knows nothing about main. It does, however, know about a symbol called _start. Your runtime library provides this. That code contains some stack manipulation and eventually calls __libc_start_main which is also provided by the library. Continue reading “The Linux X86 Journey To Main()”