Many of us electronics hacker types tend to have at least the same common equipment on our benches, namely a multimeter, an oscilloscope, some sort of adjustable power supply, and maybe a logic analyzer. These are great tools covering many bases, but dealing with temperature measurements is often neglected. A sudden need for such often results in just buying a either dedicated measurement unit, or some cheap eBay thermocouple board and just rolling with a few hacks. [Jana Marie Hemsing] had a need for measuring the thermal side of things, and got fed up with hacking with piles of boards, and designed herself a proper instrument for the task.
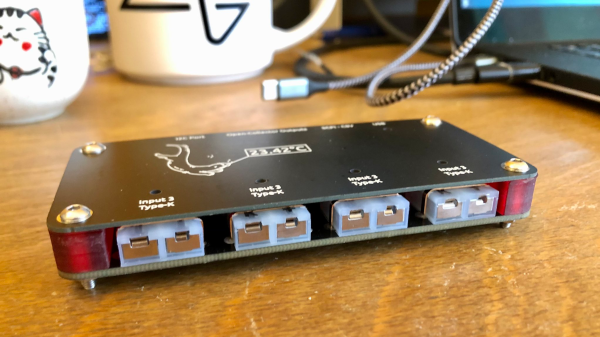
The result is a very tidy four-channel thermocouple frontend, feeding the data into the host computer via USB. Each of the four channels can either be a K-type input or a NTC thermistor input, decided at board assembly time, but you could just build two units with four channels of each and cover all bases. The K-type thermocouple input is based around the MAX31855 series device. While the ‘KASA’ suffixed device is probably most common, if you need to dedicate some channels to handling one of the other six or so other common thermocouple types, that just needs the appropriate MAX31855 variant dropping in, and you’re good to go.
For the controller, [Jana] has chosen the common STM32F0x microcontroller, which handles all the USB protocol side of things. The extra functionality added allows direct driving of a heater controller via the DRV8837 H-Bridge, with a extra few open collector outputs for other things you might want to drive. This allows the logger to function as a kind-of thermal IO device. Firmware is written in good old fashioned STM32 HAL, using the standard STM32CubeMX and the GCC toolchain. It looks like the Makefile came via the STM32 Project Generator route. The firmware has a neat trick up its sleeve too; with a flick of the switch on the back, the firmware can switch between outputting CSV data over a standard USB CDC link (a virtual serial port), or it can present a SCPI terminal interface, enabling integration into existing SCPI-based test flows. Nice work!
We’ve seen a few logging projects on these fair pages, like this battery powered ESP32 logger device. If IoT logging is more your thing, here you go.