Nordic NRF24L01+ – Real Vs Fake

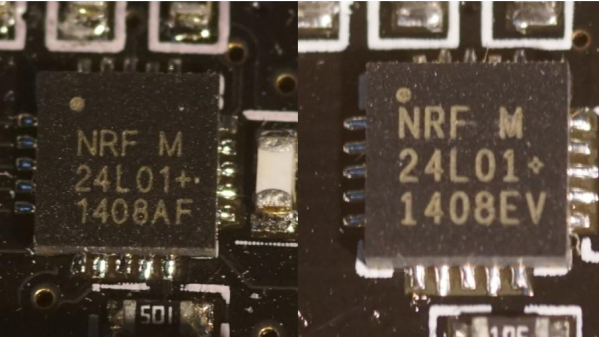
[zeptobars], the folks behind all the decapping hard work and amazing die shots are at it again. This time they decided to look under the hood of two identical looking Nordic nRF24L01+ chips.

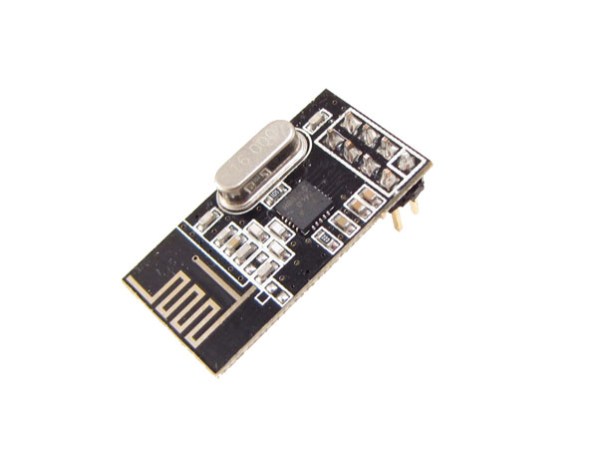
The nRF24L01+ is a highly integrated, ultra low power (ULP) 2Mbps RF transceiver IC for the 2.4 GHz ISM (Industrial, Scientific and Medical) band. Popular, widely used and inexpensive – and the counterfeit foundries are drawn to it like honey bees to nectar. But to replicate and make it cheaper than the original, one needs to cut several corners. In this case, the fakes use 350 nm technology, compared to 250 nm in the original and have a larger die size too.

These differences mean the fakes likely have higher power usage and lower sensitivities, even though they are functionally identical. The foundry could have marked these devices as Si24R1, which is compatible with the nRF24L01 and no one would have been wiser. But the lure of higher profits was obviously too tempting. A look through Hackaday archives will dig up several posts about the work done by [zeptobars] in identifying fake semiconductors.

Sniffing NRF24L01+ Traffic With Wireshark

Wireshark trace

We’re sure that some of our readers are familiar with the difficult task that debugging/sniffing nRF24L01+ communications can be. Well, [Ivo] developed a sniffing platform based on an Arduino Uno, a single nRF24L01+ module and a computer running the popular network protocol analyzer Wireshark (part1, part2, part3 of his write-up).

As these very cheap modules don’t include a promiscuous mode to listen to all frames being sent on a particular channel, [Ivo] uses for his application a variation of [Travis Goodspeed]’s technique to sniff Enhance Shockburst messages. In short, it consists in setting a shorter than usual address, setting a fix payload length and deactivating the CRC feature. The Arduino Uno connected to the nRF24L01+ is therefore in charge of forwarding the sniffed frames to the computer. An application that [Ivo] wrote parses the received data and forwards it to wireshark, on which can be set various filters to only display the information you’re interested in.

Monitoring Your Gas Consumption With A JeeNode And A NRF24L01+

[Sven337] just blogged about a gas consumption monitoring setup he finished not long ago. As his gas meter was located outside his apartment and nowhere near any electrical outlet, a battery-powered platform that could wirelessly send the current consumption data to his Raspberry Pi was required. His final solution therefore consists of a JeeNode coupled with the well known nRF24L01+ wireless transmitter, powered by 3 supposedly dead alkaline batteries.

[Sven337] carefully looked at the different techniques available to read the data from his meter. At first he had thought of using a reflective sensor to detect the number 6 which (in France at least) is designed to reflect light very well. He then finally settled for a magnetic based solution, as the Actaris G4 gas meter has a small depression intended for magnetic sensors. The PCB you see in the picture above therefore has a reed sensor and a debug LED. The four wires go to a plastic enclosure containing the JeeNode, a couple of LEDs and a reset switch. Using another nRF24L01, the Raspberry Pi finally receives the pulse count and reports it to an eeePC which takes care of the storage and graphing.

Using An NRF24L01 For Air Bootloading

nrfboot_small

[Necromant] wrote a library to flash his microcontroller over an RF link using an NRF24L01 wireless communication module. The NRF24L01 is a cheap RF module that can be easily integrated into many microcontroller projects. Though there are Arduino libraries for driving the NRF24L01, [Necromat] decided to make a port of one with no Arduino dependencies.

The resulting bootloader fits into 4K of RAM flash with packet loss and recovery along with user-configurable hardware or software SPI. Programming speeds are not the highest, but [NecromatNecromant] believes this to be a property of the VUSB rather than the transfer rate from the NRF24L01 or the target microcontroller.

To program the target AVR chip, [NecromatNecromant] used another NRF24L01 module connected to his uISP dongle over USB.  Using a custom tool to interface with the uISP, the target board can be programmed in a similar fashion as avrdude. Check out the code for the ISP dongle and the AVR bootloader on his GitHub page.

Nrf24l01+ Using 3 ATtiny85 Pins

[Ralph] wasn’t satisfied with the required 5 control pins to drive his nrf24l01+ transceiver module, so he used this circuit needing just 3 pin using an ATtiny85.

One of the key components was to effectively drive the chip select (CSN) line from the clock (SCK) line. The nrf24l01+ needs the CSN line to transition from high to low on the beginning of a communication.  [Ralph] put the SCK line behind a diode, put a capacitor in parallel with the CSN line and altered the arduino-nrf24l01 library to encode extra delays for the clock line.  This allowed the CSN line to be driven by the SCK line. Subsequent line transitions during transmission happen too fast to charge the capacitor, leaving the CSN line in a low state.

After tying the chip enable line high and dropping the 5V power line to 1.9-3.6V across a red LED, [Ralph] had an ATtiny85 controlling a nrf24l01+ module.

Though deceptively simple, a very cool hack that opens up a couple more lines on the ATtiny85.

Sniffing And Decoding Bluetooth LE Advertising Packets And NRF24L01+ Comms. For Under $30

[Omri] just documented his journey to sniff and decode the protocol used by the popular NRF24L01+ transceiver off the air for very cheap. As he was designing a mesh network code and needed a way to monitor/debug the overall network performance, [Omri] decided to look for some RF hardware.

We’re sure that most of our readers are familiar with Software Defined Radio (SDR), which not so long ago became popular when some engineer discovered hidden registers inside Realtek RTL2832U chip, allowing many DVB-T dongles to be converted into RF listening devices. Unfortunately for [Omri], most of them have a maximum listening frequency of 2.2GHz, while the NRF24L01+ emits at 2.4GHz. The solution? Buy a 2.2-2.4GHz antenna from Aliexpress with a low-noise block downconverter (LNB), used for a Multichannel Multipoint Distribution Service (MMDS). The LNB therefore takes the 2.2-2.4GHz signal and downconverts it to around 400MHz, allowing any RTL-SDR-compatible DVB-T dongle to listen to the NRF communications. A program was then written to decode the RF signal and output the sniffed data in realtime.

Sending Data Over Bluetooth Low Energy With A Cheap NRF24L01+ Module

nRF24L01+ modules like the one shown above are a great way to send data wirelessly between your projects. They can be found on many websites for less than $1.50 a piece and many libraries exist for them. After having thoroughly looked at the Bluetooth Low Energy (BLE) specifications, [Dimitry] managed to find a way to broadcast BLE data with an nRF24L01+.

Luckily enough, BLE and nRF24L01+ data packets have the same preambles. However, the latter can’t send more than 32 bytes in a packet and can’t hop between frequencies as fast as the BLE specification wants. [Dimitry] found the solution when he discovered that he could send unsolicited advertisements on three specific channels. In the end, considering the 32 bytes the nRF24L01+ can send, you’ll need to use 3 bytes for the CRC, 2 for the packet header, 6 for the MAC address and 5 for devices attributes. This leaves us with 16 bytes of pure data or 14 bytes to split between data and name if you want your project to have one.