3D Printed Radiation Shields Get Put To The Test

Don’t get too excited, a 3D printed radiation shield won’t keep you from getting irradiated during WWIII. But until the Doomsday Clock starts clanging its midnight bell, you can use one to improve the accuracy of your homebrew weather monitoring station by keeping the sun from heating up your temperature sensor. But how much does it help, and what material should you load up in your extruder to make one? Those questions, and more, are the topic of a fascinating whitepaper included in the upcoming volume of HardwareX.

Design and Implementation of 3-D Printed Radiation Shields for Environmental Sensors not only tests how effective these low-cost shields are when compared to an uncovered sensor, but addresses specific concerns in regards to leaving 3D printed parts out in the elements. Readers who’ve squirted out a few rolls worth of the stuff will know that common polylactic acid (PLA) filament, while easy to work with and affordable, isn’t known for its resilience. In fact, one of the advertised properties of the renewable plastic is that it’s biodegradable (theoretically, at least), so leaving it outside for any length of time sounds like it’s bound to go poorly.

PLA’s mechanical strength dropped rapidly.

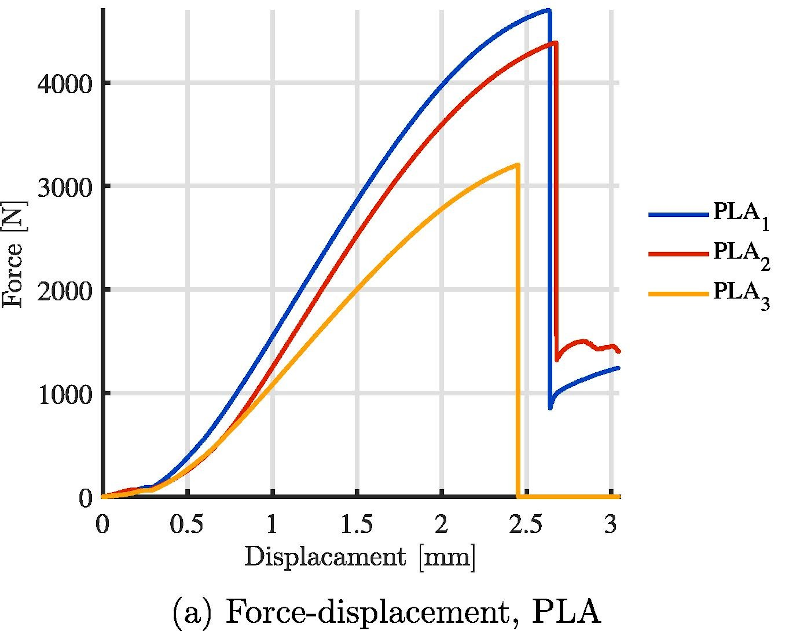
To make a long story short, it does. While the team demonstrated that the PLA printed radiation shield absolutely helped preserve the accuracy of the temperature and humidity sensors mounted inside of it, the structure itself began to deform rapidly from UV exposure. Further tests determined that the mechanical strength of the PLA showed a notable reduction in as little as 30 days, and a sharp decline after 90 days.

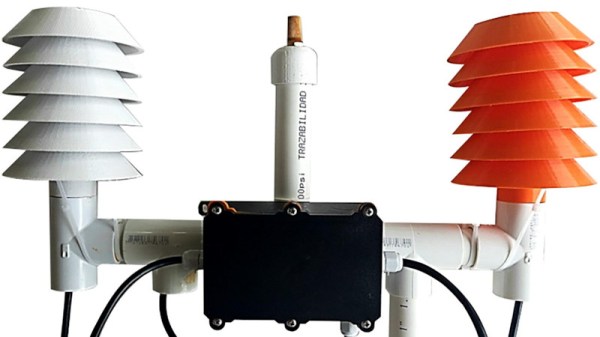
Luckily, there was more than one plastic horse in the race. In addition to the PLA printed shield, the team also tested a version printed in acrylonitrile styrene acrylate (ASA) which fared far better. There was no visible deformation of the shield, and after 90 days, the reduction in mechanical strength was negligible. It even performed a bit better when it came to shielding the temperature sensor, which the team believes may be due to the material’s optical transmission properties.

So there you have it: a 3D printed radiation shield will absolutely improve the accuracy of your weather sensors, but if you want it to last outside, PLA just isn’t going to cut it. On the other hand, you could also save yourself a whole lot of time by just using a stack of plant saucers. Whatever works.

Thanks to [tahnok] for the tip.

As apples travel down the conveyor belt, they are scanned using InGaAs and CMOS cameras. The InGaAs camera will show defects beginning to form under the skin that a human eye cannot see; the CMOS camera will show visible defects. (Credit: Hamamatsu)

Shining A Different Light On Reality With Short-Wave Infrared Radiation

As great as cameras that operate in the visual light spectrum are, they omit a lot of the information that can be gleaned from other wavelengths. There is also the minor issue that visibility is often impacted, such as when it’s raining, or foggy. When this happens, applications such as self-driving cars which rely on this, have a major issue. Through the use of sensors that are sensitive to other wavelengths, we can however avoid many of these issues.

Short-wave infrared radiation (SWIR) is roughly the part of the electromagnetic spectrum between 1.4 μm – 3 μm, or 100 THz – 214 THz. This places it between visible light and microwaves, and above long-wave IR at 20 THz – 37 THz. LWIR is what thermal cameras use, with LWIR also emitted by warm objects, such as the human body.

SWIR is largely unaffected by water in the atmosphere, while also passing through materials that are opaque to visible light. This allowing SWIR to be used for the analysis and inspection of everything from PCBs and fruit to works of art to capture details that are otherwise invisible or very hard to see.

Unfortunately, much like thermal camera sensors, SWIR sensors are rather expensive. Or they were, until quite recently, with the emergence of quantum-dot-based sensors that significantly decrease the costs of these sensors.

Continue reading “Shining A Different Light On Reality With Short-Wave Infrared Radiation”

Painted Over But Not Forgotten: Restoring Lost Paintings With Radiation And Mathematics

An intrinsic property of paintings, that makes them both wonderful and very annoying, is the fact that they are physical objects. Sometimes they survive across the ages as amazing artifacts of their era, but they are also susceptible to being lost and even destroyed. Sometimes this destruction is deliberate, such as when a painting is painted over.

Artists reuse canvas all the time — painting over what was already there. Sometimes they might be coerced by a client into altering a painting, or removing entire elements from a scene. Fortunately, nowadays we have many techniques, involving x-rays and infrared radiation, that can analyze paintings to determine not only the composition of what we can see with the naked eye, but also that what lies underneath.

In some cases, we can then reconstruct what was previously hidden, returning to physical reality paintings and sketches which haven’t seen the light of day for sometimes centuries. Continue reading “Painted Over But Not Forgotten: Restoring Lost Paintings With Radiation And Mathematics”

A Trio Of Photodiodes Make A Radiation Detector

The instinctive reaction when measuring nuclear radiation is to think of a Geiger counter, as the low-pressure gas tube detectors have entered our popular culture through the Cold War. A G-M tube is not the only game in town though, and even the humble photodiode can be pressed into service. [Robert] gives us a good example, with a self-contained radiation detector head that uses a trio of BPW34s to do the job.

At its heart is a transimpedance amplifier, a not-often-seen op-amp configuration that serves as a very high gain current-to-voltage converter. This produces a spike for every radiation event detected by the diodes, which is fed to a comparator to produce a logic pulse. The diodes require a significant bias voltage, for which he’s used 48 V from a stack of 12 V photographic dry cells rather than a boost converter or other potentially noisy power supply. Such a sensitive high-gain device needs to be appropriately shielded, so the whole circuit is contained in a diecast box with a foil window to allow radiation to reach the diodes.

This isn’t the first BPW34-based radiation detector we’ve seen, so perhaps before looking for a Cold War era relic for our radiation experiments we should be looking in a semiconductor catalogue instead.

Review: What On Earth Is An Electromagnetic Radiation Tester And Why Would I Need One?

One of the joys of an itinerant existence comes in periodically being reunited with the fruits of various orders that were sent to hackerspaces or friends somewhere along the way. These anonymous parcels from afar hold an assortment of wonders, with the added element of anticipation that comes from forgetting exactly what had been ordered.

So it is with today’s subject, a Mustool MT525 electromagnetic radiation tester. At a cost not far above £10 ($13.70), this was an impulse purchase driven by curiosity; these devices claim to measure both magnetic and electric fields, but what do they really measure? My interest in these matters lies in the direction of radio, but I have never examined such an instrument. Time to subject it to the Hackaday treatment.

Continue reading “Review: What On Earth Is An Electromagnetic Radiation Tester And Why Would I Need One?”

Plasma Discharges Show You Where The Radiation Is

Depending on the context of the situation, the staccato clicks or chirps of a Geiger counter can be either comforting or alarming. But each pip is only an abstraction, an aural indication of when a particle or ray of ionizing radiation passed through a detector. Knowing where that happened might be important, too, under the right circumstances.

While this plasma radiation detector is designed more as a demonstration, it does a pretty good job at localizing where ionization events are happening. Designed and built by [Jay Bowles], the detector is actually pretty simple. Since [Jay] is the type of fellow with plenty of spare high-voltage power supplies lying around, he took a 6 kV flyback supply from an old build and used it here. The detector consists of a steel disk underneath a network of fine wires. Perched atop a frame of acrylic and powered by a 9 V battery, the circuit puts high-voltage across the plate and the wires. After a substantial amount of tweaking, [Jay] got it adjusted so that passing alpha particles from a sample of americium-241 left an ionization trail between the conductors, leading to a miniature lightning bolt.

In the video below, the detector sounds very similar to a Geiger counter, but with the added benefit of a built-in light show. We like the way it looks and works, although we’d perhaps advise a little more caution to anyone disassembling a smoke detector. Especially if you’re taking apart Soviet-era smoke alarms — you might get more than you bargained for.

Continue reading “Plasma Discharges Show You Where The Radiation Is”

Visualizing Ionizing Radiation With DIY Plastic Scintillators

Although most types of radiation are invisible, except for the visible part of the EM spectrum, there are many ways that we can make various types of radiation visible. One of these methods is called ‘scintillation’, which can be used to make ionizing radiation visible. Recently [Lukas Springer] demonstrated how to make scintillators out of what is essentially plastic: bisphenol-A (E45, ‘epoxy’) resin with hardener and other additives.

The essential principle of operation behind a scintillator is its sensitivity to ionizing radiation, along with the tendency to absorb the energy and re-emit it in the form of light, i.e. luminescence. This is akin to the luminescence of LEDs, except that in their case the underlying principle is that of electro-luminescence. In the case of a plastic scintillator, the scintillating material is suspended in the solid polymer matrix base.

As [Lukas] points out, plastic scintillators are hardly ideal when it comes to their sensitivity to ionizing radiation, but they compensate for this by being easy to shape and produce, while being very durable. For this experiment, he used regular epoxy as the scintillator matrix, p-Terphenyl as primary scintillator and Coumarin 102 as the wavelength shifter. These three compounds act as a reaction chain, with the matrix absorbing the radiation and transferring it to the primary scintillator, which in turns emits the energy as light.

As the primary scintillator tends to radiate in the deep UV part of the EM spectrum, a wavelength shifter (i.e. secondary scintillator) which ‘shifts’ the emitted UV radiation into the visible part of the spectrum.

After producing a batch of plastic scintillators following the above recipe, [Lukas] irradiated them with gamma radiation, and found them to perform worse than some already not remarkable Russian PS-based scintillators. [Lukas’s] guess is that the matrix may be absorbing the primary scintillator’s output, or a mismatch between the primary and second scintillator.

While tricky to get right, it does seem like a fun hobby if one has some interesting in chemistry. [Lukas] (@GigaBecquerel on Twitter) provides a basic recipe as well as many other compounds to use for the primary and secondary scintillator, as well as the matrix compound. Enough to get started with.