Maybe The Simplest Cloud Chamber

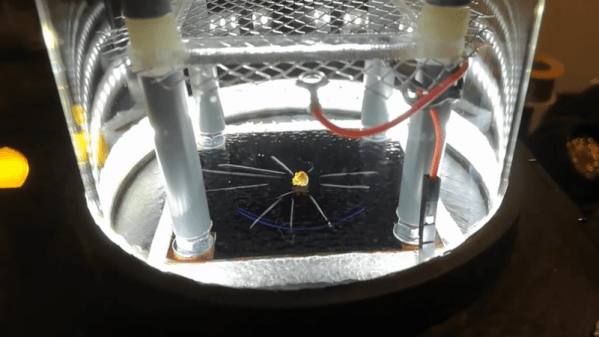
Have you ever seen a Wilson cloud chamber — a science experiment that lets you visualize ionizing radiation? How hard would it be to build one? If you follow [stoppi’s] example, not hard at all (German, Google Translate link). A plastic bottle. some tape, a flashlight, some water, hot glue, and — the only exotic part — a bit of americium 241. You can see the design in the video below and the page also has some more sophisticated designs including one that uses a CPU cooler. Even if you don’t speak German, the video will be very helpful.

You need to temper your expectations if you build the simple version, but it appears to work. The plastic bottle is a must because you have to squeeze it to get a pressure change in the vessel.

Continue reading “Maybe The Simplest Cloud Chamber”

Sergiy Nesterenko giving his Remoticon 2021 talk

Remoticon 2021 // Sergiy Nesterenko Keeps Hardware Running Through Lightning And Cosmic Rays

Getting to space is hard enough. You have to go up a few hundred miles, then go sideways really fast to enter orbit. But getting something into space is one thing: keeping a delicate instrument working as it travels there is quite another. In his talk at Remoticon 2021, [Sergiy Nesterenko], former Radiation Effects Engineer at SpaceX, walks us through all the things that can destroy your sensitive electronics on the way up.

The trouble already starts way before liftoff. Due to an accident of geography, several launch sites are located in areas prone to severe thunderstorms: not the ideal location to put a 300-foot long metal tube upright and leave it standing for a day. Other hazards near the launch pad include wayward wildlife and salty spray from the ocean.

Those dangers are gone once you’re in space, but then suddenly heat becomes a problem: if your spacecraft is sitting in full sunlight, it will quickly heat up to 135 °C, while the parts in the shade cool off to -150 °C. A simple solution is to spin your craft along its axis to ensure an even heat load on all sides, similar to the way you rotate sausages on your barbecue.

But one of the most challenging problems facing electronics in space is radiation. [Sergiy] explains in detail the various types of radiation that a spacecraft might encounter: charged particles in the Van Allen belts, cosmic rays once you get away from Low Earth orbit, and a variety of ionized junk ejected from the Sun every now and then. The easiest way to reduce the radiation load on your electronics is simply to stay near Earth and take cover within its magnetic field.

For interplanetary spacecraft there’s no escaping the onslaught, and the only to survive is to make your electronics “rad-hard”. Shielding is generally not an option because of weight constraints, so engineers make use of components that have been tested in radiation chambers to ensure they will not suddenly short-circuit. Adding redundant circuits as well as self-monitoring features like watchdog timers also helps to make flight computers more robust.

[Sergiy]’s talk is full of interesting anecdotes that will delight the inner astronaut in all of us. Ever imagined a bat trying to hitch a ride on a Space Shuttle? As it turns out, one aspiring space bat did just that. And while designing space-qualified electronics is not something most of us do every day, [Sergiy]’s experiences provide plenty of tips for more down-to-earth problems. After all, salt and moisture will eat away cables on your bicycle just as they do on a moon rocket.

Be sure to also check out the links embedded in the talk’s slides for lots of great background information.

Continue reading “Remoticon 2021 // Sergiy Nesterenko Keeps Hardware Running Through Lightning And Cosmic Rays”

Visualizing Ionizing Radiation With DIY Plastic Scintillators

Although most types of radiation are invisible, except for the visible part of the EM spectrum, there are many ways that we can make various types of radiation visible. One of these methods is called ‘scintillation’, which can be used to make ionizing radiation visible. Recently [Lukas Springer] demonstrated how to make scintillators out of what is essentially plastic: bisphenol-A (E45, ‘epoxy’) resin with hardener and other additives.

The essential principle of operation behind a scintillator is its sensitivity to ionizing radiation, along with the tendency to absorb the energy and re-emit it in the form of light, i.e. luminescence. This is akin to the luminescence of LEDs, except that in their case the underlying principle is that of electro-luminescence. In the case of a plastic scintillator, the scintillating material is suspended in the solid polymer matrix base.

As [Lukas] points out, plastic scintillators are hardly ideal when it comes to their sensitivity to ionizing radiation, but they compensate for this by being easy to shape and produce, while being very durable. For this experiment, he used regular epoxy as the scintillator matrix, p-Terphenyl as primary scintillator and Coumarin 102 as the wavelength shifter. These three compounds act as a reaction chain, with the matrix absorbing the radiation and transferring it to the primary scintillator, which in turns emits the energy as light.

As the primary scintillator tends to radiate in the deep UV part of the EM spectrum, a wavelength shifter (i.e. secondary scintillator) which ‘shifts’ the emitted UV radiation into the visible part of the spectrum.

After producing a batch of plastic scintillators following the above recipe, [Lukas] irradiated them with gamma radiation, and found them to perform worse than some already not remarkable Russian PS-based scintillators. [Lukas’s] guess is that the matrix may be absorbing the primary scintillator’s output, or a mismatch between the primary and second scintillator.

While tricky to get right, it does seem like a fun hobby if one has some interesting in chemistry. [Lukas] (@GigaBecquerel on Twitter) provides a basic recipe as well as many other compounds to use for the primary and secondary scintillator, as well as the matrix compound. Enough to get started with.

Steampunk Geiger Counter Is A Mix Of Art And Science

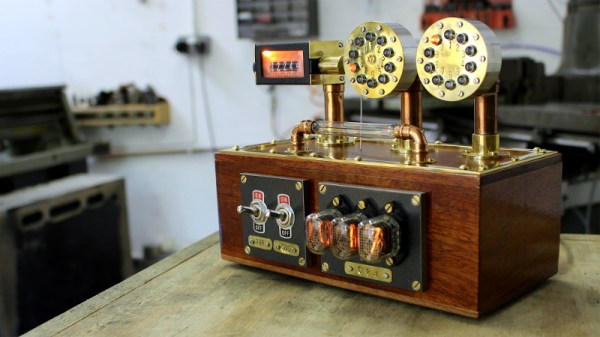
It took nearly a year for [Chris Crocker-White] to assemble this glorious mahogany and brass Geiger counter, but we think you’ll agree with us that it was time well spent. From the servo-actuated counter to the Nixie tubes and LED faux-decatrons, this project is an absolute love letter to antiquated methods of displaying information. Although for good measure, the internal Raspberry Pi also pushes all the collected radiation data into the cloud.

[Chris] says the design of this radiation monitor was influenced by his interest in steampunk and personal experience working on actual steam engines, but more specifically, he also drew inspiration from a counter built by [Richard Mudhar].

Based on a design published in Maplin back in 1987, [Richard] included a physical counter and LED “dekatron” displays as an homage to a 1960s era counter he’d used back in his school days. [Chris] put a modern spin on the electronics and added the glowing display of real-time Counts Per Minute (CPM) as an extra bonus; because who doesn’t like some Nixies in their steampunk?

Internally, the pulses generated by a common Geiger counter board are picked up by some custom electronics to drive the servo and LEDs. Triggered by those same pulses, the Raspberry Pi 3A+ updates the Nixie display and pushes the data out to the cloud for analysis and graphing. Note that the J305β Geiger tube from the detector has been relocated to the outside of the machine, with two copper elbows used as connectors. This improves the sensitivity of the instrument, but perhaps even more importantly, looks awesome.

We’ve seen some very high-tech DIY radiation detection gear over the years, but these clever machines that add a bit of whimsy to the otherwise mildly terrifying process of ionizing radiation are always our favorite.

Continue reading “Steampunk Geiger Counter Is A Mix Of Art And Science”

How Science Adapted To The Aftermath Of Cold War Nuke Tests

Current global events have demonstrated that we do not live in the most stable of times. Still, most of us 90’s kids are probably glad that we did not have to endure the political shakiness of the Cold War era when people were living in constant fear of nuclear Armageddon. Nuclear weapons tests were common during this period as the United States and the Soviet Union invested heavily to increase the quality and quantity of their warheads in the race for nuclear supremacy.

Even though the political situation stabilized after the fall of the Soviet Union, the consequences of the vast amount of nuclear tests conducted back then are still noticeable today. Besides the devastating effects on human health and the environment, this period also leaves some implications for science which are not always negative.

Continue reading “How Science Adapted To The Aftermath Of Cold War Nuke Tests”

See The Radioactive World With This Peltier Cloud Chamber

Remember when a homemade cloud chamber was a science fair staple? We haven’t participated for decades, but it seemed like every year someone would put a hunk of dry ice in a fish tank, add a little alcohol, and with the lighting just right – which it never was in the gymnasium – you might be lucky enough to see a few contrails in the supersaturated vapor as the occasional stray bit of background radiation whizzed through the apparatus.

Done right, the classic cloud chamber is a great demonstration, but stocking enough dry ice to keep the fun going is a bit of a drag. That’s where this Peltier-cooled cloud chamber comes into its own. [mosivers] spares no expense at making a more permanent, turn-key cloud chamber, which is perched atop a laser-cut acrylic case. Inside that is an ATX power supply which runs a Peltier thermoelectric cooling module. Coupled with a CPU cooler, the TEC is able to drive the chamber temperature down to a chilly -42°C, with a strip of white LEDs providing the required side-lighting. The video below gives a tour of the machine and shows a few traces from a chunk of pitchblende; it’s all pretty tame until [mosivers] turns on his special modification – a high-voltage grid powered by a scrapped electronic fly swatter. That really kicks up the action, and even lets thoriated TIG welding electrodes be used as a decent source of alpha particles.

It’s been a while since we’ve seen a Peltier cloud chamber build around here, which is too bad because they’re great tools for engaging young minds as well as for discovery. And if you use one right, it just might make you as famous as your mother.

Continue reading “See The Radioactive World With This Peltier Cloud Chamber”

Ambitious Homebrew X-Ray Machine Reveals What Lies Within

We’re not quite sure what to say about this DIY X-ray machine. On the one hand, it’s a really impressive build, with incredible planning and a lot of attention to detail. On the other hand, it’s a device capable of emitting dangerous doses of ionizing radiation.

In the end, we’ll leave judgment on the pros and cons of [Fran Piernas]’ creation to others. But let’s just say it’s probably a good thing that a detailed build log for this project was not provided. Still, the build video below gives us the gist of what must have taken an awfully long time and a fair amount of cash to pull off. The business end is a dental X-ray tube of the fixed anode variety. We’ve covered the anatomy and physiology of these tubes previously if you need a primer, but basically, they use a high voltage to accelerate electrons into a tungsten target to produce X-rays. The driver for the high voltage supply, which is the subject of another project, is connected to a custom-wound transformer to get up to 150V, and then to a voltage multiplier for the final boost to 65 kV. The tube and the voltage multiplier are sealed in a separate, oil-filled enclosure for cooling, wisely lined with lead.

The entire machine is controlled over a USB port. An intensifying screen converts the X-rays to light, and the images of various objects are quite clear. We’re especially impressed by the fluoroscopic images of a laptop while its hard drive is seeking, but less so with the image of a hand, presumably [Fran]’s; similar images were something that [Wilhelm Röntgen] himself would come to regret.

Safety considerations aside, this is an incredibly ambitious build that nobody else should try. Not that it hasn’t been done before, but it still requires a lot of care to do this safely.

Continue reading “Ambitious Homebrew X-Ray Machine Reveals What Lies Within”