Game Boy Color Makes Itself At Home In A DMG-01

When we last checked in with [Bucket Mouse], he had just finished cramming a Game Boy Advance (GBA) SP motherboard into the body of the iconic Game Boy DMG-01, complete with an aftermarket IPS display. Unfortunately, after a few weeks of using the system, he ran into a few issues that sent him back to the drawing board.

This time, he’s revamped Nintendo’s classic handheld with the internals from its successor, the Game Boy Color (GBC). Obviously that means this new build can’t play any GBA titles, but that was never actually the goal in the first place. It might seem obvious in hindsight, but owing to their general similarity, it ended up being far easier to fit the GBC hardware into the Game Boy’s shell. Though we still wouldn’t call this an “easy” swap by any stretch of the imagination…

Whether you want to follow his footsteps towards portable gaming bliss or just want to live vicariously through his soldering iron, [Bucket Mouse] has done an absolutely phenomenal job of documenting this build. While he cautions the write-up isn’t designed to be a step by step instructional piece, there’s an incredible wealth of information here for others looking to perform similar modifications.

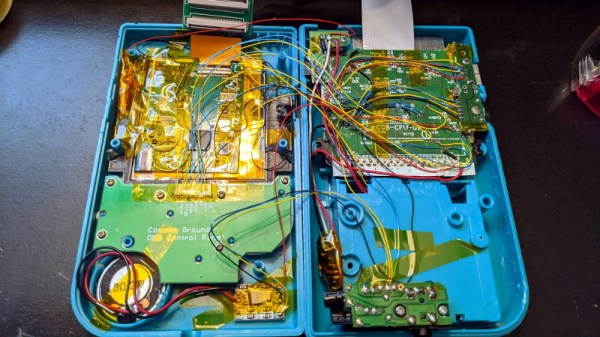
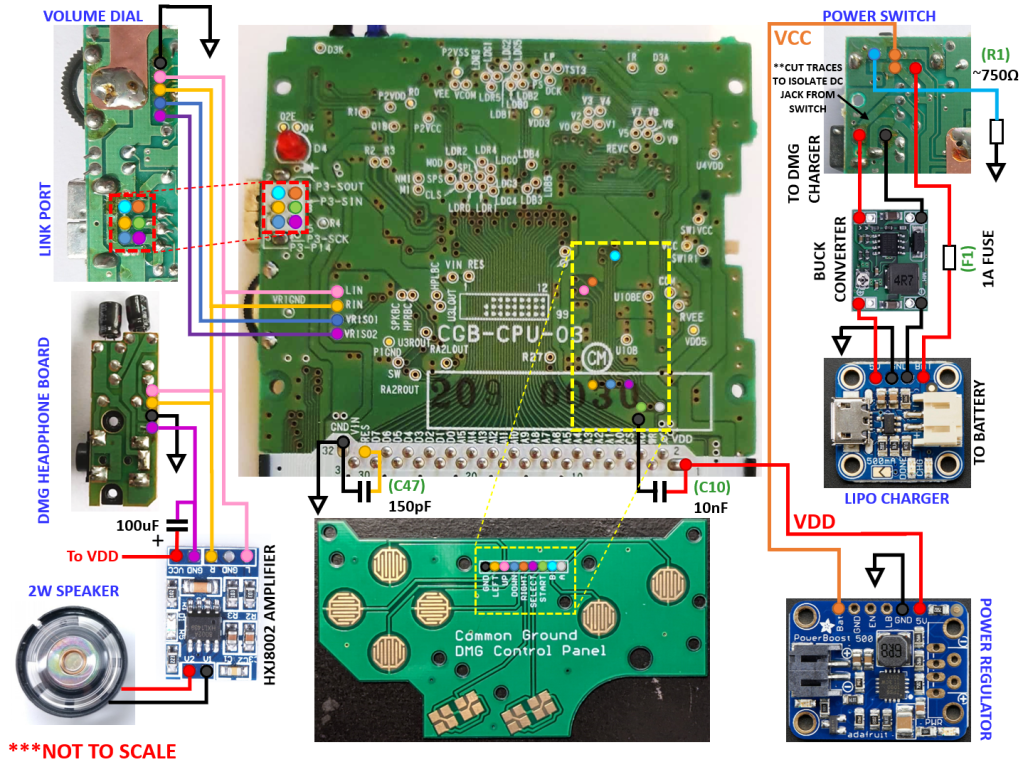
The build involved removing much of the original Game Boy’s connectors and controls, such as the volume wheel, Link Port, and even headphone jack, and grafting them onto a GBC motherboard that’s been physically trimmed down. At a high level it’s not unlike the trimmed Wii portables we’ve seen, but made much easier due to the fact the GBC only used a two-layer PCB. It also helps that [Bucket Mouse] has once again used an aftermarket IPS display, as that meant he could literally cut off the LCD driver section of the GBC motherboard. Of course there have also been several hardware additions, such as a new audio amplifier, power regulation system, LiPo charger, and 2000 mAh battery.

There’s a lot of fantastic details on this one, so if you’re remotely interested in what made the Game Boy and its successors tick, we’d highly recommend taking the time to read through this handheld hacking tour de force. His previous build is also more than worthy of some close study, even if it ended up being a bit ungainly in practice.

Retro Computers From Paper

Want to start your own collection of retro computers, for free? Well graphic designer [Rocky Bergen]’s collection of paper craft models might be the answer. [Rocky] has designed over a dozen models of old computers, including classics such as the IMSAI 8080, Commodore Pet, and the BBC Microcomputer to name just a few.

The completed size of these models isn’t mentioned, but inspecting the PDF file of a randomly selected Commodore C64 model shows it was intended to be printed on A3 paper ( 297 x 420 mm, or roughly the size of an 11 x 17 ANSI C page if you think better in inches ). That still doesn’t give us the finished size of a model, but one collector posted on [Rocky]’s site that when he scaled it to A4 paper, the resulting computer was a perfect match for use with common 1/6 scale dolls and dollhouses (also known as playscale). Of course, the pattern existing as a computer PDF file, you can scale it to any size you want.

We’ve covered a few paper craft projects in the past, including these cool automata, a claw from a crane game, and even a gyroscope that really spins. Check out the video below the break to see [Rocky] assembling the Apple II paper craft model. Thanks to [CollegeCop] for sending this into our tip line.

Continue reading “Retro Computers From Paper”

Pen Plotter Is About As Simple As It Can Get

Sure, we see quite a few plotters and other motion machines, but the one from [DAZ Projects] has the virtual of looking dead simple. The Arduino and CNC shield are old hat, of course. But some 3D printed pulleys and a very simple-looking core XY arrangement looks like this could be a pretty quick build.

You might ask; if you have a 3D printer, why you wouldn’t just mount a pen on it and call it a day? Well, you could do that, of course, but what fun is that? Besides, that will tie up your printer, too. You can see a video of the project, below.

Continue reading “Pen Plotter Is About As Simple As It Can Get”

Cool Binary Clock Uses Old-School LEDs And A Fancy Graphic PCB

Ah, the 5mm LED. Once a popular choice, they’ve been supplanted in modernity by smaller SMD components and/or more capable RGB parts in recent years. However, they’re still able to do the job and are a great way to give your project that proper homebrew look. [Ian Dunn] chose those very parts to produce his 4017 Decade Binary Clock.

The clock uses only digital logic ICs to tell the time – there are no microcontrollers here! After four or five iterations over almost a whole year, [Ian] was finally able to coax the circuit into reliable operation. As you’d expect, it relies on a 32.768 kHz crystal to provide a stable clock. Fed into a 4060 binary ripple counter, that clock is divided down 14 times to deliver a 2Hz square wave. This then goes through a 4027 flip flop to get the desired 1Hz signal. From there, a bunch of extra logic handles counting the seconds, minutes, and hours, and resetting the counters as appropriate.

The PCB that houses the project is printed on directly by a flatbed inkjet printer, which [Ian] purchased when inspired by our previous article on how to get your PCBs made at the mall. He didn’t actually use it to make the PCB in this case, but the flatbed printer does a great job of putting graphics on the board.

The result is quite an attractive look that might surprise a few electronics enthusiasts who haven’t seen a graphic printed board before. It’s a technique we think could be used to great effect on conference badges, too. If you’ve experimented with similar techniques, be sure to drop us a line!

A Trio Of Photodiodes Make A Radiation Detector

The instinctive reaction when measuring nuclear radiation is to think of a Geiger counter, as the low-pressure gas tube detectors have entered our popular culture through the Cold War. A G-M tube is not the only game in town though, and even the humble photodiode can be pressed into service. [Robert] gives us a good example, with a self-contained radiation detector head that uses a trio of BPW34s to do the job.

At its heart is a transimpedance amplifier, a not-often-seen op-amp configuration that serves as a very high gain current-to-voltage converter. This produces a spike for every radiation event detected by the diodes, which is fed to a comparator to produce a logic pulse. The diodes require a significant bias voltage, for which he’s used 48 V from a stack of 12 V photographic dry cells rather than a boost converter or other potentially noisy power supply. Such a sensitive high-gain device needs to be appropriately shielded, so the whole circuit is contained in a diecast box with a foil window to allow radiation to reach the diodes.

This isn’t the first BPW34-based radiation detector we’ve seen, so perhaps before looking for a Cold War era relic for our radiation experiments we should be looking in a semiconductor catalogue instead.

Hands-On: Whiskey Pirates DC29 Hardware Badge Blings With RISC-V

The Whiskey Pirates have once again dropped an excellent electronic badge for DEF CON 29. This is, of course, unofficial, but certainly makes the list of the hottest custom bling seen so far this year.

I’m not able to make it to the con in person, but the Pirates sent over one of these badges anyway for an early look. It’s gorgeous, and peering into the circuit board it would be easy to think that the chip shortage ain’t got nothin’ on this badge. But this was possible only because of some very creative parts sourcing, and a huge dose of inspired design work.

Continue reading “Hands-On: Whiskey Pirates DC29 Hardware Badge Blings With RISC-V”

Hackaday Podcast 130: Upside Down 3D-Printer, Biplane Quadcopter, Gutting A Calculator Watch, And GitHub CoPilot

Hackaday editors Elliot Williams and Mike Szczys get charged up on the best hacks the week had to offer. The 3D printer design gods were good to us, delivering an upside-down FDM printer and a hack that can automatically swap out heated beds for continuous printing. We look at a drone design that builds vertical wings into the frame of a quadcopter — now when it tips on its side it’s a fixed-wing aircraft! We chew the artificially-intelligent fat about GitHub CoPilot’s ability (or inability?) to generate working code, and talk about the firm future awaiting solid state batteries.

Take a look at the links below if you want to follow along, and as always, tell us what you think about this episode in the comments!

Direct download (60 MB or so.)

Places to follow Hackaday podcasts:

Continue reading “Hackaday Podcast 130: Upside Down 3D-Printer, Biplane Quadcopter, Gutting A Calculator Watch, And GitHub CoPilot”