A 3D-printed Portal Turret

3D Printed Portal Turret Moves And Talks Like The Real Thing

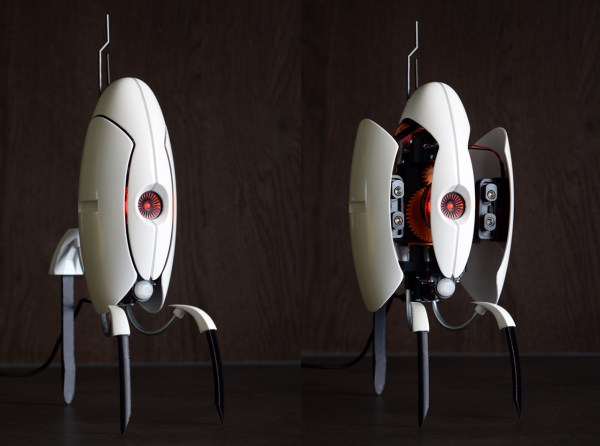
Thanks to its innovative gameplay and quirky humor, Portal became an instant hit when it was released in 2007. Characters became cultural icons, quotes became memes and the game became a classic along with its 2011 sequel. Even today, more than a decade later, we regularly see hackers applying their skills in recreating some of the game’s elements. One beautiful example is [Joran de Raaff]’s physical rendition of a Portal Turret.

A 3D CAD drawing of a Portal Turret
Inside the Turret it’s full of moving parts.

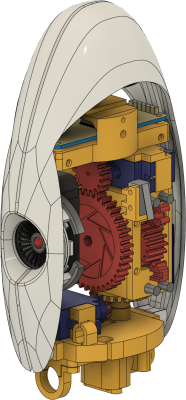
[Joran] decided to use his 3D printer to create a Turret that can move and speak exactly as it does in the game. The result, as you can see in the video embedded below, was a triumph. We’re making a note here, “huge success”. The outer shell is a beautiful shiny white, an effect achieved through patient sanding, priming, and spraying with high-gloss paint. The internals are even more impressive with servos, microswitches, and a whole array of 3D-printed gears, cams, and levers.

A motion sensor activates the Turret whenever a human moves nearby. It will then open its wings and fire its guns while playing the corresponding sounds from the game. Its brains are formed by a Wemos D1 which drives the various LEDs and servos, while an MP3 player board holds a library of sound bites and plays them through a speaker hidden inside the Turret’s shell.

After posting his creation on YouTube [Joran] got many requests for the 3D files, so he made them available and wrote a comprehensive build guide. This should enable anyone with a 3D printer to build this neat gun, without getting too much science done. If this model is too small for you, then perhaps this life-sized model is more to your liking. If you prefer your Turret small and cute, check out this plushie version.

Continue reading “3D Printed Portal Turret Moves And Talks Like The Real Thing”

G10 Is The 3D Print Surface You Crave

Print surfaces have been a major part of 3D printer development and experimentation since the beginning. [Makers Muse] has been experimenting with G10, a cheap high-pressure fiberglass laminate, and found that it’s an excellent candidate for most of your FDM printing needs. (Video embedded after the break.)

You’re probably more familiar with the fire-resistant version of G10, FR-4, the fiberglass substrate used for most PCBs. It’s also known by the brand name Garolite. [Makers Muse] tested with PLA, PETG (on his headphone build), ABS, ASA, PET, PCTG, and nylon. All the materials displayed excellent bed adhesion when heated to the appropriate temperature, and would often self-release the part as it cooled down. For TPU, the bed was left unheated to prevent it from sticking too well. 0.5 mm, 1.5 mm, and 3 mm G10 sheet thicknesses were tested, and [Makers Muse] found 1.5 mm to be the perfect balance between rigidity, and flexibility for removing particularly sticky prints.

G10 has been used in some commercial 3D printers, but there is very little information regarding its use beyond high-temperature materials like nylon. It leaves an excellent surface finish on the bottom of parts, as long as you take care not to scratch the bed. Compared to glass, its lower weight is advantageous for printers where the bed moves for the Y-axis. Another major advantage is the low cost, especially compared to some of the more exotic bed materials.

The results certainly look very promising, and we are keen to get our hands on some G10 for our own printers. If you have trouble finding it for sale, check out your local knife-making suppliers, who sell it as handle materials.

Continue reading “G10 Is The 3D Print Surface You Crave”

Art of 3D printer in the middle of printing a Hackaday Jolly Wrencher logo

3D Printering: Corrugated Plastic For Cheaper & Easier Enclosures

Clear acrylic panels have long been a mainstay of 3D printer enclosure designs, but they can also add significant cost in terms of money, shipping, weight, and hassle. An alternative material worth looking at is corrugated plastic (also known by its trade name coroplast) which is cheap, light, an excellent insulator, and easy to work with. Many enclosure designs can be refitted to use it instead of acrylic, so let’s take a closer look at what it has to offer.

What’s Wrong With Acrylic?

It’s not just the purchase price that makes acrylic a spendy option. Acrylic is fairly heavy, and shipping pieces the size of enclosure panels can be expensive. Also, cutting acrylic without special tools can be a challenge because it cracks easily if mishandled. Acrylic cuts beautifully in a laser cutter, but most laser cutters accessible to a hobbyist are not big enough to make enclosure-sized panels. If you are stuck with needing to cut acrylic by hand, here are some tips on how to get by with the tools you have.

It is best to source acrylic from a local shop that can also cut it to size with the right tools for a reasonable price, but it is still far from being a cheap material. There’s another option: corrugated plastic has quite a few properties that make it worth considering, especially for a hobbyist.

Continue reading “3D Printering: Corrugated Plastic For Cheaper & Easier Enclosures”

Test For 3D Printer Runaway

A few 3D printers have had a deserved reputation for bursting into flames. Most — but apparently not all — printers these days has firmware that will detect common problems that can lead to a fire hazard. If you program your own firmware, you can check to see if you have the protection on, but what if you have a printer of unknown provenance? [Thomas] shows you how to check for a safe printer. Also check out his video, embedded below.

The idea is to fake the kind of failures that will cause a problem. Primarily, you want to have the heaters turned on while the thermistor isn’t reading correctly. If the thermistor is stuck reading low or is reading ambient, then it is possible to just drive the heating element to get hotter and hotter. This won’t always lead to a fire, but it could lead to noxious fumes.

Continue reading “Test For 3D Printer Runaway”

3D Printing Steel Parts At Home Via Special Filaments

Rocket engines are great for producing thrust from fire and fury, but they’re also difficult to make. They require high-strength materials that can withstand the high temperatures involved. [Integza], however, has tried for a long time to 3D print himself a working rocket engine. His latest attempt involves printing an aerospike design out of metal.

Even steel couldn’t hold up to the fury of the rocket exhaust!

The project relies on special metal-impregnated 3D printer filaments. The part can be printed with a regular 3D printer and then fired to leave just the metal behind. The filament can be harsh, so [Integza] uses a ruby nozzle to handle the metal-impregnated material. Processing the material requires a medium-temperature “debinding” stage in a kiln which removes the plastic, before a high-temperature sintering process that bonds the remaining metal particles into a hopefully-contiguous whole. The process worked well for bronze, though was a little trickier for steel.

Armed with a steel aerospike rocket nozzle, [Integza] attempts using the parts with his 3D printed rocket fuel we’ve seen before. The configuration does generate some thrust, and lasts longer than most of [Integza]’s previous efforts, though still succumbs to the intense heat of the rocket exhaust.

Overall, though, it’s a great example of what it takes to print steel parts at home. You’ll need a quality 3D printer, ruby nozzles and a controllable kiln, but it can be done. If you manage to print something awesome, be sure to drop us a line. Video after the break.

Continue reading “3D Printing Steel Parts At Home Via Special Filaments”

3D Printed CNC Knee Mill

CNC mills will never match real heavy metal mills on hard materials, but that won’t stop people from pushing the limits of these DIY machines. One of the usual suspects, [Ivan Miranda] is at it again, this time building a knee mill from aluminum extrusions and 3D printed fittings. (Video after the break.)

Most DIY CNC milling machines we see use a gantry arrangement, where the bed is fixed while everything else moves around it. On most commercial metal milling machines, the table is the moving part, and are known as knee mills. In the case of [Ivan]’s mill, the table can move 187 mm on the X-axis and 163 mm on the Y-axis. The 1.5 kW spindle can move 87 mm in the Z-axis. All axes slide on linear rails and are driven by large stepper motors using ball screws. The table can also be adjusted in the Z-direction to accept larger workpieces, and the spindle can be tilted to mill at an angle.

To machine metal as [Ivan] intended, rigidity is the name of the game, and 3D printed parts and aluminum extrusion will never be as rigid as heavy blocks of steel. He says claims that the wobble seen on the video is due to the uneven table on which the mill was standing. Of course, a wobbly base won’t be doing him any favors. [Ivan] also had some trouble with earthing on the spindle. He nearly set his workshop on fire when he didn’t notice tiny sparks between the cutter and aluminum workpiece while he was cooling it with isopropyl alcohol. This was solved with the addition of the grounding wire.

While the machine does have limitations, it does look like it can machine functional metal parts. It could even machine metal upgrades for its 3D printed components. One possible way to improve rigidity would be to cast the frame in concrete. [Ivan] has built several other workshop tools, including a massive 3D printer and a camera crane. Continue reading “3D Printed CNC Knee Mill”

3D Printing Food University Style

While refitting a 3D printer for food printing isn’t really a new idea, we liked the detailed summary that appeared from a team from the University of Birmingham which converted an i3 clone printer to use a syringe extruder.

The syringe in question was meant for veterinarian use and is made of metal. The paper suggests that the metal is a better thermal conductor, but it was’t clear to us if they included a heating element for the syringe. In the pictures, though, it does appear to have some insulation around it. In any case, we imagine a metal syringe is easier to keep clean, which is important if you are depositing something edible.

Continue reading “3D Printing Food University Style”