Upgrade Board Adds GPIO Pins To Your Replica PDP-11

Like many Hackaday readers, [Steven Stallion] has had his eyes on the replica PDP-11 created by [Oscar Vermeulen] for some time now, and this summer he finally got the opportunity to build one himself. But while most owners might be content to just watch the Raspberry Pi based faux-retro computer blink away on a shelf, he wanted to explore putting the machine to more practical use. The end result is the PiDP-11 I/O Expander,  an add-on that lets the modern minicomputer interact with the world around it.

Developed after some discussion with [Oscar] himself, the Microchip MCP23016 based expander board fits neatly onto the PiDP-11 PCB, and [Steven] has made sure his installation guide meshes well with the replica’s documentation. The Pi’s I2C bus is actually broken out on the original PCB, so you just need to solder a header on and run some jumpers to where the expander is mounted. You’ll need to pull 5 V as well, and the installation guide has a few tips on convenient connection points.

The installed PiDP-11 I/O Expander

Each expander board gives you 16 GPIO pins which can be accessed over I2C, including support for interrupts which has been connected to GPIO 19 on the Raspberry Pi. [Steven] notes that you should be able to stack multiples of his expander up should you need even more free pins, though some fiddling with pull-up resistors and I2C addresses will likely be necessary.

The PCBs for the expander have been released under the two clause BSD license, so you’re free to spin up your own copies however you see fit. But if you’d like to save some time, [Steven] is offering assembled boards on Tindie.

Since [Oscar] first teased it at the 2015 Hackaday Supercon, we’ve been enamored with his fantastic PDP-11 replica. We’re always glad to see when somebody has picked up one of these wonderful kits, and doubly so when they’ve figured out a way to expand it in unexpected ways.

Detect Lightning Strikes With An Arduino

Lightning is a powerful and seemingly mysterious force of nature, capable of releasing huge amounts of energy over relatively short times and striking almost at random. Lightning obeys the laws of physics just like anything else, though, and with a little bit of technology some of its mysteries can be unraveled. For one, it only takes a small radio receiver to detect lightning strikes, and [mircemk] shows us exactly how to do that.

When lightning flashes, it also lights up an incredibly wide spectrum of radio spectrum as well. This build uses an AM radio built into a small integrated circuit to detect some of those radio waves. An Arduino Nano receives the signal from the TA7642 IC and lights up a series of LEDs as it detects strikes in closer and closer proximity to the detector. A white LED flashes when a strike is detected, and some analog circuitry supports an analog galvanometer which moves during lightning strikes as well.

While this project isn’t the first lightning detector we’ve ever seen, it does have significantly more sensitivity than most other homemade offerings. Something like this would be a helpful tool to have for lifeguards at a pool or for a work crew that is often outside, but we also think it’s pretty cool just to have around for its own sake, and three of them networked together would make triangulation of strikes possible too.

Continue reading “Detect Lightning Strikes With An Arduino”

Small sensor built into audio jack, held in tweezers

Measuring LED Flicker, With Phototransistor And Audio App

No one likes a flickering light source, but lighting is often dependent on the quality of a building’s main AC power. Light intensity has a close relation to the supply voltage, but bulb type plays a role as well. Incandescent and fluorescent bulbs do not instantly cease emitting the instant power is removed, allowing their output to “coast” somewhat to mask power supply inconsistencies, but LED bulbs can be a different story. LED light output has very little inertia to it, and the quality of both the main AC supply and the bulb’s AC rectifier and filtering will play a big role in the stability of an LED bulb’s output.

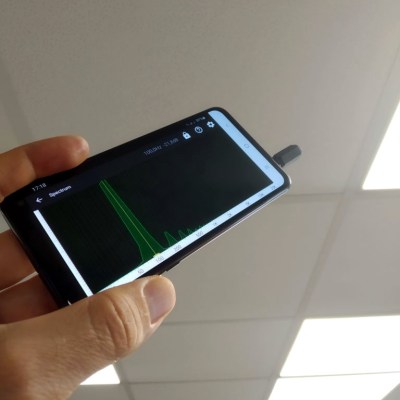
Mobile phone spectrum analyzer pointed at light source
The DIY photosensor takes the place of the microphone input.

[Tweepy] wanted to measure and quantify this effect, and found a way to do so with an NPN phototransistor, a resistor, and a 3.5 mm audio plug. The phototransistor and resistor take the place of a microphone plugged into the audio jack of an Android mobile phone, which is running an audio oscilloscope and spectrum analyzer app. The app is meant to work with an audio signal, but it works just as well with [Tweepy]’s DIY photosensor.

Results are simple to interpret; the smoother and fewer the peaks, the better. [Tweepy] did some testing with different lighting solutions and found that the best performer was, perhaps unsurprisingly, a lighting panel intended for photography. The worst performer was an ultra-cheap LED bulb. Not bad for a simple DIY sensor and an existing mobile phone app intended for audio.

Want a closer look at what goes into different LED bulbs and how they tick? We have you covered. Not all LED bulbs are the same, either. Some are stripped to the bone and others are stuffed with unexpected goodness.

ARM’s Chinese Venture Goes Sour

We’re used by now to many of the more capable microcontrollers and systems-on-chip that we use having an ARM core at their heart. From its relatively humble beginings in a 1980s British home computer, the RISC processor architecture from Cambridge has transformed itself into the go-to power-sipping yet powerful core for manufacturers far and wide. This has been the result of astute business decisions over decades, with ARM’s transformation into a fabless vendor of cores as IP at its heart. Recent news suggests that perhaps the astuteness has been in short supply of late though, as it’s reported that ARM’s Chinese subsidiary has gone rogue and detatched from the mothership taking the IP with it.

It seems that the CEO of the Chinese company managed to retain legal power when sacked by the parent company over questionable ties with another of his ventures, and has thus been able to declare it independent of its now-former parent. It still has the ARM IP up to the moment of detatchment and claims to be developing its own new products, but it seems likely that it won’t receive any new ARM IP.

What will be the effect of this at our level? Perhaps we have already seen it, as more Chinese chips such as the cheaper STM32 clones are likely to get low-end ARM cores as a result. It seems likely that newer ARM IP will remain for now in more expensive non-Chinese chip families, but in the middle of a semiconductor shortage it’s likely that we wouldn’t notice anyway. Where it will have a lasting effect is in future Chinese joint ventures by non-Chinese chip companies. Seeing ARM’s then-owner Softbank getting their fingers burned in such a way is likely to provide a disincentive to other companies considering a similar course. Whether ARM will manage to resolve the impasse remains to be seen, but it can hardly be a help to the rocky progress of their Nvidia merger.

See The Unseen With This Magnetic Field Visualizer

The average Hackaday reader likely knows, at least in the academic sense, what a magnetic field looks like. But as the gelatinous orbs in our skull can perceive only a tiny fraction of the EM spectrum, we have to take those textbook diagrams at face value. That is, unless you’ve got one of these nifty magnetic field visualizers developed by [Dr.Stone].

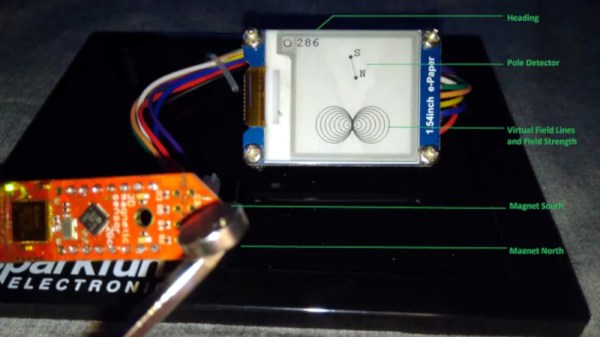
Using an XMC1100 microcontroller development board and a TLV49 3D magnetic sensor, the device is able to track the poles of a magnet in real-time and produce an approximation of what the field lines would look like on its electronic paper display. Relative field strength is indicated by the size of the visualization, which allows the user to easily compare multiple magnets. Incidentally, [Dr.Stone] notes that the current version of the hardware and software can only handle one magnet at a time; visualizing complex magnetic fields and more than two poles would take an array of sensors and likely a more powerful processor.

Do you need to visualize the field lines around a magnet? Perhaps not. But being able to quickly get an idea of how strong a magnet is and identify where its poles are could certainly come in handy. We’d like to see [Dr.Stone] take the project to the next phase and turn this into a handheld device for convenient workbench use. It would be a lot less messy than some of the previous methods we’ve seen for visualizing magnetic fields, though if you’re only worried about field strength, there’s arguably more straightforward ways to display it.

Continue reading “See The Unseen With This Magnetic Field Visualizer”

So How Does A Rocket Fly Sideways, Anyway?

It’s often said that getting into orbit is less about going up, and more about going sideways very fast. So in that sense, the recent launch conducted by aerospace startup Astra could be seen as the vehicle simply getting the order of operations wrong. Instead of going up and then burning towards the horizon, it made an exceptionally unusual sideways flight before finally moving skyward.

As you might expect, the booster didn’t make it to orbit. But not for lack of trying. In fact, that the 11.6 meter (38 feet) vehicle was able to navigate through its unprecedented lateral maneuver and largely correct its flight-path is a testament to the engineering prowess of the team at the Alameda, California based company. It’s worth noting that it was the ground controller’s decision to cut the rocket’s engines once it had flown high and far enough away to not endanger anyone on the ground that ultimately ended the flight; the booster itself was still fighting to reach space until the very last moment.

Astra’s rocket on the launch pad.

There’s a certain irony to the fact that this flight, the third Astra has attempted since their founding in 2016, was the first to be live streamed to YouTube. Had the company not pulled back their usual veil of secrecy, we likely wouldn’t have such glorious high-resolution footage of what will forever be remembered as one of the most bizarre rocket mishaps in history. The surreal image of the rocket smoothly sliding out of frame as if it was trying to avoid the camera’s gaze has already become a meme online, arguably reaching a larger and more diverse audience than would have resulted from a successful launch. As they say, there’s no such thing as bad press.

Naturally, the viral clip has spurred some questions. You don’t have to be a space expert to know that the pointy end of the rocket is usually supposed to go up, but considering how smooth the maneuver looks, some have even wondered if it wasn’t somehow intentional. With so much attention on this unusual event, it seems like the perfect time to take a close look at how Astra’s latest rocket launch went, quite literally, sideways.

Continue reading “So How Does A Rocket Fly Sideways, Anyway?”

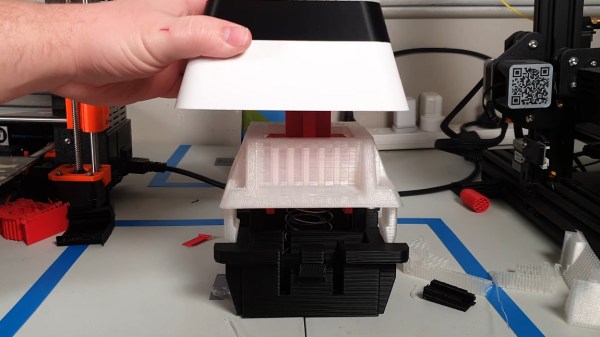
A giant, 3D-printed key switch that sends F to pay respects.

Big ‘F’ Key To Pay Big Respects

So your ally was slain. Your comrade has fallen. And somehow, that capital F coming from that tiny key is supposed to convey your respect? Please. What you need is a giant, dedicated F key that matches the size of your respect. And [Jaryd_Giesen] is gonna teach you how to build your own. Well, kind of. Between the Thingiverse build guide and the hilarious build video below, you’ll get the gist.

Making a custom spring using a drill and a 3D printed dowel.One of the coolest things about this build is the custom spring. Between a birthday time crunch and lockdown, there was just no way to source a giant spring in two days, so [Jaryd] printed a cylinder with a hole in it to chuck into a drill and stand in for a lathe. Ten attempts later, and the perfect spring was in there somewhere.

We love the level of detail here — making a pudding-style keycap to match the main keyboard is the icing on this clacky cake. But the best part is hidden away inside: the stem of the giant switch actuates a regular-sized key switch because it’s funnier that way. Since it’s a giant Gateron red, it doesn’t exactly clack, but it doesn’t sound linear, either, mostly because you can hear the printed pieces rubbing together. Check out the build video after the break, and hit up the second video if you just want to hear the thing.

Seeing things embiggened is one of our favorite things around here. Some things are just for looks, but other times they’re useful tools.
Continue reading “Big ‘F’ Key To Pay Big Respects”