3D Printing Giant LEGO-Like Blocks To Build Big Toys

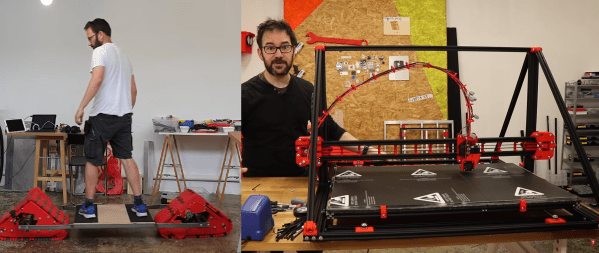
[Ivan Miranda] is all about big 3D prints. He’s now set about printing giant blocks in the vein of LEGO Technic to build himself a full-sized rideable go kart. The project is still in progress, but [Ivan] has made great progress with his design.

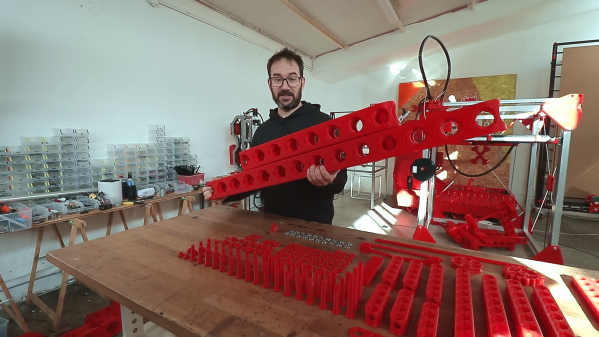
The benefit of 3D printing giant blocks like this is that they open up the possibilities for rapid prototyping of big projects. It’s already easy to snap together a little LEGO tank, boat, or car at the small scale. Bigger blocks would make that possible for larger builds, too. Plus, once you’ve got plenty of blocks, there’s no need to wait for the 3D printer to churn out parts. You can just play with your toolbox of existing components.

[Ivan]’s design has faced some teething problems along the way. He struggled to solve various coupling problems for joining the blocks in various orientations, and made iterative changes to solve the issue. Eventually, he realized if he just eliminated an offset between the top and side holes of his beam design, everything would neatly work out. Plus, he learned that he could print a tiny scale version of his big blocks in order to test out designs without using as much plastic.

We love the idea of having a garage full of adult-sized LEGO-style blocks for big projects. The only caveat is that you really need a giant printer like [Ivan’s] to make them. Continue reading “3D Printing Giant LEGO-Like Blocks To Build Big Toys”

Upgrade A 3D Printed CNC Milling Machine By Using It

One of the original ideas behind the RepRap project was for the machines to create their own upgrades. That philosophy is shining brightly in [Ivan Miranda] CNC milling machine project, which has been used to upgrade its aluminum and 3D printed frame components to steel.

For precision machining on hard metal, machine rigidity is of utmost importance. [Ivan]’s original CNC mill made extensive use of lightweight aluminum extrusions with 3D printed fittings. The machine worked, but the lack of rigidity was visible in the surface quality of the machine parts. The latest upgrade included a completely new frame from welded steel tubing and heavy aluminum mounting plates. The original machine was used to slowly machine slots in the steel tubes to retain the adjustability of the Z-axis. Some of the 3D printed motor mounts remained, so in the second video after the break [Ivan] used the newly upgraded machine to mill some aluminum replacements.

While this machine might not be perfect, we have to respect [Ivan]’s willingness to toss himself in at the deep end and show all failures and lessons learned the hard way. This project was clearly used as an opportunity to improve his welding and machining skills. His fabrication skills have come a long way from mainly 3D printed projects like the giant tracked tank and screw tank.

Continue reading “Upgrade A 3D Printed CNC Milling Machine By Using It”

3D Printed CNC Knee Mill

CNC mills will never match real heavy metal mills on hard materials, but that won’t stop people from pushing the limits of these DIY machines. One of the usual suspects, [Ivan Miranda] is at it again, this time building a knee mill from aluminum extrusions and 3D printed fittings. (Video after the break.)

Most DIY CNC milling machines we see use a gantry arrangement, where the bed is fixed while everything else moves around it. On most commercial metal milling machines, the table is the moving part, and are known as knee mills. In the case of [Ivan]’s mill, the table can move 187 mm on the X-axis and 163 mm on the Y-axis. The 1.5 kW spindle can move 87 mm in the Z-axis. All axes slide on linear rails and are driven by large stepper motors using ball screws. The table can also be adjusted in the Z-direction to accept larger workpieces, and the spindle can be tilted to mill at an angle.

To machine metal as [Ivan] intended, rigidity is the name of the game, and 3D printed parts and aluminum extrusion will never be as rigid as heavy blocks of steel. He says claims that the wobble seen on the video is due to the uneven table on which the mill was standing. Of course, a wobbly base won’t be doing him any favors. [Ivan] also had some trouble with earthing on the spindle. He nearly set his workshop on fire when he didn’t notice tiny sparks between the cutter and aluminum workpiece while he was cooling it with isopropyl alcohol. This was solved with the addition of the grounding wire.

While the machine does have limitations, it does look like it can machine functional metal parts. It could even machine metal upgrades for its 3D printed components. One possible way to improve rigidity would be to cast the frame in concrete. [Ivan] has built several other workshop tools, including a massive 3D printer and a camera crane. Continue reading “3D Printed CNC Knee Mill”

Building A Robotic Band To Make Up For Lack Of Practice

Learning to play a musical instrument well requires a significant time investment. [Ivan Miranda] had dreamt of doing this but made peace with the fact that his talents and motivation lay in building machines. However, he has decided to play to his strengths and is building a robotic band. See the videos after the break.

So far he has mechanized a hi-hat, snare drum, and a very basic guitar. The guitar is nothing more than a single string stretched across an aluminum frame, with an electronic pickup. Most of the work has gone into the solenoid-driven picking mechanism. He wanted to avoid picking the string when the solenoid is turned of, so he created a simple little mechanism that only comes in contact with the string when it’s moving in one direction. A bistable solenoid might be a simpler option here.

For the high hat, [Ivan] built a custom stand with two bistable solenoids to lift and drop the top cymbal. A solenoid-driven drumstick was also added. The snare drum uses a similar mechanism, but with a larger solenoid. So far he hasn’t really worked on a control system, focusing mainly on electronics.

[Ivan] points out several times that he has knows very little about making music, but we do enjoy watching him explore and experiment with this new world. Usually, his projects involve a lot more 3D printing, like when he built a giant nerf bazooka or a massive 3D printed tank. Continue reading “Building A Robotic Band To Make Up For Lack Of Practice”

3D Printed Camera Crane For The Workshop

When you make a living building stuff and documenting the process camera setups take up a lot of time, breaking expensive equipment is an occupational hazard. [Ivan Miranda] knows this all too well, so he built a fully-featured camera crane to save his time and camera equipment. Video after the break.

The basic design is a vertical mast with a pivoting camera mounted to the end. The aluminum mast telescopes for increased vertical adjustability, and rides on a plywood base with caster wheels. The aluminum pivoting arm is counterweighed to offset the camera head, and a parallel bar mechanism allows the camera to hold a constant vertical angle with the ground. Thanks to the explosion of home gyms during the pandemic, gym weights were hard to find, so [Ivan] used an ammo can filled with sand and screws instead. A smaller sliding counterweight on top of the arm allows for fine-tuning. [Ivan] also wanted to be able to do horizontal sliding shots, so he added a pulley system that can be engaged with a clutch mechanism to keep a constant horizontal angle with the camera. Most of the fittings and brackets are 3D printed, some of them no doubt on his giant 3D printer.

We can certainly see this crane meeting its design objectives, and we can’t help but want one ourselves. [Alexandre Chappel] also built a camera crane a while back which utilized a completely different arm mechanism. As cool as these are, they still pale in comparison to [mingul]’s workshop-sized 8-axis CNC camera crane. Continue reading “3D Printed Camera Crane For The Workshop”

Big Workshop Clock Is 3D Printing Done Right

Time is something uniquely important to humans, and they remain the only creatures on the planet to build devices to regularly track its progress. [Ivan Miranda] is one such creature, and built a giant 7-segment clock for his workshop that really ties the room together.

The clock is a testament to [Ivan]’s design skills in the 3D printed space. Taking advantage of his large format printer, each segment consists of a front panel, large single-piece diffuser, LED carrier, and backing plate. There are plenty of nice touches, from the interlocking ridges between each digit, to integral printed arrows on the inside that guide installation of the LED strips. Fit and finish approaches the level of a commercial product, a reward for [Ivan]’s years of practice in the field.

Electronically, an ESP8266 runs the show, synchronizing the time over its in-built WiFi connection. Each segment contains 9 WS2812B LEDs, wired up in a single long strip that’s addressed by the microcontroller. This means that the segments can be lit up to any color of the rainbow, though [Ivan] is a man who best appreciates the look of classic red.

[Ivan]’s long been a proponent of big 3D-printed builds — his tank-tracked electric skateboard is a particularly good example. Video after the break.

Continue reading “Big Workshop Clock Is 3D Printing Done Right”

Electric Skateboard With Tank Tracks, From A Big 3D Printer

One of the basic truths of ground vehicles is that they are always cooler with tank tracks. Maybe not better, but definitely cooler. [Ivan Miranda] takes this to heart, and is arguably the king of 3D printed tank projects on YouTube. He has built a giant 3D printed electric skateboard with tank tracks with the latest version of his giant 3D printer. Videos after the break.

The skateboard consists of a large steel frame, with tracked bogies on either end. Most of the bogie components are 3D printed, including the wheels and tracks, and each bogie is driven by a brushless motor via a belt. Some bends were added to the steel frame with just 3D printed inserts for his bench vice. The bogies are mounted to the frame with a standard skateboard truck, which allows it to steer like a normal skateboard, by tilting the deck. It looks as though this works well on a smooth concrete floor, but we suspect that turning will be harder on rough surface where the tracks can’t slide. We’ll have to wait for the next video for a full field test.

The large components for this skateboard were printed on [Ivan]’s MK3 version of his giant 3D printer. Although it’s very similar to the previous version, improvements were made in key areas. The sliding bed frame’s weight was reduced by almost 50%, and the wheels were rotated, so they ride on top of the extrusion below it, instead of on it’s side, which helps the longevity of the wheels. This also allows bed levelling to be done by turning the eccentric spacers on each of the wheels. The rigidity of base frame and x-axis beam were increased by adding more aluminium extrusions. Although he doesn’t explicitly mention the print volume, it looks to be the same as the previous version, which was 800x500x500. For materials other than PLA, we suspect a heated build chamber will be required have any chance of making big prints without excessive warping.

[Ivan] really likes big prints, with a number of 3D printed tanks, a giant nerf gun, and a sand drawing bot. Continue reading “Electric Skateboard With Tank Tracks, From A Big 3D Printer”