Teaching An Old Lathe New Tricks With A Programmable Power Feed

Ask anybody whose spent time standing in front of a mill or lathe and they’ll tell you that some operations can get tedious. When you need to turn down a stainless rod by 1/4″ in 0.030″ increments, you get a lot of time to reflect on why you didn’t just buy the right size stock as you crank the wheel back and forth. That’s where the lead screw comes in — most lathes have a gear-driven lead screw that can be used to actuate the z-axis ( the one which travels parallel to the axis of rotation). It’s no CNC, but this type of gearing makes life easier and it’s been around for a long time.

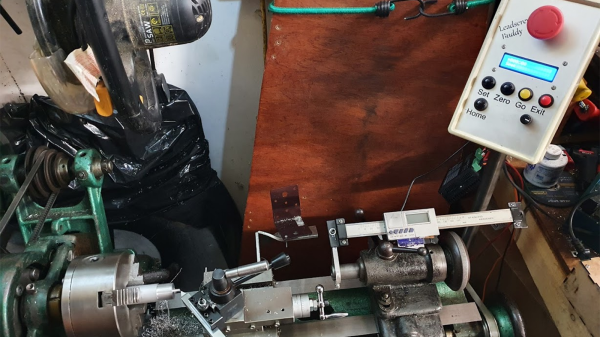
[Tony Goacher] took this idea a few steps further when he created the Leadscrew Buddy. He coupled a beautiful 1949 Myford lathe with an Arduino, a stepper motor, and a handful of buttons to add some really useful capabilities to the antique machine. By decoupling the lead screw from the lathe’s gearbox and actuating it via a stepper motor, he achieved a much more granular variable feed speed.

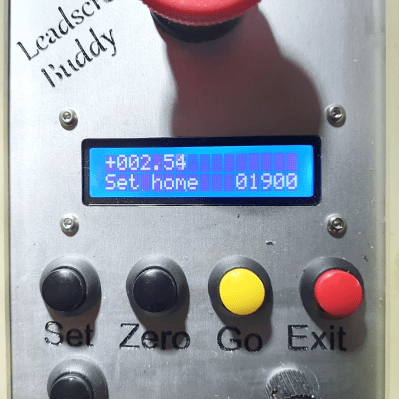
If that’s not enough, [Tony] used a rotary encoder to display the cutting tool’s position on a home-built Digital Readout (DRO). The pièce de résistance is a “goto” command. Once [Tony] sets a home position, he can command the z-axis to travel to a set point at a given speed. Not only does this make turning easier, but it makes the process more repeatable and yields a smoother finish on the part.

These features may not seem so alien to those used to working with modern CNC lathes, but to the vast majority of us garage machinists, [Tony]’s implementation is an exciting look at how we can step up our turning game. It also fits nicely within the spectrum of lathe projects we’ve seen here at Hackaday- from the ultra low-tech to the ludicrously-precise.

Continue reading “Teaching An Old Lathe New Tricks With A Programmable Power Feed”

Turning A Waterjet Cutter Into A Wood Lathe, For No Reason

On the shortlist of dream tools for most metalworkers is a waterjet cutter, a CNC tool that uses insanely high-pressure water mixed with abrasive grit to blast sheet metal into intricate shapes. On exactly nobody’s list is this attachment that turns a waterjet cutter into a lathe, and with good reason, as we’ll see.

This one comes to us by way of the Waterjet Channel, because of course there’s a channel dedicated to waterjet cutting. The idea is a riff on fixtures that allow a waterjet cutter (or a plasma cutter) to be used on tubes and other round stock. This fixture was thrown together from scrap and uses an electric drill to rotate a wood blank between centers on the bed of the waterjet, with the goal of carving a baseball bat by rotating the blank while the waterjet carves out the profile.

The first attempt, using an entirely inappropriate but easily cut blank of cedar, wasn’t great. The force of the water hitting the wood was enough to stall the drill; the remedy was to hog out as much material as possible from the blank before spinning up for the finish cut. That worked well enough to commit to an ash bat blank, which was much harder to cut but still worked well enough to make a decent bat.

Of course it makes zero sense to use a machine tool costing multiple hundreds of thousands of dollars to machine baseball bats, but it was a fun exercise. And it only shows how far we’ve come with lathes since the 18th-century frontier’s foot-powered version of the Queen of the Machine Shop.

Continue reading “Turning A Waterjet Cutter Into A Wood Lathe, For No Reason”

Build A Lathe Like It’s 1777

We’ve seen quite a few scratch built lathes here at Hackaday, but none quite like the handcrafted pole lathe put together by [Jon Townsend] and his band of Merry Men as part of their effort to build a period-accurate 18th century log cabin homestead. With the exception of a few metal spikes here and there, everything is made out of lumber harvested from the forest around them.

The lathe is designed to be a permanent structure on the homestead, with two poles driven into the ground to serve as legs. Two rails, made of a split log, are then mounted between them. The movable components of the lathe, known as “puppets” in the parlance of the day, are cut so they fit tightly between the rails but can still be moved back and forth depending on the size of the work piece. With two metal spikes serving as a spindle, the log to be turned down is inserted between the puppets, and wedges are used to lock everything in place.

So that’s the easy part. But how do you spin it? The operator uses a foot pedal attached to a piece of rope that’s been wound around the log and attached to a slender pole cantilevered out over the lathe. By adjusting the length and angle of this pole, the user can set the amount of force it takes to depress the pedal. When the pedal is pushed down the log will spin one way, and when the pole pulls the pedal back up, it will spin the other.

Since the tools only cut in one direction, the user has to keep letting the pressure off when the log spins back around. The fact that the work piece isn’t continuously rotating in the same direction makes this very slow going, but of course, everything was just a bit slower back in the 18th century.

So now that we’ve seen lathes made from wood, intricately cut slabs of stone, and a grab bag of junkyard parts, there’s only one question left. Why do you still not have one?

Continue reading “Build A Lathe Like It’s 1777”

Adding A Digital Readout To A Wood Lathe

The benefit of living in the modern era is that there are plenty of affordable machine tools on the market for the budding maker. However, to meet lower price points, products often forgo some of the nice-to-have features that make working easier. Of course, if you’ve got the skills to do it yourself, this needn’t be a problem, as [Zach] demonstrates.

[Zach] enjoyed using his wood lathe, but it didn’t come with a digital readout. Thankfully, retrofitting one was an easy, straightforward project. After a little research, a Hall effect sensor was chosen to detect the rotational speed of the lathe. The spindle was thus fitted with several magnets to trigger the sensor, allowing for higher resolution than just using a single device. An Arduino Nano was then used to monitor the output of the Hall effect sensor, displaying the rotational speed on a set of 7-segment displays. The project was then given its own custom PCB, and a nice 3D printed enclosure to fit it to the body of the lathe.

It’s a project that shows how easy it is to add functionality to basic machine tools using maker components. It also serves to demonstrate the value in giving a project a proper enclosure, to enable it to survive in a workshop environment. We’ve seen other hacky DRO mods before, too. Video after the break.

Continue reading “Adding A Digital Readout To A Wood Lathe”

Lathe And 3D Printer Help Repair Buried Buttons

Usually corroded buttons on a piece of electronic equipment wouldn’t be that big a deal to repair, but as [Haris Andrianakis] recently found out, things can get a little tricky when they are sealed inside a device meant to operate in a marine environment. Figuring out how to get into the case to clean the buttons up is only half the battle, when you’re done you still need to close it back well enough that the elements can’t get in.

The device in question is a tachometer intended for a Yamaha outboard motor, and the buttons are sealed between the guage’s face and the compartment in the rear that holds the electronics. Pulling the guts out of the back was no problem, but that didn’t get [Haris] any closer to the defective buttons. In light of the cylindrical design of the gauge, he decided to liberate the front panel from the rest of the unit with his lathe.

Removing the face was a delicate operation, to put it mildly. The first challenge was getting the device mounted securely in the chuck, but then the cutting had to be done very carefully so as not to damage the housing. Once he cut through the side far enough to get the face off, the actual repair of the buttons was fairly straightforward. But how to get it back together?

After a few missteps, [Haris] finally found a solution that have him the results he was looking for. He 3D printed a ring that fit the front of the gauge tightly, hot glued it into place, and used it as a mould to pour in black epoxy resin. Once the epoxy had cured, the mould was cut off and the gauge went back on the lathe so he could trim away the excess. He had to do some hand sanding and filing to smooth out the bezel, but overall the end result looks very close to factory.

We get it, there’s a lot to consider when you add a lathe to your workshop. But hacks like these are wonderful reminders of how many tricks these versatile machines are really capable of.

Continue reading “Lathe And 3D Printer Help Repair Buried Buttons”

High-Precision Air Bearing CNC Lathe And Grinder

You know you’re in for a treat when you are told that a lathe which can reach a resolution of one micrometer (1×10⁻⁶, a millionth of a meter, or 0.00004″ for people who love zeros) is ‘not hard to build’.  This is one of the opening statements in this video by [Dan Gelbart], as he walks the viewer through the details of a custom CNC lathe which he built. (Video embedded below.)

As it’s a combined CNC lathe and grinder, it uses custom software he had developed specifically for the machine. Much of the high precision of the machine is courtesy of air bearings. All but two of the air bearings were made by [Dan], with the two surplus air bearings he used coming from machines used in the semiconductor industry.

The bed of the machine is formed out of off-the-shelf reference granite, to which the other parts are epoxied, providing a stable base with well-defined dimensions. Though perhaps a few light years beyond most DIY lathe efforts, [Dan]’s videos nevertheless provide a treasure trove of tips and information for lathe builders and users alike. Certainly worth a look.

Thanks [Drew] for the tip in the comments.
Continue reading “High-Precision Air Bearing CNC Lathe And Grinder”

Scratch Building A Lathe From Pieces Of Granite

As hackers, we’re well accustomed to working with what we have on hand. That’s the name of the game, really. A large majority of the projects that have graced these pages are the direct result of trying to coerce a piece of hardware or software into doing something it was never designed to do, for better or for worse.

But even still, attempting to build a functional lathe using scrap pieces from granite countertops is a new one for us. [Nonsense Creativity] has spent the last several months working on this build, and as of his latest video, it’s finally getting to the point at which the casual observer might recognise where he’s going with it.

We won’t even hazard a guess as to the suitability of thick pieces of granite for building tools, but we’re willing to bet that it will be plenty heavy enough. Then again, his choice of building material might not be completely without precedent. After all, we once saw a lathe built out of concrete.

Building a lathe out of what you’ve got laying around the shop is of course something of a tradition at this point., but if you’re not quite up to the challenge of cutting your own metal (or granite, as the case may be), [Quinn Dunki] has put together a lathe buying guide that you may find useful.

Continue reading “Scratch Building A Lathe From Pieces Of Granite”