School Bus Keyless Door Lock Conversion

schoolbuslock2

When a school bus has finished its life ferrying children around, it often ends up as someone’s pet project. Most buses in the US, however, have annoying back doors that lock only from the inside, which isn’t very convenient if you’re loading/unloading gear. Drawing inspiration from another project that fit a simple deadbolt upgrade, [Leonard] took the build one step further and hacked together his own keyless entry deadbolt system.

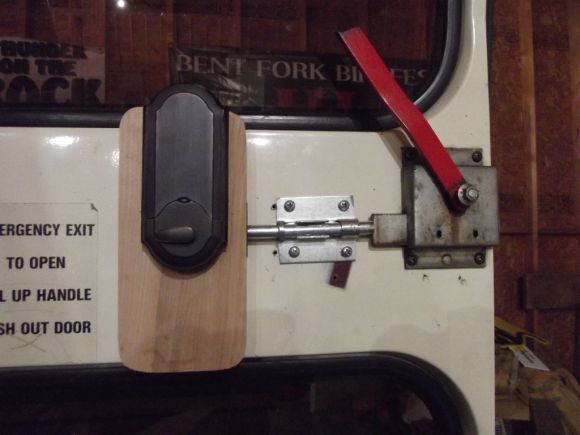
He started by removing the white safety bar that normally covers the long red handle and attached a slide bolt to the door. The slide bolt serves only as an extension for the deadbolt, which would otherwise get whacked by the red handle. [Leonard] made a few modifications to the slide bolt so it can sit flush against the bus’s lock bar, then went to work attaching the keyless deadbolt. At 2.5″, the bus’s door is actually thicker than standard doors, not to mention this build needs the deadbolt to move along the door’s surface to push the slide bolt fitted to the door. [Leonard] decided to throw in a chunk of wood as a kind of “simulated door,” which mounts next to the slide bolt and houses the deadbolt’s guts.

Check out the video after the break to make sense of the door’s operation and swing by [Leonard’s] blog to see what else he’s done to the bus. If you’re in the mood for more transportation hacks, make sure you see the Raspberry Pi CarPC.

Continue reading “School Bus Keyless Door Lock Conversion”

Wi-Fi Enabled Garage Door Opener

Normally, internet-controlled household devices are a cobbled together mashup of parts. This is great for a prototype, but if you’re looking for something that will last a decade in your garage, you’ll need something a little cleaner and more robust. [Phil]’s Internet-enabled garage door opener is just that, replete with a custom-made enclosure for his Arduino powered system.

The main hardware for [Phil]’s build is a Freetronix EtherTen, an Arduino clone with a built-in Ethernet interface. Aside from that, the electronics are simple: a relay, transistor, and diode provide the connection from the EtherTen to the garage door opener.

The software for this setup consists of a main file that sets up the web page, the serial monitor, and loops through the main program. There are a bunch of classes for initializing the web page, writing passwords to the EEPROM, activating the door, and setting the MAC and IP addresses.

Opening the door with this remote is a snap: with any WiFi enabled smartphone or tablet, [Phil] only needs to log onto his network, surf on over to the page hosted on the Arduino, and enter a password. From there, opening the door is just a press of a button. Passwords and other configuration settings cane be entered with MegunoLink. This software also includes a serial monitor to log who opened the door and when.

It’s an interesting and compact system, and handy to boot. You might sometimes forget your garage door opener, but we’re thinking if you ever find yourself without your phone, a closed garage door is the least of your problems.

Stealth Peephole Camera Watches Your Front Door

In this week’s links post we mentioned an over-powered DSLR peephole that purportedly cost $4000. So when we saw this tip regarding a relatively inexpensive digital peephole, we thought some of you might be a bit more interested.

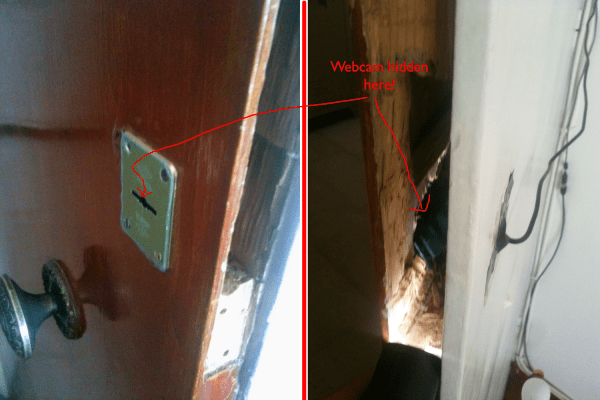
The hardware is quite simple; a decent webcam, a Raspberry Pi, and a powered USB hub. The camera gets stripped down to its PCB and hidden inside the door itself. Even if you see this from the inside it’s just a suspicious-looking wire which wouldn’t make most people think a camera was in use.

On the software side of things, [Alex] set up his Raspberry Pi as a 24/7 webcam server to stream the video online. Unlike using a cheap wireless CCTV camera, his video signals are secure. He then runs Motion, a free software motion detector to allow the camera to trigger events when someone comes sneaking by. It can be setup to send you a text, call you, play an alarm, take a picture, record a video… the list goes on. His blog has a full DIY guide if you want to replicate this system. We just hope you have a stronger door!

We covered a similar project back in 2011, but it had made use of real server instead of an inexpensive Raspberry Pi.

[Thanks Alex!]

Building A Barn Door Tracker For Astronomical Photography

That’s a pretty amazing image to catch peering out from your back balcony. The rig used to record such a gem is seen on the right. It’s called a Barn Door tracker and was built by [DCH972]. Details for this build are scattered all over the place, there’s a video (also found below), another album of some of the best images, and plenty of background info in the Reddit thread.

This design is also know as a Haig or Scotch mount. While we’re dropping links all over the place check out the Wikipedia page on the topic. The point of the system is to move the camera in such a way so that the stars appear to hold in the same place even though the earth is moving. There’s an ATmega32u4 breakout board riding on top of the breadboard. It’s doing some pretty heavy math in order to calculate the stepper motor timing. That’s because the mount is like a photo album, hinged at one side and opened on the other by a ball screw. This linear actuation needs to be meshed with the change in angle of the mounting platform, and finally it needs to sync with the movement of the earth. But once a series of images is captured correctly they can be processed into the composite photograph shown above.

If missed that SDR galactic rotation detector from last May you should find it equally compelling.

Continue reading “Building A Barn Door Tracker For Astronomical Photography”

Water Heater Controller Automates Garage Doors

water-heater-controller-automates-garage-doors

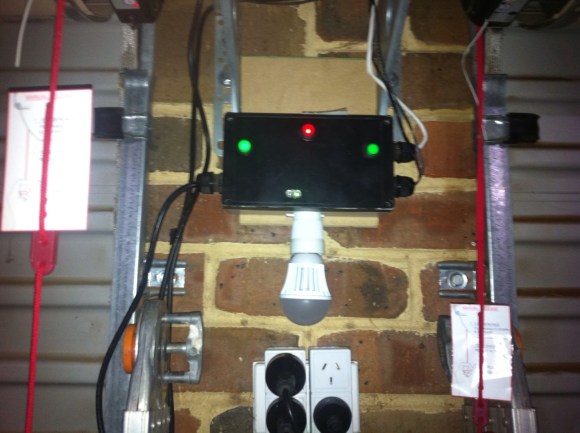
The black box mounted between two garage doors is actually a water heater controller. The entire assembly is a conglomeration of hacks which [Simon] added to his garage over the last four years. We’ll give you a quick rundown, but the entire story is told in his blog post.

Back when the house was built [Simon] was approached by the contractor who offered to throw in remote control for the garage door rollers for just 1500 Australian Dollars (about $1350 with today’s rates). That sounded quite steep to him. He managed to add his own remote control for about a third of the price. But there were a few missing features. Notably, a lack of a light that comes on when the doors open. He also didn’t like that the button inside the garage was on the motor, which is mounted quite high.

Years later his water heater controller needed a firmware upgrade from the manufacturer. Check this out: they replaced the entire controller rather than flashing the PIC 18F2321 inside. What a waste! But in this case [Simon] snagged the old unit, which included several mains rated relays. He connected one up to a light socket seen above, and outfitted several illuminated buttons on its original enclosure. Now he has the satisfaction of a light that comes on with when the door opens,  and shuts itself off after a preset delay.

Now his daughter wants smartphone control. But that’s as easy as hacking a Bluetooth headset.

Complicated IPhone Garage Door Opener

iphone-garage-door-opener

The round-about way this iPhone garage door opener was put together borders on Rube Goldberg. But it does indeed get the job done so who are we to judge? Plus you have to consider that the Apple products aren’t quite as hacker friendly as, say, Android phones — so this may have been the easiest non-Jailbreak way.

The main components that went into it are the iPhone, a Wemo WiFi outlet, and a 110V rated mechanical relay. But wait, surely it can’t be that simple? You’re correct, just for added subterfuge [Tall-drinks] rolled IFTTT into the mix.

You may remember hearing about If This Then That from the Alert Tube project. It’s a web-based natural language scripting service. Throw everything together and it works like this: The iPhone sends a text message which IFTTT converts to a Wemo command. A power cord connects the Wemo outlet to the 110V electrodes on the relay. The normally open connection of the relay is attached to the same screw terminals of the garage door opener as the push button that operates it. When the relay closes, the garage door goes up or down.

The biggest problem we have with this is the inability to know if your garage door is open or closed.

Hackerspace Security System Brings RFID, Video Feedback, And Automatic Doors

rfid-hackerspace-door-lock

[Will] has been hard at work on a replacement system for his Hackerspace’s RFID door lock. The original is now several years old and he’s decided to upgrade to a much more powerful processor, adding some bells and whistles along the way.

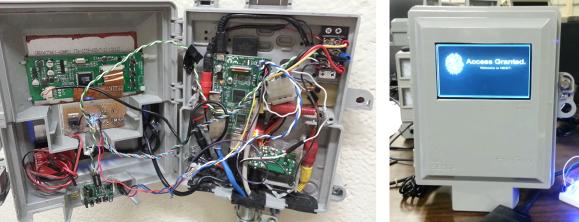
The control box seen above is the exterior component of the system. It’s a telephone service box like you’d find on the back of most houses in the US. They had a few of these lying around and they are a perfect choice because… well… they’re meant to be locking enclosures that brave the elements. [Will] made the jump from an Arduino which has run the locks for the last three years to a Raspberry Pi board. This gives him a lot of extra power to work with and he took advantage of that by adding a vehicle backup LCD screen for visual feedback. You can see it giving the ‘Access Granted’ message he used during testing but the demo video after the break shows that they plan to do some image scripting to display a head shot of the RFID tag owner whenever a tag is read.

There are several other features included as well. The system Tweets whenever a tag is read, helping the members keep tabs on who is hanging out at the space right now. It also patches into a sliding door which one of the members automated using a garage door opener motor.

Continue reading “Hackerspace Security System Brings RFID, Video Feedback, And Automatic Doors”