MRRF: Innovating Extruders And Dissolvable Filament

Think laying down molten plastic on a 3D printer is as easy as squeezing plastic filament out of a hot tube? It’s not, and anyone who had a 3D printer in 2009 would tell you as such. There were hobbed bolts that stripped the plastic into a gooey paste, extremely large x carriages that made everything wobbly, and nothing worked as well as it does today.

Technology marches on, and this year’s Midwest RepRap Festival had people showing off the latest advances in pushing plastic, and something that hasn’t seen much use yet – dissolvable filament.

Continue reading “MRRF: Innovating Extruders And Dissolvable Filament”

It’s Time The Software People And Mechanical People Sat Down And Had A Talk.

With the advances in rapid prototyping, there’s been a huge influx of people in the physical realm of hacking. While my overall view of this development is positive, I’ve noticed a schism forming in the community. I’m going to have to call a group out. I think it stems from a fundamental refusal of software folks to change their ways of thinking to some of the real aspects of working in the physical realm, so-to-speak. The problem, I think, comes down to three things: dismissal of cost, favoring modularity over understanding, and a resulting insistence that there’s nothing to learn.

Continue reading “It’s Time The Software People And Mechanical People Sat Down And Had A Talk.”

Super Sizing The Printrbot Metal Simple

The Printrbot Simple Metal is a good 3D printer, with a few qualifications. More accurately, the Printrbot Simple Metal is a good first 3D printer. It’s robust, takes a beating, can produce high-quality prints, and is a great introduction to 3D printing for just $600. There are limitations to the Printbot Simple Metal, the most important is the relatively small 150mm cubed build volume.

[ken.do] wanted to print large parts, specifically scale aircraft wings and panels. While the Printrbot can’t handle these things normally, the design of the printer does lend itself to increasing the size of the build volume to 500mm long and 500mm high.

Increasing the build height on the Printrbot is as simple as adding two longer smooth rods and a single threaded rod to the Z axis. Increasing the X axis is a bit trickier: it requires a very flat sheet that doesn’t warp or bend over 500 mm, even when it’s being supported in different places. [ken.do] is engineering stiffness into a build plate here. The solution to a huge bed is a two kilogram aluminum bed supported by heavier rails and riding on a massive printed bushing block. Does it work? Sure does.

If you want to print tall objects, the current crop of 3D printers has you covered: just get a delta, and you’re limited only by the length of the extrusion used in the body. Creating big objects in all three dimensions is a marginally solved problem – just get a big printer. Big printers have drawbacks, notably the incredible power requirements for a huge heated build plate.

The ability to print long objects is a problem that’s usually not addressed with either commercial 3D printers or RepRaps. We’re glad to see someone has finally realized the limitations of the current crop of 3D printers and has come up with a way to turn a very good first printer into something that solves a problem not covered by other 3D printers.

Hacklet 90: Schlieren Videos And Jigsaw Puzzle Robots

Happy new year, and welcome to the first Hacklet of 2016! The Hacklet is one of my favorite columns to write, as I get to talk about the great projects people are working on at Hackaday.io. Generally these articles follow a theme, but this being a new year, I’m going to try something new. As Hackaday’s community editor, I keep an eye on the new and updated projects feeds over on Hackaday.io. Every single week I see projects that surprise, impress, and inspire me. This week, I’m going to highlight a couple that I think are just freaking awesome.

torch
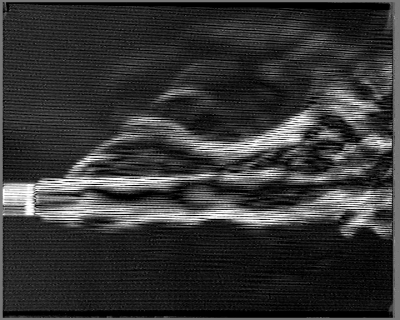
[Jana Marie] created the Schlieren-Videography project. Schlieren photography is used to image changing densities in fluids and this includes capturing density changes in air. Super and Hypersonic wind tunnels often use this technique to show airflow around a test model. Outside of the wind tunnel, Schlieren is great for showing density changes due to heat or different gasses. That’s exactly what [Jana] is doing in this project.

There are several ways to create Schlieren images, everything from lasers, to diffraction gratings, to razor blades can be used. [Jana] is using a simple moiré pattern and a couple of video tricks to capture Schlieren video. A high density moiré pattern will appear to flicker as density changes bend the light from the moiré stripes. [Jana] simply takes a reference image, then subtracts that image from the live video. The result of the subtraction is the Schlieren images you see above. [Jana] did more than explain the technique she’s used to create the videos, she’s also uploaded a processing sketch which performs the video subtraction magic.

jigsolve
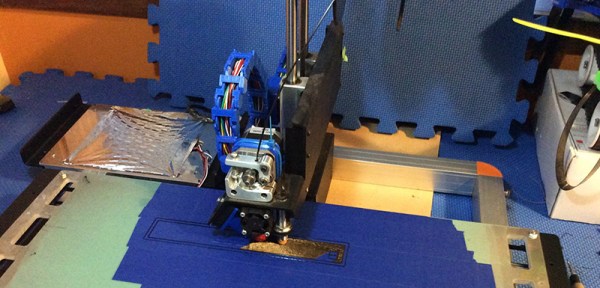
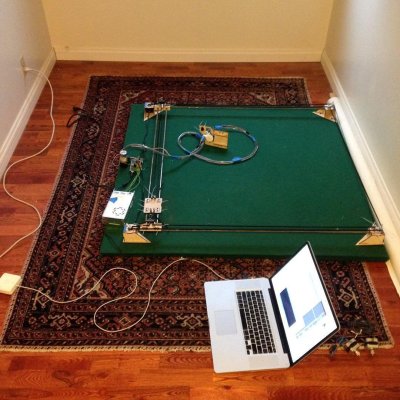
[Dan Royer] has a more domestic problem – his family loves starting jigsaw puzzles, but never seems to finish them. He’s decided to invite around 3 billion of his closest friends in the form of JigSolve, an internet connected jigsaw puzzle robot. JigSolve’s Cartesian platform  is a CoreXY based design. [Dan] used CoreXY as a guideline, but designed and built the hardware himself. The electronic hardware side borrows from RepRap 3D printers. An Arduino Mega2560 and RAMPS board control two NEMA 17 stepper motors. The Arduino is running firmware from Makelangelo, [Dan’s] own open source art robot.

The internet connected portion of the project comes in the form of a Java based IRC bot and a connection to the Freenode IRC network. The internet connected masses will have to see what they are working on, so a Logitech webcam will stream video to the ‘net.

The hardest part of JigSolve thus far has been the nozzle. Much like an SMT pick and place machine, the nozzle needs to pick up parts with a vacuum, then rotate them to the desired orientation. [Dan] is looking at different kinds of silicon, and he’s asking for suggestions. Stop over on the project page and offer him a hand!

That’s it for this week’s Hacklet. As always, see you next week. Same hack time, same hack channel, bringing you the best of Hackaday.io!

Hello RAMPS, Meet ESP8266

The proliferation of  DIY 3D printers has been helped in large measure by the awesome open-source RepRap project. A major part of this project is the RAMPS board – a single control board / shield to which all of the other parts of the printer can be easily hooked up. A USB connection to a computer is the usual link of choice, unless the RAMPS board has the SD-Card option to allow the 3D printer to operate untethered. [Chetan Patil] from CreatorBot built a breakout board to help attach either the ESP8266 WiFi or the HC-05 Bluetooth module to the Aux-1 header on the RAMPS board. This lets him stream G-code to the printer and allow remote control and monitoring.

While the cheap ESP8266 modules are the current flavor of the season with Hackers, getting them to work can be quite a hair tearing exercise. So [Chetan] did some hacking to figure out the tool chain for developing on the ESP module and found that LUA API from NodeMcu would be a good start. The breakout board is nothing more than a few headers for the ESP8266, the HC-05 and the Aux-1 connections, with a few resistors, a switch to set boot loader mode and a 3.3V regulator. If you’re new to the ESP8266, use this quick, handy, guide by [Peter Jennings] to get started with the NodeMCU and Lualoader. [Chetan]’s code for flashing on the ESP8266, along with the Eagle board design files are available via his Github repo. Just flash the code to the ESP8266 and you’re ready to go.

One gotcha to be aware of is to plug in the ESP module after the printer has booted up. Otherwise the initial communication from the ESP module causes the printer to lock up. We are sure this is something that can be taken care of with an improved breakout board design. Maybe use a digital signal from the Arduino Mega on the RAMPS board to keep the ESP module disabled for a while during start up, perhaps? The video after the break gives a short overview of the hack.

Continue reading “Hello RAMPS, Meet ESP8266”

glue rep strap

Wood & Glue RepStrap Works Surprisingly Well

Even with the cost of 3D Printers continually falling, entering the hobby still requires a significant investment. [Skeat] had some typical 3D Printer components available but didn’t have access to a printer for making the ever-so-common frame parts of typical RepRap designs.

glue rep strap [Skeat’s] plan was to cobble together a printer just good enough to print out parts for another, more robust one. The frame is made from wood, a very inexpensive and available material. The frame is not screwed together and doesn’t have any alignment tabs, it’s just hand cut pieces glued together. Each portion of the frame is laid out, aligned with a carpenter’s square and then glued together. This design and assembly method was intentional as [Skeat] didn’t have access to any precision tools. He stated that the only parts of the frame that had to be somewhat precise were the motor mount holes. The assembly process is well documented to aid anyone else looking to make something similar.

In addition to the wooden frame, all of the components are glued in place. That includes the bearings, rods, limit switches and even the Z axis motor! After seeing the photos of this printer, it would be easy to dismiss it as a poor performer. The below video shows that this printer’s print quality can keep up with any hobby level machine available. We wonder if [Skeat] is rethinking making another since this one works so well.

Continue reading “Wood & Glue RepStrap Works Surprisingly Well”

Hackaday Links Column Banner

Hackaday Links: June 7, 2015

I’ve said over and over again that Apple’s MagSafe port is the greatest advancement in laptop tech in the last 15 years. Those charger connectors break, though, so how do you fix it? With Lego, of course (Google translatrix). Use a light-colored 1×4 brick so the LED will shine through.

Want to learn Git commands? Here’s a great game that does just that. It’s a really well-designed game/tutorial that walks you through basic Git commands.

Lets say you’re just slightly paranoid about the Bad Guys™ getting into your computer with 0-days and roller blades. You’d like to connect this computer to the Internet, but you don’t want to leave it connected all the time. The solution? A timer for an Ethernet switch. It’s actually a better solution than doing the same thing with scripts: there’s a real, physical interface, and if the Bad Guys™ get in when you are connected, they could just enable the network adapter anyway. An extremely niche use case, but that’s 99% of the security hacks we see.

The DaVinci 3D printer is an okay printer if you’re cool with the Gilette model. The filament cartridges are chipped, and the software is proprietary. These problems have been solved, and now you can use a standard RepRap heated bed and glass with the DaVinci. At this point, people are buying the DaVinci just to tear it apart.