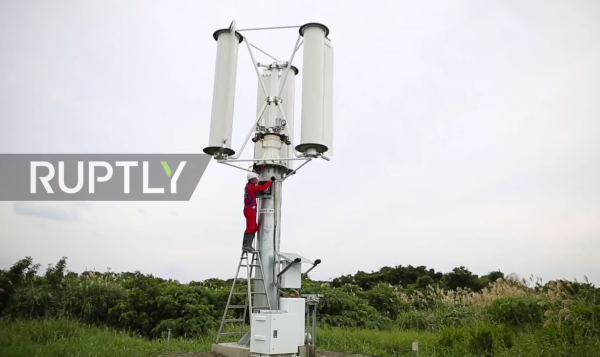
Injecting Code Into Mouse Firmware Should Be Your Next Hack

Here’s a DEF CON talk that uses tools you likely have and it should be your next hacking adventure. In their Saturday morning talk [Mark Williams] and [Rob Stanely] walked through the process of adding their own custom code to a gaming mouse. The process is a crash course in altering a stock firmware binary while still retaining the original functionality.

The jumping off point for their work is the esports industry. The scope of esporting events has blown up in recent years. The International 2016 tournament drew 17,000 attendees with 5 million watching online. The prize pool of $20 million ($19 million of that crowdfunded through in-game purchases) is a big incentive to gain a competitive edge to win. Contestants are allowed to bring their own peripherals which begs the questions: can you alter a stock gaming mouse to do interesting things?

The steelseries Sensei mouse was selected for the hack because it has an overpowered mircocontroller: the STM32F103CB. With 128 KB of flash the researchers guessed there would be enough extra room for them to add code. STM32 chips are programmed over ST-Link, which is available very inexpensively through the ST Discovery boards. They chose the STM32F4DISCOVERY which runs around  $20.

Perhaps the biggest leap in this project is that the firmware wasn’t read-protected. Once the data, clock, and ground pads on the underside of the board were connected to the Discovery board the firmware was easy to dump and the real fun began.

They first looked through the binary for a large block of zero values signifying unused space in flash. The injected firmware is designed to enumerate as a USB keyboard, open Notepad, then type out, save, and execute a PowerShell script before throwing back to the stock firmware (ensuring the mouse would still function as a mouse). Basically, this builds a USB Rubber Ducky into stock mouse firmware.

There are a few useful skills that make taking on this project a worthwhile learning experience. To compile your custom code correctly you need to choose the correct offset address for where it will end up once pasted into the firmware binary. The vector table of the original code must be rewritten to jump to the injected code first, and it will need to jump back to the mouse execution once it has run. The program flow on the left shows this. Both of these jumps require the program counter and registers to be saved and restored. The ARM stack is subtractive and the address will need to be updated to work with the added code.

The talk ended with a live demo that worked like a charm. You can check out the code in the MDHomeBrew repo. In this case the PowerShell script adds keyboard shortcuts for DOOM cheats. But like we said before, the experience of getting under the hood with the firmware binary is where the value will be for most people. With this success under your belt you can take on more difficult challenges like [Sprite_TM’s] gaming keyboard hack where the firmware couldn’t easily be dumped and an update binary was quite obsfucated.

Everything You Need To Know About Logic Probes

We just spent the last hour watching a video, embedded below, that is the most comprehensive treasure trove of information regarding a subject that we should all know more about — sniffing logic signals. Sure, it’s a long video, but [Joel] of [OpenTechLab] leaves no stone unturned.

At the center of the video is the open-source sigrok logic capture and analyzer. It’s great because it supports a wide variety of dirt cheap hardware platforms, including the Salae logic and its clones. Logic is where it shines, but it’ll even log data from certain scopes, multimeters, power supplies, and more. Not only can sigrok decode raw voltages into bits, but it can interpret the bits as well using protocol decoder plugins written in Python. What this all means is that someday, it will decode everything. For free.

[Joel] knows a thing or two about sigrok because he started the incredibly slick PulseView GUI project for it, but that doesn’t stop him from walking you through the command-line interface, which is really useful for automated data capture and analysis, if that’s your sort of thing. Both are worth knowing.

But it’s actually the hardware details where this video shines. He breaks down all of the logic probes on his bench, points out their design pros and cons, and uses that basis to explain just what kind of performance you can expect for $20 or so. You’ll walk away with an in-depth understanding of the whole toolchain, from grabber probes to GUIs.
Continue reading “Everything You Need To Know About Logic Probes”

Bessel Filter Design

Once you fall deep enough into the rabbit hole of any project, specific information starts getting harder and harder to find. At some point, trusting experts becomes necessary, even if that information is hard to find, obtuse, or incomplete. [turingbirds] was having this problem with Bessel filters, namely that all of the information about them was scattered around the web and in textbooks. For anyone else who is having trouble with these particular filters, or simply wants to learn more about them, [turingbirds] has put together a guide with all of the information he has about them.

For those who don’t design audio circuits full-time, a Bessel filter is a linear, passive bandpass filter that preserves waveshapes of signals that are within the range of the filter’s pass bands, rather than distorting them in some way. [turingbirds]’s guide goes into the foundations of where the filter coefficients come from, instead of blindly using lookup tables like he had been doing.

For anyone else who uses these filters often, this design guide looks to be a helpful tool. Of course, if you’re new to the world of electronic filters there’s no reason to be afraid of them. You can even get started with everyone’s favorite: an Arduino.

Broadpwn – All Your Mobiles Are Belong To Us

Researchers from Exodus Intel recently published details on a flaw that exists on several Broadcom WiFi chipsets. It’s estimated to affect nearly 1 Billion devices, from Android to iPhone. Just to name a few in the top list:

  • Samsung Galaxy from S3 through S8, inclusive
  • All Samsung Notes3. Nexus 5, 6, 6X and 6P
  • All iPhones after iPhone 5

So how did this happen? And how does a bug affect so many different devices?

A smart phone nowadays is a very complicated mesh of interconnected chips. Besides the main processor, there are several other secondary processors handling specialized tasks which would otherwise clog up the main CPU. One of those is the WiFi chipset, which is responsible for WiFi radio communications — handling the PHY, MAC and MLME layers. When all the processing is complete, the radio chipset hands data packets over the kernel driver, which runs on the main CPU. This means that the radio chipset itself has to have some considerable data processing power to handle all this work. Alas, with great power comes great responsibility.

Continue reading “Broadpwn – All Your Mobiles Are Belong To Us”

Nixie Tachometer Displays In Style

Nixietach II is a feature-rich tachomoter [Jeff LaBundy] built for his 1971 Ford LTD. It displays RPM with an error rate of only 0.03 RPM at 1,000 RPM

The latest iteration of a long-running project, [Jeff] approached it with three goals: the tachometer had to be self-contained and easy to install, the enclosure had to be of reasonable size, and it had to include new and exciting features over the first two versions.

The finished project consists of an enclosure mounted under the dash with a sensor box in the engine bay connected to the ignition coil. He can also flip a switch and the Nixietach serves as a dwell sensor able to measure the cam’s angle of rotation during which the ignition system’s contact points are closed.  The dash-mounted display consists of those awesome Soviet nixie tubes with a lovely screen-printed case. Its reverse has a USB plug for datalogging and a programming interface.

Hackaday has published some great car projects recently, like this chess set built from car parts and a 90-degree gearbox harvested from a wrecked car.


A Flexible Sensor That Moves With You

If you have a project in mind that requires some sort of gesture input or precise movements, it might become a nettlesome problem to tackle. Fear this obstacle no longer: a team from the Wyss Institute for Biologically Inspired Engineering at Harvard have designed a novel way to make wearable sensors that can stretch and contort with the body’s natural movements.

The way they work is ingenious. Layers of silicone are sandwiched between two lengths of silver-plated conductive fabric forming — by some approximation — a capacitance sensor. While the total surface area doesn’t change when the sensor is stretched — how capacitance sensors normally work — it does bring the two layers of fabric closer together, changing the capacitance of the band in a proportional and measurable way, with the silicone pulling the sensor back into its original shape as tension relaxes. Wires can be attached to each end of the band with adhesive and a square of thermal film, making an ideal sensor to detect the subtlest of muscle movements.

Continue reading “A Flexible Sensor That Moves With You”

Fail Of The Week: Good Prosthetic Hand Design Goes Bad

Is this a case of a good design gone wrong in the build phase? Or is this DIY prosthetic arm a poor design from the get-go? Either way, [Will Donaldson] needs some feedback, and Hackaday is just the right place for that.

Up front, we’ll say kudos to [Will] for having the guts to post a build that’s less than successful. And we’ll stipulate that when it comes to fully articulated prosthetic hands, it’s easy to fail. His design is ambitious, with an opposable thumb, fingers with three phalanges each, a ball and socket wrist, and internal servos driving everything. It’s also aesthetically pleasing, with a little bit of an I, Robot meets Stormtrooper look.

But [Will]’s build was plagued with print problems from the start, possibly due to the complex nature of the bosses and guides within the palm for all the finger servos. Bad prints led to creaky joints and broken servos. The servos themselves were a source of consternation, modified as they were for continuous rotation and broken apart for remotely mounting their pots in the hand’s knuckles. The video below relates the tale of woe.

There’s a lot to admire with [Will]’s build, but it certainly still has its issues. He’s almost to the point of other more successful DIY hand builds but just needs a little help. What say you in the comments line? Continue reading “Fail Of The Week: Good Prosthetic Hand Design Goes Bad”