[Ted Fried] recently found a beautiful HP 1600A/1607A logic analyzer set. State of the art in 1975, it looks like glorious Space Age equipment today. He decided to hook it up some modern gear to put it through its paces.
Wanting to give the equipment a proper shakedown, he enlisted a Teensy 4.1 to spit a deluge of logic at the HP unit. The microcontroller was tasked with generating 32 data signals along with two clock outputs to give the analyzer plenty to analyze. The HP 1600A handled this no problem, so [Ted] kept tinkering.
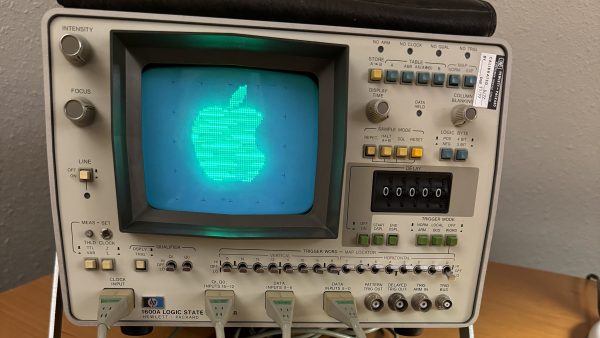
His next feat was to explore the addressable “MAP” function of the unit, which allowed writing to the 64×64 pixel display. The Teensy 4.1 was easily able to send images to the display, but [Ted] isn’t stopping there. He’s got plans to do the usual thing and get Bad Apple going on the hardware.
Getting a logic analyzer to analyze logic isn’t much of a hack, sure. But it’s instructive of how to approach working with such hardware. If you want to spit a bunch of logic out fast, a Teensy 4.1 is a great choice because it’s got a ton of IO and a ton of clock cycles to tickle it with.
We enjoyed seeing this old piece of hardware light up the phosphors once more. If you’ve got your own projects going on with classic bits of HP test gear, don’t hesitate to let us know!