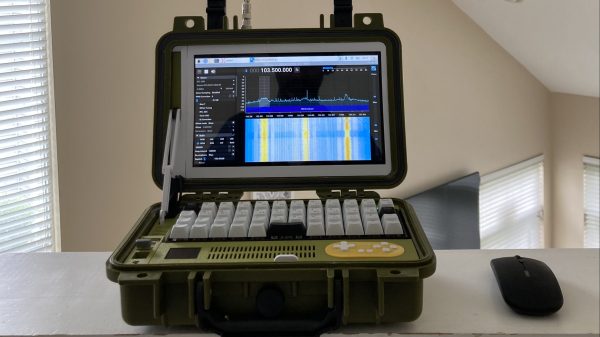
A wooden table with a puzzle on top of it sits in an off white room with a light wood floor. A red chair sits behind the table and the slats of the rolled away tambour top are visible.

Tambour Table With A Puzzling Secret

Some people really like puzzles. [Simone Giertz] is one of these serious puzzle lovers and built a transforming table (YouTube) to let her easily switch between puzzles and more mundane tasks, like eating.

While there are commercial solutions out there for game tables with removable tops and simpler solutions like hinged lids, [Giertz] decided to “make it more complicated and over-engineered than that.” A tambour top that rolls out of the way makes this a unique piece of furniture already, but the second, puzzle table top that can be raised flush with the sides of the table really brings this to the next level.

If that wasn’t already enough, the brass handles on the table are also custom made. In grand maker tradition, [Giertz] listened to her inner MYOG (Make Your Own Gnome) and got a lathe to learn to make her own handles instead of just buying some off the shelf.

If you’re less enamored of puzzles, you may want to see how Jigsaw Puzzles are Defeated. If you’re worried about losing pieces, check out these 3D Printed Sliding Puzzles.

Continue reading “Tambour Table With A Puzzling Secret”

A hand holding a paper cup pours orange resin into a mold. There are several different colors in a spiral inside a circular mold on a circular platform with holes around its perimeter sitting on a wooden table.

Reproducing Vinyl Records In Resin

While most are just plain, vinyl records can be found in a variety of colors, shapes, and some even glow in the dark. [Evan and Katelyn] decided to spruce up a plain old record by replicating it in bright, glow-in-the-dark resin.

By first making a silicone mold of the vinyl record and then pouring several different colors of resin into the resulting mold, [Evan and Katelyn] were able to make a groovy-looking record that still retained the texture necessary to transmit the original sounds of the record. The resulting piece has some static, but the music is still identifiable. That said, audiophiles would probably prefer to leave this up on the wall instead of in their phonograph.

Acrylic rings were laser cut and bolted together to build the form for the silicone mold with the original record placed at the bottom. To prevent bubbles, the silicone was degassed in a vacuum chamber before pouring over the record and the resin was cured in a pressure pot after pouring into the resulting mold.

If you’re interested in how records were originally made, check out this installment of Retrotechtacular. A more practical application of resin might be this technique to reproduce vintage plastic parts.

Continue reading “Reproducing Vinyl Records In Resin”

A segmented lamp made of circular slices of plywood. They are arranged as shutters around a long, skinny LED bulb in the center that gives off an incadescent-looking glow. A cord trails off to the left against the grey background.

Plywood Lamp Has Customizable Light Output

There’s something about light fixtures that attracts makers like moths to a flame. [danthemakerman] wanted something with a more configurable light output and built this Sculptural and Customizable Plywood Lamp.

In his detailed build log, [danthemakerman] describes how he wanted something “sort of like an analog dimmable light.” By using a stack of split plywood donuts hinged on a brass rod, he can vary the output and shape of the lamp. These shutters allow the lamp to go from bright to nightlight without using any electrical dimming components.

The plywood was rough cut on a bandsaw before being turned on a lathe. The light cover sections were then hollowed out with a Forstner bit and split in half. The tricky bit is the overlap of the cut on the hinge side of the shutters. Cutting the piece exactly in half would’ve required a lot more hardware to make this lamp work than what was achieved by patient woodworking.

If you’d like to see more ways to make light fixtures with plywood, check out this Hexagonal Lamp, these Upcycled Plywood and Glass Lamps, or this Laser-cut Sphere Lampshade that Packs Flat.

Exploring Piston Engine Design With LEGO

When learning about the design of a machine or mechanism, reading and watching videos is certainly effective, but it’s hard to beat hands-on experimentation. In the video after the break, [Brick Technology] uses LEGO to gain some practical insight into the world of piston engine design, from single-cylinder all the way up to radial twelve-cylinder engines.

Using pneumatic cylinders from the LEGO Technic series, [Brick Technology] starts by getting the basics working with a single-cylinder design. Besides the fact that there are no fuel-air explosions involved, these pistons are also double-acting thanks to a valve mechanism that switches the pressurized side of the piston as it reaches the end of its stroke. After a couple of experiments, he settles on using a bank of six two liter soda bottles as a source of pressurized air.

He also increased the performance of the LEGO cylinders by drilling out the ports and adding silicon oil for lubrication. In the initial prototypes, the cylinders also acted as connecting rods, tilting back and forth as the crankshaft rotates. After some testing, he discovered he could increase efficiency by constraining the cylinder with a slider mechanism and adding a separate connecting rod.

With the basics done, [Brick Technology] could start experimenting with engine arrangements and geometry. Inline two, three, and four cylinders and V2, V6, V8, and even R12 were all on the menu. He could also change crankshaft geometry to trade torque for RPM and vice versa, and build a starter motor, and torque generator.

Just like [Brick Technology]’s LEGO electronic drums and vortex machine, this video gives us a itch that can only be scratched by a few hundred LEGO pieces. For rapid prototyping of course.

Infinitely Scrolling E-Ink Landscape Never Repeats

Traditional Chinese landscape scrolls can be a few dozen feet long and require the viewer to move along its length to view all the intricate detail in each section. [Dheera Venkatraman] replicated this effect with an E-Ink picture frame that displays an infinitely scrolling, Shan Shui-style landscape that never repeats.

E-ink picture frame with infinitely scrolling landscape
A new landscape every time you look

The landscape never repeats and is procedurally generated using a script created by [Lingdong Huang]. It consists of a single HTML file with embedded JavaScript, so you can run it locally with minimal resources, or view the online demo. It is inspired by historical artworks such as A Thousand Li of Rivers and Mountains and Dwelling in the Fuchun Mountains.

[Dheera]’s implementation uses a 10.3″ E-ink mounted in an off-the-shelf picture frame connected to a Raspberry Pi Zero running a forked version of [Lingdong]’s script. It does a decent job of avoiding the self-illuminated electronic look and creates a piece of decor that you could easily just stand and stare at for a long time.

Computer-generated art is making a lot of waves with the advent of AI models like Dall-E and Stable Diffusion. The ability to bring original art into existence with a simple phrase will have an undeniably profound long-term effect on the art world.

Lighting Up Glue Stick Bicycle Tyres With RGB

Being visible to motorists is a constant concern for cyclists, but we doubt [The Q] will have this problem with his RGB LED illuminated tires made from glue sticks.

The project started with a set of 3D-printed tire molds that bolt to the standard wheels. A bot of melted glue sticks is poured into the mold, allowed to cool, and the mold sections are removed with the help of a heat gun after cooling. We doubt the weight and hardness make the tires particularly practical, but you can’t make normal tires glow from the inside. 

The idea to illuminate the tires probably came after molding, because they had to be cut off to fit the LEDs. [The Q] built a simple hot wire jig with a piece of nichrome wire between two screws and used it to cut a few millimeters from the inside of the tire and fit a sleeved RGB LED strip in the wheel. Power come from a set of three 18650 batteries housed with a wireless controller in a 3D printed hub-mounted enclosure.

Like [The Q]’s hubless and partial wheel bicycles, it’s a definite head-turner, with function following form. 

Continue reading “Lighting Up Glue Stick Bicycle Tyres With RGB”

Moving Big Stuff Without The Tears

It’s something that has probably happened to more than one of us over the years, there’s an unmissable opportunity at the machinery auction or on eBay, with the small snag that it weighs a ton and requires a flatbed truck to transport. A big lathe, a bandsaw, or the like.

The sensible option would be to hire a crane or a forklift to do the job, but cash is tight so at the appointed hour the truck turns up at the end of your driveway to meet you and as big a group of your friends as you could muster. You’re going to shift this thing with pure muscle power! If you grow up around any form of workshop-based small business it’s something you’ll no doubt be familiar with. Craftsmen seem to have a network for such moments, so just as the blacksmith might find himself helping the woodworker unload a huge saw bench, so might they both spend an unexpected afternoon at the engineering shop manhandling a lathe.

It came as a shock in a casual hackerspace conversation to realise how many times I’d been involved in such maneuvers at home, for friends, or at hackerspaces, and how that experience in doing so safely isn’t necessarily something that’s universal. Maybe it’s time to tell the story of moving big machines on limited resources. This is something that starts by thinking ahead and planning what you’ll need and where you’ll need it. Continue reading “Moving Big Stuff Without The Tears”