There is something special about food that has been cooked in a grill, barbecue, or broiler. The charred surface brings both flavour and texture to the food, that other cooking methods fail to emulate. Of course, should you come from a part of the world in which the locals steam their hamburgers those are fighting words, but for [Robots Everywhere] the prospect of a flaccid patty cooked in a microwave oven was too much.
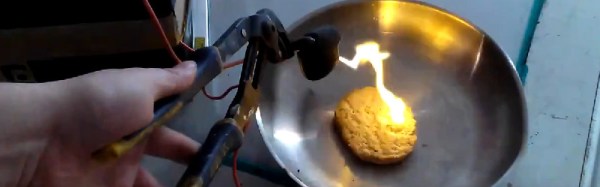
His solution? Broil the microwaved meat in double-quick time, using a plasma arc generated with a high voltage supply. The patty is placed in a grounded metal frying pan, and the high voltage probe is run over each side with accompanying plasma and sparks to lend that essential grilled exterior.
The power supply is a fairly simple affair, if a little hair-raising. A simple push-pull MOSFET oscillator drives a pair of flyback transformers whose secondaries are connected in series. It’s not the most efficient way to generate high voltages with a flyback transformer – the key is in the word “flyback” – but it generates enough juice for the job in hand.
It’s hardly the safest cooking method, and we’d be worried about contamination from whatever metal the electrode is made from. But it’s entertaining to watch, as you’ll be able to see from the video below the break.
Continue reading “Cooking With The Awesome Power Of Plasma!”