4 Axis Delta Router Says Hello World

deltaRouter

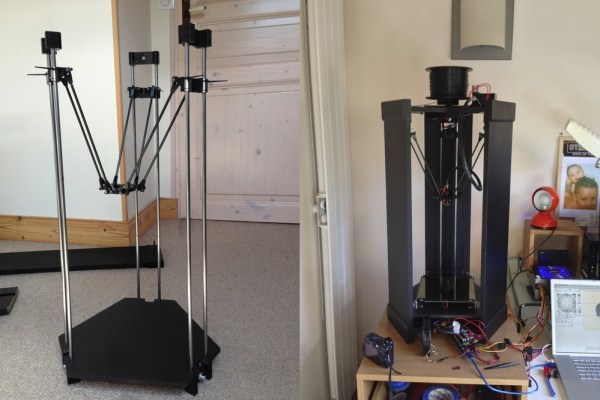
[Bart] stood upon the shoulders of the delta 3D printer giants and created this 4 axis delta router. The router was originally created for ORD Camp, an invite only hackers gathering. Each year he creates a new thing with one main purpose: to spark conversation. In his own words “Practicality and suitability are way down the list, so go ahead and snark away. If you do, you are missing the point.”

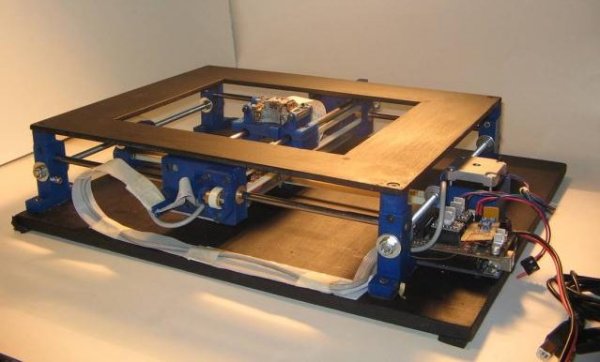
[Bart] did things a bit differently with his delta. For motors, he went with non captive steppers. “Non captive” means that rather than a shaft, the motor has a hollow threaded nut which rotates. A lead screw (usually with an acme thread) is passed through this nut. As the motor’s nut turns, the screw is pushed or pulled through the motor, creating a linear actuator. The only major downside is that a non captive stepper motor can’t be adjusted by hand. The screw doesn’t turn and neither do any external parts of the motor. For structure, the router uses MakerSlide and v-grove wheels. The spindle is a simple brushless hobby motor and 30 amp speed control. Rather than the outrunner motors we’ve seen lately, [Bart] wisely chose an inrunner motor normally used on R/C cars. Inrunners generally have less torque than their outrunner counterparts, but they make up for this in RPM. [Bart’s] motor is capable of 30,000 RPM, which is plenty for spindle duty. We think the motor bearings will probably need an upgrade, as the original motor bearings weren’t designed for side loads. For a controller, [Bart] utilized an  Azteeg X3 running Repetier.

The router made a great showing at camp, and [Bart] decided it needed a 4th axis. He sourced a rotary axis from eBay. To keep the software simple, he connected the rotary axis to the extruder outputs on his controller. He was then able to hack the mach3 wrapped rotary post processor to output extruder commands. The results look great. [Bart] says the system definitely needs a tailstock, and we agree. We’re looking forward to the next update on this machine!

Continue reading “4 Axis Delta Router Says Hello World”

Laser-Based PCB Printer

Being able to create PCB’s at home is a milestone in the DIYer’s arsenal. Whether you physically mill or chemically etch boards, it’s a tricky task to perfect. [Charlie & Victor] are working towards a solution to this complicated chore. They call their machine the DiyouPCB. DiyouPCB is an open source PCB etching project consisting of both hardware and software components.

The project is based on using a Blue Ray optical pickup. The pickup was used in its entirety, without any modification, to simplify the build process. In order to use the stock pickup, [Charlie & Victor] had to reverse engineer the communication protocol which also allowed them to take advantage of the auto-focus feature used while reading Blue Ray discs. The frame of the machine is reminiscent of a RepRap, which they used to do preliminary testing and laser tuning. The X and Y axes run on brass bushings and are belt driven by stepper motors which are controlled by an Arduino through a specially designed DiyouPCB Controller Shield.

Continue reading “Laser-Based PCB Printer”

Touring Deezmaker, The First *Good* 3D Printer Store In The World

When we visited the Crash Space hackerspace earlier this week, it came to our attention we were staying mere blocks away from Deezmaker, a 3D printer store in beautiful Pasadena that is home base for the Bukobot and Bukito printers, an awful lot of awesome printed plastic things, and [Rich] a.k.a [whosawhatsis], creator of the RepRap Wallace and all this stuff. Obviously a tour was in order.

Inside Deezmaker is a treasure trove of printed baubles and a fishbowl full of a herringbone planetary gear systems free for the taking. They have printers running all the time, a very nice lab for [whosawhatsis], and enough work space to host a few workshops every week.

In the video below, [Diego], the big cheese of Deezmaker takes us around the shop showing off his wares. [whosawhatsis] also makes an appearance showing off his latest invention, the Bukito printer. It’s a very small and incredibly portable printer that can be powered by batteries. They’re using a 3-cell 5000mAh lipo battery when they take the Bukito camping. I didn’t catch how long the battery lasts, but it’s more than enough to squirt out a few of the gear systems they give away.

Video after the break.

Continue reading “Touring Deezmaker, The First *Good* 3D Printer Store In The World”

Lux: A 100% Open Source Camera

luxCamera

[Kevin Kadooka] recently finished his open source camera. The Lux Camera is 100% open source. Lux uses no parts from other cameras – not even a lens! To date we’ve only seen this with achieved with pinhole cameras. [Kevin] isn’t new to camera hacking. He was the man behind the Duo camera, which had a successful Kickstarter campaign in February of 2013. Duo is a DIY camera, but it still required lenses from Mamiya-Sekor, and a shutter from Seiko. Lux is a different animal. It has a manual focus 65mm f/5.6 Single Element lens. The shutter is [Kevin’s] own solenoid based leaf shutter design. Just as in the original shutter, an Arduino controls shutter operation and timing.

The main camera body and many of its parts are 3D printed. [Kevin] got some very nice quality parts from Shapeways 3D printing service. We have to say that some of the assemblies look a bit complex for desktop printers. However since everything is open source, anyone willing to put the time in could adapt them for the average RepRap or Ultimaker. [Kevin] has posted detailed build photos, as well as some photos taken with the Lux on his flickr stream. The pictures have  a decidedly holga-esque look to them, due in part to the single element lens. Even with this limitation, we love the idea of having a brownie style camera built completely from scratch.

3DMonstr Printer: 8 Cubic Feet Of Build Volume

3D Monster

So you’re looking at 3D printers, but the build volumes for the current offerings just aren’t where you’d like them to be. [Ben Reylblat] had the same problem and came up with the 3DMonstr, an enormous printer that has (in its biggest configuration) a two foot cubed build volume, four extruders, and the mechanical design to make everything work.

Most of the ginormous 3D printers we’ve seen are basically upgraded versions of the common table-top sided models. This huge Ultimaker copy uses the same rods as its smaller cousin, and LeBigRap also uses woefully undersized parts. The 3DMonstr isn’t a copy of smaller machines, and instead uses very big motors for each axis, ball screws, and a proper welded frame. It’s highly doubtful anyone will call this printer a wobblebot.

The 3DMonstr comes in three sizes: 12 inches cubed, 18 inches cubed, and 24 inches cubed, with options for two to four extruders.  We caught up with the 3D Monstr team at the NYC Maker Faire, and from first impressions we have to say this printer is freakin’ huge and impeccably designed.

3D Printering: Making A Thing In AutoCAD, Part II

printering

It’s time once again for another part in 3D Printering’s series of Making A Thing. Last week was a short tutorial on the beginnings of making a thing in AutoCAD. This is an extremely complex software package, and in a desire to make things short and sweet, I broke this AutoCAD tutorial into two parts.

Since we already covered the 2D design portion of AutoCAD, part II of this tutorial is going to turn our 2D part into a three-dimensional object. Check out the rest of the tutorial below.

Continue reading “3D Printering: Making A Thing In AutoCAD, Part II”

Custom Rostock 3D Printer Makes Use Of IKEA Components

After discovering 3D printers, [Turi] had to make one. This past summer he did, and it looks fantastic.

He chose the Rostock design not only because it can print big parts quickly, but also because of its mesmerizing operation. 3D printers are generally fun to watch for the first few minutes, but Rostocks tend to have an even more robotic appeal in the motion of its end effector (robotics lingo for tool head).

The cool part of this build is [Turi’s] choice of enclosure. He had an IKEA cabinet collecting dust in his basement, so he decided to make use of its drawers for the main structure of the Rostock. A bit of wood work and some matte black spray paint later, and he has one great looking enclosure! The rest of the build was pretty standard, making use of 3D printed parts, a RAMPS 1.4 control board mounted on an Arduino Mega, and a computer power supply. He did make his own control arms using carbon fiber arrows, though!

To see it up close and in action, check out the quick video after the break.

Continue reading “Custom Rostock 3D Printer Makes Use Of IKEA Components”