LED Matrix Mask Will Scare Up Holiday Cheer

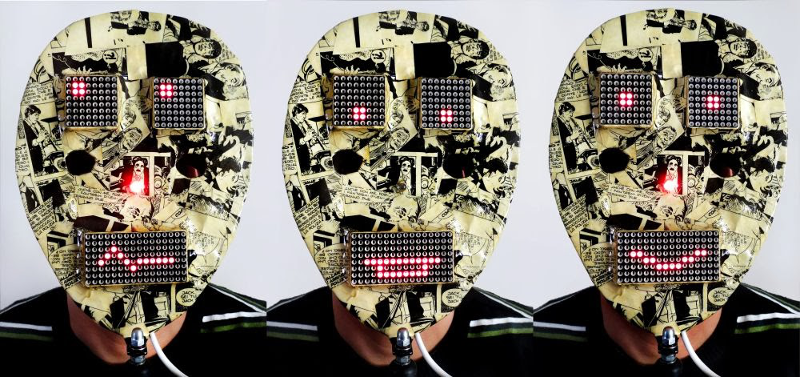
[Davide] sent us this fun LED matrix mask he built using an ATMega8 and 74LS595N shift registers. Each of the eyes is an 8×8 LED matrix, and the mouth is made from two 8x8s. [Davide] used a ULN2803A Darlington transistor array to drive the matrices.

When the user steps behind the mask, an IR sensor detects that a face is within range and activates the facial features. The code randomly runs the eye and mouth patterns. If the user starts speaking, a microphone element detects his voice and a separate speaking mouth pattern is executed.

The mask body and stand are découpaged with pages from Dylan Dog comics. [Davide] says he built the mask years ago, but decided to submit it to the 2013 Inverart Art Fair in Milan. As you can probably imagine, the mask has been a big hit with the kids so far. Stick around to see [Davide]’s Santa-fied demonstration after the jump. [Davide] didn’t give us any details on that sweet hat, unfortunately.

If you require a better degree of protection or more LEDs, check out this LED helmet.

Continue reading “LED Matrix Mask Will Scare Up Holiday Cheer”

Direct, Wall-Mounted Storage With Lasers And Polymorph

parts-storage-brackets

We’re sure everyone could use some more storage and organization in their workshop. [Nixie] is no exception, though he also hates sacrificing tabletop space for boxes. His solution was to attach them to the wall directly by hacking together some brackets. This hack allowed him to hang everything without using internal screws which were a pain to get at if he need to removed the boxes from the wall to take with him.

[Nixie] started by laser-cutting a negative pattern for a mounting bracket that would fit the dovetail rails already on the sides of the boxes. He then pressed a piece of polymorph into this mold, slid the bracket along the side of the box…and realized it wouldn’t work. The piece wiggled around too much because it did not sit firmly in the rail. Back at the drawing board, [Nixie] split the project into two steps. He cast the screw-hole portion of the bracket in its own separate mold, then cast the railing part of the bracket directly in the dovetail section of the box, providing him a much higher degree of accuracy. After joining the two pieces, [Nixie] had a sturdy support bracket that he duplicated and attached around the rest of the bins.

Fubarino Contest: A Sculpted Room With LEDs

[Sisam] and [Mclien] are a father and son team that built this sculptural room with an organic looking built-in seating area and sculpted lamp shades. When you have a room that looks this cool, the only option you have is to fill it with RGB LEDs, and it just so happens their light controller has a great Hackaday Easter egg.

The room lighting is provided by a Shifty VU shield, OctoBar LED controller, and a few of these RGB LED modules. All pretty standard for an RGB LED project, but where this contest submission really shines is the controller for all the room lights. It has three sliders for the red, green, and blue channels, beefy toggle switches for each light location, an LCD for showing the program mode, a rotary switch, and push buttons for cycling through stored setups.

The Easter egg for this project comes into play whenever the color value of the lights is set to Hackaday green, #00c100. When that happens, the Hackaday URL is displayed on the controller’s display.

Awesome work, and a really cool-looking room. We wouldn’t mind a tutorial on how you sculpted it, [Sisam].


This is an entry in the Fubarino Contest for a chance at one of the 20 Fubarino SD boards which Microchip has put up as prizes!

Retrotechtacular: Submarine Cable Splicing Is Serious Business

Really. As this wonderfully narrated talkie picture from 1939 will attest, keeping even one drop of water from penetrating undersea cables is of the utmost importance.

How do they do it? Many, many layers of protection, including several of jute wrapping. The video centers on splicing a new cable to an existing one in the San Francisco Bay to bring the wonder of telephony to a man-made island created for the Golden Gate International Expo.

The narrator makes these men out to be heroes, and when you see how much lead they came into contact with, you’ll understand what he means. Each of the 1,056 individually insulated wires must be spliced by hand. After that comes a boiling out process in which petrolatum is poured over the splice to remove all moisture. Then, a lead sleeve is pulled over the connections. Molten lead is poured over the sleeve and smoothed out by hand.

At this point, the splice is tested. The sleeve is punctured and nitrogen gas is pumped in at 20psi.  Then comes the most important step: the entire sleeve is painted with soap suds.  Any gas that escapes will make telltale bubbles.

Once they are satisfied with the integrity of the sheath, they wrap the whole thing in what appears to be lead cables and pound them into submission. Surely that would be enough, don’t you think?  Nope.  They weld the cables all around and then apply two coats of tar-treated jute wrapping, which retards saltwater corrosion considerably.

Continue reading “Retrotechtacular: Submarine Cable Splicing Is Serious Business”

Fubarino Contest: A Really, Really Old Plotter

DCF 1.0

Decades ago, [Vegipete] found an old drum plotter at a university used equipment sale. This plotter was old in the 80s, so like any great tinkerer, [Vegi] reverse engineered the plotter’s circuitry and got it working with his Apple ][.

The years went by, dust accumulated, and in 2010 [Vegipete] found himself doing some work with linear acceleration on a PIC microcontroller. Remembering his old plotter, [Vegi] realized he could build an embedded version of his old Apple ][ circuit. He built a circuit that turned the plotter into something that can be controlled with an FTDI adapter. A small update to the code added the an Easter egg. When the Konami code is entered on the plotter’s buttons it responds in the spirit of our Fubarino contest.


This is an entry in the Fubarino Contest for a chance at one of the 20 Fubarino SD boards which Microchip has put up as prizes!

Continue reading “Fubarino Contest: A Really, Really Old Plotter”

3DMonstr Printer: 8 Cubic Feet Of Build Volume

3D Monster

So you’re looking at 3D printers, but the build volumes for the current offerings just aren’t where you’d like them to be. [Ben Reylblat] had the same problem and came up with the 3DMonstr, an enormous printer that has (in its biggest configuration) a two foot cubed build volume, four extruders, and the mechanical design to make everything work.

Most of the ginormous 3D printers we’ve seen are basically upgraded versions of the common table-top sided models. This huge Ultimaker copy uses the same rods as its smaller cousin, and LeBigRap also uses woefully undersized parts. The 3DMonstr isn’t a copy of smaller machines, and instead uses very big motors for each axis, ball screws, and a proper welded frame. It’s highly doubtful anyone will call this printer a wobblebot.

The 3DMonstr comes in three sizes: 12 inches cubed, 18 inches cubed, and 24 inches cubed, with options for two to four extruders.  We caught up with the 3D Monstr team at the NYC Maker Faire, and from first impressions we have to say this printer is freakin’ huge and impeccably designed.