Become A Mad Scientist, Build A Power Distribution Panel

One practical use of large switches and indicator lamps is to make a power distribution panel which can be useful when you want to control and monitor the power consumption of numerous devices such as your electronics work bench or amateur radio station. Old-school in appearance and using military surplus electronics, this power distribution panel allows for control of outlet on back. Did I mention I built it when I was 16?

Building it was easy, 120 VAC line enters through a main breaker. It is fed through an AC amp meter (with built-in shunt) then to a line filter. From the line filter it goes to a line voltage meter and filament transformer to power the indicator lamps. This AC line is then bussed out to the circuit breakers. Each breaker controls one outlet on the rear panel. As devices are switched on or off the current draw can be measured. This is well demonstrated in the video overview found after the break.

Be creative. Use military surplus switches, indicators, and other unique looking hardware. Customize to give your preferred mad scientist look while also providing valuable functionality.

Continue reading “Become A Mad Scientist, Build A Power Distribution Panel”

Unusual Nixie Tubes Lead To Unique Clock

There’s no doubting the appeal of Nixie tubes. The play of the orange plasma around the cathodes through the mesh anode and onto the glass envelope can be enchanting, and the stacking of the symbols in the tube gives a depth to the display that is unlike any other technology. So when [Ian] found a set of six tubes on eBay at a fire sale price, he couldn’t resist picking them up and incorporating them into a unique but difficult to read Nixie clock.

It turns out the set of tubes [Ian] ordered were more likely destined for a test instrument than a clock, displaying symbols such a “Hz”, “V” and “Ω”. Initially disappointed with his seemingly useless purchase, [Ian] put his buyer’s remorse aside and built his clock anyway. Laser-cut acrylic, blue LEDs under the tube for a glow effect, a battery-backed RTC talking to an ATmega328, and the appropriate high-voltage section lead to a good-looking and functional clock, even if [Ian] himself needs a cross-reference chart to read the time. You’ll be able to figure out at the whole character set after watching the video after the break; spoiler alert: sensibly enough, Ω maps to 0.

We’ve seen lots of Nixie projects before, but few as unique as [Ian]’s clock.

Continue reading “Unusual Nixie Tubes Lead To Unique Clock”

Free 3D printing in NY

FREE 3D Printing In New York?

Looking to prototype some of your designs for the Hackaday Prize? Miss the Shapeways Gift Card Giveaway we did? Well if you happen to live in NYC, [John Tirelli] just wrote in to tell us about a FREE 3D printing lab!

That’s right — free. They don’t even charge for materials.

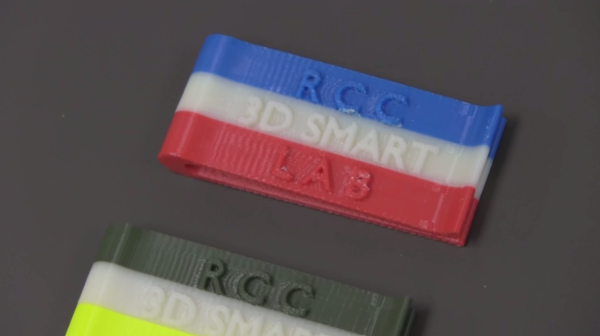
And we aren’t talking about a bunch of community rickety RepRaps falling apart in someone’s college dorm, nope, this place has CAD workstations with SolidWorks licenses, industrial Stratasys printers (Fortus 250mic, SST 1200 es, and a uPrint SE Plus) — not to mention a Roland LPX-1200 DS 3D laser scanner! Oh, and they’re getting a Fortus 400 and Connex 3 Objet soon!

It’s all thanks to a grant for Haverstraw Rockland Community College, which allowed them to open up this Smart Lab.

RCC’s 3D Printing Smart Lab offers manufacturers a proof-of-concept center where they can evaluate, customize, and expedite prototypes in a sandbox environment. The Smart Lab’s services are available to New York companies free of charge. Assistance is provided by RCC staff and CAD (Computer Assisted Design) students.

How awesome is that? Sounds like you do have to be a New York Company… but you filed that LLC paperwork, right?

Continue reading “FREE 3D Printing In New York?”

Hackaday Prize Entry: Tracking Rhinos With UAVs

For his Hackaday Prize project, [tlankford01] is using RC planes and UAVs as an anti-poaching system for rhinos and elephants. It’s a laudable goal for sure, but the conditions of this use case make for some very interesting engineering challenges.

The design goals [tlandford] has set are relatively simple for a bush plane, but building a plane that can fly 200km with a 6kg payload and return to base is a challenge that isn’t usually taken up by RC enthusiasts. For this project, [tlandford] is using an entirely 3D printed airframe, with living hinges printed right into the control surfaces. That in itself is pushing the limits of amateur airframes, but [tlandford] isn’t stopping there.

This UAV system will be completely automated, with a single ground control system taking care of controlling a swarm of planes, pointing a tracking antenna, and connecting to the Internet for observation or control from anywhere in the world.

The project that has seen a lot of improvement since it was entered in last year’s Hackaday Prize. The addition of a completely 3D printed airframe is a big one, and replacing the RVJet with something that looks a bit more like a glider should increase the loiter times over the target. There’s a video of the Icarus flying available below. If you also have a UAV project entered in The Hackaday Prize, there is now one obvious choice of what music you should use.

The 2015 Hackaday Prize is sponsored by:

Continue reading “Hackaday Prize Entry: Tracking Rhinos With UAVs”

HamShield Puts Your Arduino On The Radio

Anybody can grab a USB TV tuner card and start monitoring the airwaves, but to get into the real meat of radio you’ll need your amateur radio license. Once you have that, the bandwidth really opens up… if you can afford the equipment. However, [spaceneedle] and friends have dramatically lowered the costs while increasing the possibilities of owning a radio by creating this ham radio shield for the Arduino.

The HamShield, is a versatile shield for any standard Arduino that allows it to function like an off-the-shelf radio would, but with a virtually unlimited number of functions. Anything that could be imagined can be programmed into the Arduino for use over the air, including voice and packet applications. The project’s sandbox already includes things like setting up mesh networks, communicating over APRS, setting up repeaters or beacons, monitoring weather stations, and a whole host of other ham radio applications.

HamShield operates on a wide range of frequencies and only uses a 250 mW amplifier. The power draw is small enough that the HamShield team operated it from a small solar panel, making it ideal for people in remote areas. The project is currently gathering funding and has surpassed their goal on Kickstarter, branding itself appropriately as the swiss army of amateur radio. The transceiver seems to be very robust, meaning that the only thing standing in the way of using this tool is simply writing the Arduino code for whatever project you want to do, whether that’s as a police scanner or even just a frequency counter. And if you want to follow along on hackaday.io, the project can be found here.

Continue reading “HamShield Puts Your Arduino On The Radio”

Move Over Gucci; Laser Cut Handbags Are A Thing

What happens when you want to make a custom handbag with some handy tech features, and have access to a nice laser cutter? You end up doing what [Christian] did: design a assemble a Woman’s Handbag made of Laser-Cut Leather with iPhone charger and LED Light.

The design of the bag was made in Adobe Illustrator and sent off to a Epilog Legend 36EXT laser cutter located in the hackerspace located near [Christian] in Vienna. Once the parts were precision cut, traditional leather sewing methods were used to assemble the handbag (with a little help from a shoe cobbler).

The interior of the bag was lined with old blue jeans and a white LED, which is wired and held into place with conductive thread. Powered by a coin cell and controlled by your choice of a button, or a slide switch, the light helps locating items in the deep bag.

Slide a standard USB battery pack in one of the pockets of the old jeans and you are ready for a night out on the town. Join us after the break for a video showing the design, construction and features of this practical project.

Continue reading “Move Over Gucci; Laser Cut Handbags Are A Thing”

Safe Cracking With Signal Analysis

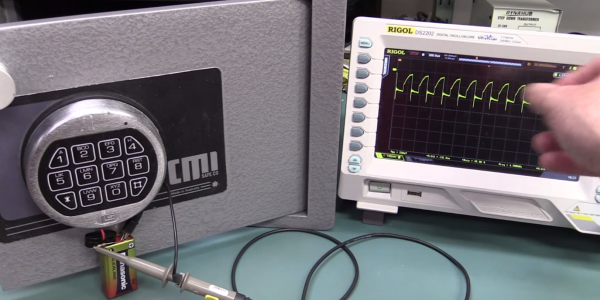
[Dave Jones] over at EEVblog got his hands on a small safe with an electronic lock and decided to try his hand at safe cracking. But rather than breaking out the thermal drill or shaped charge, he hooked up his Rigol scope and attempted a safe cracking via signal analysis (YouTube link).

We have to say that safes Down Under seem much stouter than most of the inexpensive lock boxes we’ve seen in the US, at least in terms of the quality (and quantity) of the steel in the body of the safe. Even though [Dave] was looking for a way in through the electronics, he still needed to deal with all that steel to get himself out of a face-palm moment that resulted in a lockout. Once that was out of the way, he proceeded to capture usable signals from the internal microcontroller using the only two available contacts – the 9 volt battery connections. While he did get signals, he couldn’t find any signatures that would help determine the six digits in the PIN, and as he points out, even if he did, brute-forcing through the one million permutations to find the right code would take too long, given the wrong-code lockout feature of the lock.

Even though he failed to hack into this particular safe, there’s still plenty to be learned from his methods. And who’s to say that other similar locks aren’t a little more chatty about their internals? Maybe you could even manage to EMP your way past the lock.