Carbon fiber weaving robot!

Hackaday Prize Entry: Weaving Carbon Fiber With Industrial Robots

Oh to have a 6-axis robot arm to play with… For [Basia Dzaman’s] final graduation project for School of Form, she designed and 3D printed an end effect tool for an industrial KUKA robot — for weaving carbon fiber.

Through an iterative design process, she developed many prototypes of the tool until the one you see above. It’s capable of holding a Dremel multi tool which can be used to drill into a work surface for installing pegs which make up the custom weaving jig. The pegs (nails) are then installed by hand so that the robot can thread carbon fiber — fed through an epoxy bath as it is dispensed — onto the jig. In the example, she shows a traditional Polish handcraft called Snutki (a type of stitching), wrapping the carbon fiber in patterns around the pegs. Once the epoxy cures, a strong structure can be removed.

Remember the 6-axis robot that can 3D print in metal, and is currently working on 3D printing a bridge? [Basia’s] design could do similar things, for a completely different industry. You can check out [Basia]’s video for the project below.

The 2015 Hackaday Prize is sponsored by:

Continue reading “Hackaday Prize Entry: Weaving Carbon Fiber With Industrial Robots”

Using A TeensyLC To Emulate The XBOX 360 Controller

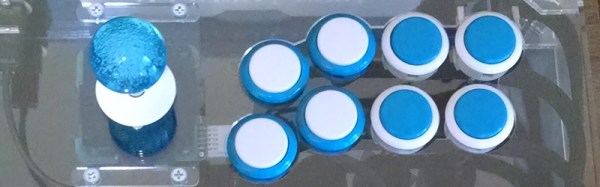
After the release of Mortal Kombat X, [Zachery’s] gaming group wanted to branch out into the fighter genre. They quickly learned that in order to maximize their experience, they would need a better controller than a standard gamepad. A keyboard wasn’t going to cut it either. They wanted a fight stick. These are large controllers that look very much like arcade fighting controls and include a joystick and large buttons. [Zachery’s] group decided to build their own fight stick for use with a PC.

[Zachery] based his build around the TeensyLC, which is a 32 bit development board with an ARM processor. It’s also compatible with Arduino. The original version of his project setup the controller as a HID, essentially emulating a keyboard. This worked for a while until they ran into compatibility issues with some games. [Zachery] learned that his controller was compatible with DirectInput, which has been deprecated. The new thing is Xinput, and it was going to require more work.

Using Xinput meant that [Zachery] could no longer use the generic Microsoft HID driver. Rather than write his own drivers, he decided to emulate the XBOX 360 controller. When the fight stick is plugged into the computer, it shows up as an XBOX 360 controller and Windows easily installs the pre-built driver. To perform the emulation, [Zachery] first had to set the VID and PID of the device to be identical to the XBOX controller. This is what allows the Microsoft driver to recognize the device.

Next, the device descriptor and configuration descriptor had to be added to the Teensy’s firmware. The device descriptor includes information such as USB version, device class, protocol, etc. The configuration descriptor includes additional information about the device configuration. [Zachery] used Microsoft Message Analyzer to pull the configuration descriptor from a real XBOX 360 controller, then used the same data in his own custom controller.

[Zachery] programmed the TeensyLC using the Arduino IDE. He ran into some trouble here because the IDE did not include the correct device type for an Xinput device. [Zachery] had to edit the boards.txt file and add three lines of code in order to add a new hardware device to the IDE’s menu. Several other files also had to be modified to make sure the compiler knew what an Xinput device type was.  With all of that out of the way, [Zachery] was finally able to write the code for his controller.

Retrotechtacular: The J-57 Afterburner Engine

The J-57 afterburner engine appeared in many airplanes of notable make, including the F-101, -102, and -103. This USAF training film shows the parts of the J-57, explains the complex process by which the engine produces thrust, and describes some maintenance and troubleshooting procedures.

The name of this game is high performance. Precision thrust requires careful rigging of the engine’s fuel control linkage through a process called trimming. Here, the engine fuel control is adjusted with regard to several different RPM readings as prescribed in the manual.

One of the worst things that can happen to a J-57 is known as overtemping. This refers to high EGT, or exhaust gas temperature. If EGT is too high, the air-fuel ratio is not ideal. Troubleshooting a case of high EGT should begin with a check of the lines and the anti-icing valve. If the lines are good and the valve is closed, the instruments should be checked for accuracy. If they’re okay, then it’s time for a pre-trimming inspection.

In addition to EGT, engine performance is judged by RPM and PP7, the turbine discharge pressure. If RPM and PP7 are within spec and the EGT is still high, the engine must be pulled. It should be inspected for leaks and hot spots, and the seals should be examined thoroughly for cracks and burns. The cause for high EGT may be just one thing, or it could be several small problems. This film encourages the user to RTFM, which we think is great advice in general.

Continue reading “Retrotechtacular: The J-57 Afterburner Engine”

Vintage Vinyl Laser-Etched On A Tortilla

[UpgradeTech] had a proof-of-concept itch they needed to scratch: making a playable record out of a tortilla using a laser cutter. The idea was spawned from the goofy “tortilla vinyl” YouTube video.

Uncooked flour tortillas were used. Corn tortillas were too lumpy while cooked tortillas shredded on the record player. To get the recording onto the tortilla, Audacity was used to modify a stereo WAV file. Using the RIAA equalization standard is a great choice here as it was originally adopted to prevent excess wear and tear on record grooves as the needle passed through. A Python script generated the files for the laser cutter, creating a text file with the sound data which was then processed into a vector PDF of the grooves. For each record it takes 30 minutes for the laser cutter to turn a simple flour tortilla into the musical variety.

Each tortilla can play 30-40 seconds of music at 45 or 78 RPM, but they start to warp once they dry out. Time to build a humidor around the record player! There is background noise that can make certain songs harder to hear, but there is unarguably audible music. There is plenty of room for optimizing the sound file, grooves, and cutting. We hope this project inspires others to make their own musical tortilla. Playing with your food has taken on a whole new meaning!

Continue reading “Vintage Vinyl Laser-Etched On A Tortilla”

How To Build A ProxyHam Despite A Cancelled DEFCON Talk

A few days ago, [Ben Caudill] of Rhino Security was scheduled to give a talk at DEFCON. His project, ProxyHam, is designed for those seeking complete anonymity online. Because IP addresses can be tied to physical locations, any online activities can be tracked by oppressive regimes and three letter government agencies. Sometimes, this means doors are breached, and “seditious” journalists and activists are taken into custody.

With the ProxyHam, the link between IP addresses and physical locations is severed. ProxyHam uses a 900MHz radio link to bridge a WiFi network over miles. By hiding a ProxyHam base station in a space with public WiFi, anyone can have complete anonymity online; if the government comes to take you down, they’ll first have to stop at the local library, Starbucks, or wherever else has free WiFi.

[Ben Caudill] will not be giving a talk at DEFCON. It wasn’t the choice of DEFCON organizers to cancel the talk, and it wasn’t his employers – [Ben] founded and is principal consultant at Rhino Security. The talk has been killed, and no one knows why. Speculation ranges from National Security Letters to government gag orders to a far more pedestrian explanations like, “it doesn’t work as well as intended.” Nevertheless, the details of why the ProxyHam talk was cancelled will never be known. That doesn’t mean this knowledge is lost – you can build a ProxyHam with equipment purchased from Amazon, Newegg, or any one of a number of online retailers.

Continue reading “How To Build A ProxyHam Despite A Cancelled DEFCON Talk”

Become A Mad Scientist, Build A Power Distribution Panel

One practical use of large switches and indicator lamps is to make a power distribution panel which can be useful when you want to control and monitor the power consumption of numerous devices such as your electronics work bench or amateur radio station. Old-school in appearance and using military surplus electronics, this power distribution panel allows for control of outlet on back. Did I mention I built it when I was 16?

Building it was easy, 120 VAC line enters through a main breaker. It is fed through an AC amp meter (with built-in shunt) then to a line filter. From the line filter it goes to a line voltage meter and filament transformer to power the indicator lamps. This AC line is then bussed out to the circuit breakers. Each breaker controls one outlet on the rear panel. As devices are switched on or off the current draw can be measured. This is well demonstrated in the video overview found after the break.

Be creative. Use military surplus switches, indicators, and other unique looking hardware. Customize to give your preferred mad scientist look while also providing valuable functionality.

Continue reading “Become A Mad Scientist, Build A Power Distribution Panel”

Unusual Nixie Tubes Lead To Unique Clock

There’s no doubting the appeal of Nixie tubes. The play of the orange plasma around the cathodes through the mesh anode and onto the glass envelope can be enchanting, and the stacking of the symbols in the tube gives a depth to the display that is unlike any other technology. So when [Ian] found a set of six tubes on eBay at a fire sale price, he couldn’t resist picking them up and incorporating them into a unique but difficult to read Nixie clock.

It turns out the set of tubes [Ian] ordered were more likely destined for a test instrument than a clock, displaying symbols such a “Hz”, “V” and “Ω”. Initially disappointed with his seemingly useless purchase, [Ian] put his buyer’s remorse aside and built his clock anyway. Laser-cut acrylic, blue LEDs under the tube for a glow effect, a battery-backed RTC talking to an ATmega328, and the appropriate high-voltage section lead to a good-looking and functional clock, even if [Ian] himself needs a cross-reference chart to read the time. You’ll be able to figure out at the whole character set after watching the video after the break; spoiler alert: sensibly enough, Ω maps to 0.

We’ve seen lots of Nixie projects before, but few as unique as [Ian]’s clock.

Continue reading “Unusual Nixie Tubes Lead To Unique Clock”