It’s been a big week in the world of inexpensive single board computers, and everyone’s talking about the new Raspberry Pi 3. It blows away the competition they say, nobody can touch it for the price.
Almost nobody, that is.
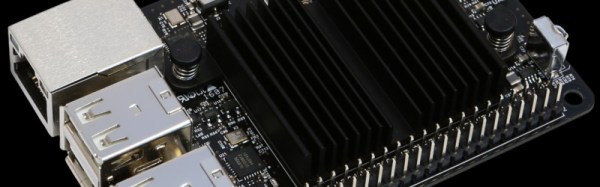
With a lot less fanfare on these shores, another cheap and speedy 64-bit quad-core ARM-based SBC slips onto the market this week, Hardkernel’s Odroid C2. And looking at the specification it seems as though the Pi 3 may be given a run for its money. Like the BCM2837 in the Pi 3 its Amlogic S905 SoC is a quad-core ARM Cortex-A53, but the C2’s 2GHz clock speed gives the raspberry to the 1.2GHz of the Pi 3. There is twice the RAM of the Pi 3 at 2Gbytes, and the onboard Mali-450 GPU can deliver 4K video.
Unlike the Pi 3 there is no wireless or Bluetooth on board, but the C2 has a Gigabit Ethernet port which is wired directly into the SoC. Compared to the Pi 3’s 100 megabit port which suffers through being on a USB interface, that’s likely to be very quick.
Storage can be a choice of either the usual micro SD card or eMMC. Given that the two boards share a very similar form factor it is no surprise that they have very similar GPIO capabilities, however it is worth noting that the C2 has a built-in analog-to-digital converter. As to operating systems, the C2 can run Ubuntu 16.04, or Android Lollipop.
Of course, we’ve seen so many boards touted as Pi-killers, and like all those also-ran tablets touted as iPad killers a few years ago we’ve never heard of most of them again after a brief moment of chatter. They look so good on paper but the price always lets them down.
The C2 could just escape that fate though, its $40 price point is very close to that of the Pi 3. Setting aside for a moment how much shipping and customs might cost for a package from Korea, that sounds interesting to us.
Why might you buy a C2 then, and why might you buy a Pi 3? That the C2 has a much faster processor is beyond doubt. This and its faster wired networking would make it a much more interesting prospect for anyone whose work involves network-attached data processing. But even though a USB wireless network adaptor can be had for only a few dollars the Pi 3’s onboard wi-fi and Bluetooth makes it much more attractive to a home user or someone using a computer on a platform unfettered by wires.
However impressive the C2 may be it is overwhelmingly likely that the Pi 3 will outsell it many times over. This will not just be due to the massive publicity advantage achieved by the Pi Foundation, but the huge ecosystem of hardware and software developers that have made the Pi boards perform to the limit of their abilities in all directions. If you don’t mind forgoing that support though, you could just find that the board from Korea gives you enough extra bang for your buck to make having it on your bench worthwhile.
We’ve followed the Odroid products from the start here at Hackaday. The C2 is just the latest of a procession of boards from Hardkernel, and we’ve featured a few projects that include them. Theirs is always the name at the top of the list when the subject turns to Raspberry Pi competitors, perhaps with the C2 they’ve got a winner.
Our thanks to [Derrick].