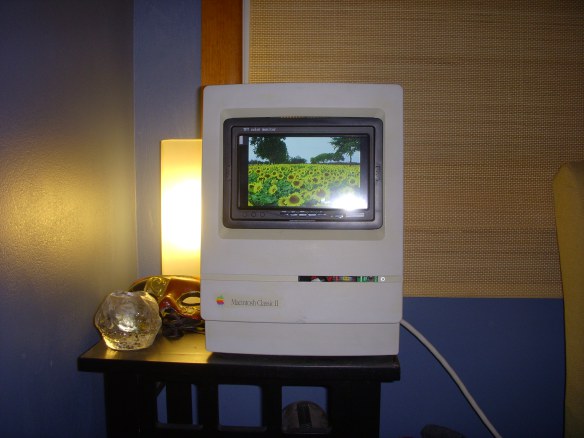
Human Powered Hydrofoil, The Wingbike!

[Steven] has been working for the past year on a very cool pedal powered hydrofoil, which he calls the Wingbike.

We’ve seen plenty of trampofoils before, which are hydrofoils that can convert a human bouncing up and down… to horizontal movement. There have even been some pedal powered versions before, but its a rather tricky mechanism to get just right.

[Steven] has built his Wingbike almost entirely out of carbon fiber, and it only weighs 10kg.The biggest problem is balance, as you’re about 1.5M above the foils. If you lean too much, you fall. If you slow down too much, you sink. The current model he is working on has fairly large foils, which does help a bit with the balance, but that also increases the amount of energy required to propel it. He plans on creating new designs with much smaller and faster foils in the future.

Unfortunately, the water is getting quite cold in the Netherlands, so he’s going to spend the rest of the winter months optimizing the bike from a design perspective. Stick around after the break to see his latest successful test video!

Continue reading “Human Powered Hydrofoil, The Wingbike!”

Fail Of The Week: Automatic Baby Rocker

fotw-baby-bouncer

The art of hacking requires you to straddle many different types of engineering. In this case, it looks like [Dan] could use a little bit of brain-storming on how to get this doubly-failed project back on track. Do go easy on him as he wasn’t the one that submitted the write-up for this week’s Fail.

Continue reading “Fail Of The Week: Automatic Baby Rocker”

A DIY NFC Tag

[Nicholas] built a simple NFC tag using an ATtiny84 microcontroller, four resistors, three capacitors, a diode, and an antenna. It implements ISO 14443-3, a standard for identification cards, and can communicate with the NFC chip sets found in most new smartphones.

This standard uses on-off keying for communication, which makes the hardware slightly more complex than the AVR RFID tag that we saw a few years back. The antenna and a variable capacitor form an LC circuit tuned at 13.56 MHz, which is the carrier frequency for the protocol. The diode acts as an envelope detector, letting the microcontroller recover the signal.

It may not be fully compliant with the standard, but [Nicolas] successfully tested out the device with his Lumia 620 phone. The firmware is available on Google Code so you can program your own tag data into main.c, build the firmware, and send some NFC packets. You can also check out a demo of the device after the break.

Continue reading “A DIY NFC Tag”

Ask Hackaday: (How) Should We Control Kickstarter Campaigns?

Kickstarter campaigns helped bring new and innovative products to the market during these last years. However there often are failures that can happen at several stages. We’d like to hear your opinion about them and discover what you think could be done to foresee/prevent these kinds of bad experiences that damage the trust between individuals and funding platforms.

Post-funding failures

There are a few project teams that give up a few months after receiving the funds, like the people behind the iControlPad 2 recently (disclaimer: we’re not backers). Even if [Craig] stated that he would document the entire production process on film and be open about all the project life steps, that didn’t prevent the project from being dropped (oddly enough) exactly one year after they received the funds. The more the project was headed towards failure, less was the frequency of updates regarding the project’s current state. The official reasons for this decision were difficulties that arose with the chosen LEDs, we’ll let you make your own opinion by having a look at the updates section. Thanks [Nikropht] for the tipping us about it.

Pre-funding failures

What is happening even more often on kickstarter is (usually successful) campaigns being canceled by the website itself after a few people rang the alarm bell. This may be due to an unfeasible project idea, a fake demonstration video/photos or even an attempt to resell an existing item under a new name.

The best examples for the first category undeniably are free energy generators. Here is an indiegogo campaign which actually succeeded. The creators announced one month ago that the project is running a bit behind schedule (aha), that the machine will cost around $5000 and that they’ll “need the funds before they make the units”. What can be done to educate the public that such energy is not created out of thin air?

The second category includes the recently canceled LUCI advanced lucid dream inducer (thanks [Michael] for the tip), which ended 2 days before the deadline. Technical guys got skeptical when they saw that the electrode signals were amplified several feet from the brain with an audio amplifier. At first glance, this was the only sign that this project may have been a scam (let’s give them the benefit of the doubt). Further research indicated that GXP (the company behind the campaign) didn’t exist, and most of their pictures were photoshopped. Here is a link to a quick summary of the situation and if you want to be entertained we advise you to make some pop-corn and head to the comments section of the project. What’s terrible here is that backers started to turn against each other, as the company always had a ‘good’ explanation for all the backers’ questions.

At last, there are some persons that just make funding campaigns with already existing products. This is the case of the eye3 flying robot and the vybe vibrating bracelet (don’t order!). Note that all of them were successfully funded. The eye3 was created by the same persons that made LumenLab, a company that created the microcnc. You’ll find more details here. The vibrating bracelet was just this one, which would be made in different colors. We just discovered this website that covered both project in greater lengths as well as many others.

Kickstarter fraudsters

Scams can also happen on the backers’ side. Recently, a Kickstarter backer named “Encik Farhan” attempted to rip off many Kickstarter projects. A ‘credit card chargeback’ technique was used, were the backer would contribute to the campaign, receive his perk and later cancel his credit card transaction using diverse reasons. The money would later be taken from the campaign funding by the payment processor.

What can be done?

The examples cited in this article set precedents which may turn people away from crowdfunding. In your opinion, what could be done to prevent this? Another reason we ask is because Hackaday may launch a sponsored product soon, thanks to the new overlords. This hypothetical product would be designed with the Hackaday community in a completely transparent process.

In the meantime, if you find any perpetual motion machines on kicstarter or indiegogo, be sure to send them in. You may also want to checkout this website predicting the success probability of a given kickstarter campaign.

Raspberry Pi Driven 128×32 LED Sign

Looks like a commercial LED display sign… right? Not even close. This is a project of [Jon’s] from over a year ago, and it is a very impressive 128×32 LED display board, driven using a single Raspberry Pi.

It’s made of eight “P10” 32×16 LED panels that he bought off of eBay, housed in a wooden frame he built himself. The display runs off of a single Raspberry Pi and can receive a video signal from anything with an Ethernet port. The individual boards are daisy-chained in a rather odd arrangement to minimize cable length, which [Jon] says helps with clocking the data fast — he’s able to parse 2 bits per pixel to refresh the display at an impressive 400+ frames per second.

To power the display, he’s using a single ATX power supply with the Pi connected to the standby 5V power line. This is to avoid a voltage drop which might cause the Pi to crash — when all LEDs are on the display can draw a healthy 32A of juice. The P10’s use shift registers to serially load the pixel data. At any time, the 4096 pixel display can have 1024 pixels on, which means a fairly fast clock is required to update the display.

[Jon] has shared all the source code on his blog, and has a fairly in-depth explanation of all the systems used. Check it out for yourself, and don’t forget to stick around after the break to see the display in action!

Continue reading “Raspberry Pi Driven 128×32 LED Sign”

View-Master Video Player!

view master 3d video player

[Alec] just sent us this great project he’s been working on. Converting an antique View-Master from the early 50’s into a modern 3D video player, capable of reading Mini-CDs.

Most View-Masters don’t have much space for tinkering, let alone adding a Raspberry Pi, two displays and a CD drive, so [Alec] really lucked out when he found this model — complete with light and D-cell battery pack. Tons of space! He originally looked into getting some cheap digital photo frame LCDs from China, but soon realized the effort involved with making those work just wouldn’t be worth it, so instead he picked up some 0.9″ OLED displays from Adafruit. He still forgot to check if they had drivers for the Raspberry Pi though, and ended up on another detour of modifying FBTFT drivers to make it all work.

After that headache he got to the fun part — cramming all the hardware inside. He picked up a cheap laptop CD drive off of eBay, and discovered that using the 80MM Mini-CD standard, the discs would just fit inside of the View-Master, sticking out just a little bit, kind of like the original photo wheels!

Quite a bit of fiddling later, he managed to assemble the entire thing in layers, without damaging the external shell of the View-Master. Since it is an antique, it was important for him that his hack be reversible — and for the most part, it is! Stick around after the break to see a short video explanation!

Continue reading “View-Master Video Player!”

InFORM The Morphing Table Gets Even More Interactive

inform2

Remember last week’s post on the inFORM, MIT’s morphing table? Well they just released a new video showing off what it can do, and it’s pretty impressive.

The new setup features two separate interfaces, and they’ve added a display  so you can see the person who is manipulating the surface. This springs to life a whole new realm of possibilities for the tactile digital experience. The inFORM also has a projector shining on the surface, which allows the objects shown from the other side to be both visually and physically seen — they use an example of opening a book and displaying its pages on the surface. To track the hand movements they use a plain old Microsoft Kinect, which works extremely well. They also show off the table as a standalone unit, an interactive table — Now all they need to do is make the pixels smaller… 

Stick around after the break to see some more awesome examples of the possibilities of this new tactile-digital interface. There are also some great clips near the end of the video showing off the complex linkage system that makes it all work.

Continue reading “InFORM The Morphing Table Gets Even More Interactive”