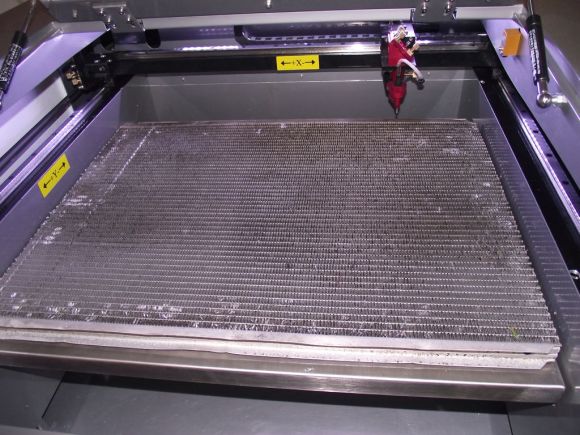
Real Multifunction “Sonic Screwdriver”

dr who sonic screwdriver

“I don’t understand, you don’t have the technology.” OK, so it’s not actually a futuristic tool with the same capabilities as the one off the hit TV series Dr. Who, but this homemade “sonic screwdriver” is a multifunction device that’s pretty cool nonetheless.

Created around an Arduino Pro Mini, [Gunther] really one-upped the last screwdriver we featured. Built in functions include: brown note tone generator, dog whistle, EMF meter, flashlight, IR universal remote, laser pointer, ohm meter, sound level meter, voltage detector, and a voltage meter.  You can also have an electromagnet or output voltage supply if you want. If that wasn’t enough, it can even play the theme song from Star Wars! Whew. That’s a mouthful of functionality.

Although he has posted the Arduino code, you’ll have to keep an eye on his site for more details if you want to create your own. He’s mentioned that he’s working on blue prints and a full parts list… Awesome. Now where’s that lock pick function?

Check out a video showing off some of the features after the break.

[via Make]
Continue reading “Real Multifunction “Sonic Screwdriver””

BGA Rework Station

SMD components may be a little challenging for the home builder – even though the’re inordinately practical for homebrew PCBs – but if you play around with electronics and solder long enough, you’re eventually going to run into the horrors of BGA parts. Instead of convenient pins, BGA parts have tiny metallic balls on which solder is applied, a board is thrown through a reflow oven, and hopefully at the end, everything works. Sometimes these balls corrode or otherwise need to be reflowed. This isn’t an easy process, so [Edmar] came up with his own BGA rework station that costs much less than commercial offerings.

[Edmar]’s build began when he wanted to repair a graphics card. A common error on his Amilo XI2428 graphics card is having the small balls on the underside of the chip corrode, leaving the user with a non-functional graphics card. Towel trick notwithstanding, the easiest way to fix this error is to heat up the card to above the melting point of solder, removing the chip, and resoldering it with careful application of solder paste.

[Edmar]’s reflow station is made of an electric skillet for the bottom of the board, an infrared lamp for the top side of the board, and control circuitry constructed from an ATMega128, temperature sensors, and a huge power supply. The temperature is controlled via USB by a computer, allowing [Edmar] to set a temperature profile as recommended by the BGA chip’s data sheet.

Right now, removing a BGA chip works great, but [Edmar] is still working on the tech necessary to replace a BGA chip on a board.

Shock Sword Works Best On Foes Who Fight With Multiple Blades

shock-sword

This project most certainly has some of Trailer Park Boys rolled into it. We say that because the living room is the only place this will ever been used and this guy’s reaction to getting shocked is exactly how [Ricky] would respond.

The sword on the left has an electronic stun mechanism built into it. it works by energizing two blades which are separated by nylon bolts and spacers. Look closely at the tip and you’ll see the blue glow which indicates high voltage. To shock your victim you have to touch them with both blades at the same time. This is demonstrated in one of the videos after the break. But the real pain comes when [Jonathan] — the guy who built the stun sword — touches it on either side with this pair of blades. His body completes the connection and his NSFW language tells the tale of how it feels.

This thing seems to pack a bit more of a punch than our own stun-gun enabled quadcopter.

Continue reading “Shock Sword Works Best On Foes Who Fight With Multiple Blades”

Fabricating Edible LEDs

fabricating-edible-LEDs

They’re edible, yes. But they don’t light up. That’s fine with us, since the process [Becky Stern] used to make these gummy candy LEDs taps into several techniques handy to have under your belt.

The first part shown in her video (embedded after the jump) is to make a mold for the candies. You probably have a few bags of LEDs in your parts bin. Those along with a trough made of foam core come together to create the form for the silicone mold. After mixing, pouring, and hardening, [Becky] peels the silicone off of the LEDs and sends it through the oven to make it food-safe. Mixing up the candy uses simple ingredients (gelatin, water, and ascorbic acid) but you’ll need to follow the methodology closely to get the taste and clarity you’re used to. Syringes are used to fill the tiny voids in the mold before adding leads which were 3D printed using PLA.

These will be a huge hit at your next hackerspace meeting!

Continue reading “Fabricating Edible LEDs”

Debian Linux On A PowerMac 7200

debian-7200

Those of us that run Linux on a modern or nearly-modern PC know that it’s a capable operating system.  It’s also (at least in my case with Ubuntu) extremely easy to install on a semi-modern computer. On a mid-90s era PowerMac 7200, things aren’t quite so simple.

In a testament to both his technical ability, and possibly even more so his tenacity, [Chris] was able to get Debian 6.07 running on a PowerMac destined for destruction. He had slated a few hours to upgrade this 56 Megabyte monster, but it turned out to be a several-day event. Those that are well-schooled in Linux may find the hairy details useful, and some more background can be found in part one. This project was a stepping-stone to something else, so we’re anxious to see what the end result is.

If you find this interesting, feel free to check out the retro edition of our site. It’s not entirely about ancient computers, but it can hopefully be displayed on one.

via [twitter]

DIY Space Experiments Within A Ping Pong Ball ‘satellite’

Pongsat space satellite

Ahhh space. The final frontier. While many people dream of one day becoming an astronaut (and possibly battling aliens or cylons), it’s a select few who actually make it their reality. Fortunately for us, there’s a middle ground that allows the masses to still have some fun in the sky. Enter the “Pongsat” program – space experiments within a ping pong ball.

Created by JP Aerospace, this free program allows anyone to create their own mini experiment and send it off to the edge of space. The imagination is the limit. Curious if a marshmallow will expand? Interested what the temperature would be? Wonder if you can charge a solar battery? Stuff it inside a ping pong ball and find out!

Check out the PDF Users Guide to get started, then their Blog and Facebook page for more up to date information.  Now go out there and get your experiment to Mars! (Or at least 100,00 feet)

Watch a video of in flight footage after the break.

[via adafruit]
Continue reading “DIY Space Experiments Within A Ping Pong Ball ‘satellite’”

Wiimote Controlled RPi Robot

Wiimote RPi Robot

[Brian] has brought together a powerful collection of hardware to build a robot. The end goal is to have a robot that’s controlled by a Wiimote.

The Wiimote communicates over Bluetooth with a Raspberry Pi, which is running a Python script. This script uses the CWiid Python module to communicate with the controller, and [Brian] has detailed instructions on getting the Wiimote working with a RPi. The RPi controls an ATmega based development board over SPI, which drives an h-bridge to control the two DC motors that move the robot.

[Brian]’s code for this could be helpful for anyone looking to control their RPi with a Wiimote. Since Wiimotes and Bluetooth dongles are fairly cheap nowadays, this is a great way to drop in wireless control to any RPi project, or even to control your media center from the couch.

After the break, check out a video of the build in action

Continue reading “Wiimote Controlled RPi Robot”