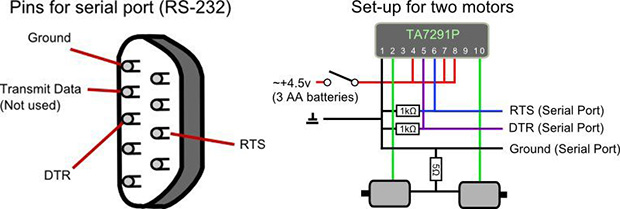
Rubicon Gives The Makerbot Digitizer A Run For Its Money

rubicon

Look out MakerBot, there’s a new 3D scanner on the block and it’s about 10% of the cost of the Digitizer. Enter the Rubicon 3D Scanner which just hit Indiegogo, a device much closer to being worth its price $199.

Just like the pricey Makerbot Digitizer it’s a very simple design made up of a webcam, two laser lines, and a stepper motor controlled turn table. Still very easy to make yourself, but at $199, it’s not a bad price for an all-in-one kit, especially compared to the Digitizer. The newcomer claims a much faster scan time (3 minutes versus 12), and the same stepper rotation (800 steps or 0.45 degrees per step). There are no details about making the design open source, but after some digging in the RepRap forums we found some discussion on that topic from designer [Robert].

It scans objects up to 160mm in diameter and 250mm tall, however it has the ability to scan marginally larger objects if the camera is moved farther back. The funding for the Indiegogo campaign will go towards a custom arduino-esq PCB with a motor driver built in – personally we would be interested in just getting the PCB and 3D printing the rest of the scanner ourselves!

More information is found in the video after the break. Continue reading “Rubicon Gives The Makerbot Digitizer A Run For Its Money”

PCB Agitator From A Broken CD-ROM Drive

pcb-agitator

Etching PCBs goes a lot better if you agitate the solution in order to carry away the dissolved copper and get fresh etchant to the area. With that in mind [Rohit Gupta] designed a mechanism in Sketch Up before realizing he was going about it the hard way. He ended up basing his agitator on a broken CD-ROM drive instead of starting from scratch.

He uses the CD sled from the drive, ditching the lens and its support structure. To get direct access to the motor that drives the tray he uses an L293D H-bridge chip. This is controlled by an MSP430G2231 microcontroller. The driver board seen in the upper right includes a voltage regulator, three status LEDs, and one user input switch. Once triggered, the sled will move back and forth, contacting an old mouse microswitch which acts as the limiting switch. We find it entertaining that [Rohit] prototyped the circuit on a breadboard, then used that success to etch the final circuit board (shown in the video below).

If you’ve been following the hacker creed and never getting rid of any junk you’ll have no problem finding a donor drive to make one of your own. But just in case you can’t get a hold of this hardware a similar agitator can be built using a hobby servo.

Continue reading “PCB Agitator From A Broken CD-ROM Drive”

Retrotechtacular: The Apollo Guidance Computer

There is so much amazing technology that came out of the space race. For this week’s Retrotechtacular we’re looking at the guidance computer used in the Apollo program undertaken by NASA in the 1960’s.

One of the main components of this system is the Inertial Measurement Unit or IMU. That’s a familiar term for hackers who build quadcopters or other devices for which spacial awareness is paramount. In this case the IMU provided critical information about the motion and orientation of the capsule during it’s trip from the Earth to the Moon and back. But it wasn’t just high tech electronics along for the flight. To determine actual position a sextant was used for triangulating position. Yes, this is the same type of measuring device used for centuries. The method of using the sextant is displayed above. The spacecraft was turned until the sextant pointed at a landmark on Earth. The instrument was the adjusted to line up a star as a landmark, then the computer calculated position based on time and the angles of the two points being sighted. There’s a lot more shown in this thirty-minute film including in-depth assembly and testing of the computer components.

Before we point you to a few related articles we’d like to mention that our stash of really cool Retrotechtacular tips is running low. So if you know of some old footage that’s awesome to watch please send us a tip about it.

Now if you can’t get enough about NASA electronics you should check out the LVDC board which [Fran] got her hands on. Also, it’s worth checking out the unbelievable soldering techniques specified in the NASA manual. There’s a pretty good discussion about that going on in the Reddit thread.

Continue reading “Retrotechtacular: The Apollo Guidance Computer”

The Melloman, Mk. II

mello

Way back in the 60s, strange electronic instruments were all the rage. The most famous of these made before the era of the synthesizer was the embodiment of musique concrète, the Mellotron. This instrument had an incredibly complex arrangement of magnetic tape that allowed a performer to play a keyboard and have the sound of any instrument come out of a speaker. This system was prone to failure, and there has been a lot of technological improvements in tape over the last fifty years, leading [Mike Walters] to build a new version of his famous Walkman-based Mellotron, the Melloman.

This build is an upgrade over the previous Melloman made in 2009. Like the original, this build uses 14 portable tape players, each loaded up with a continuous tape for each note. The tapes contain two octaves of the same note, one each on each channel, which are routed to the output whenever a key is pressed.

There are a few improvements over the old Melloman. Instead of transistors, [Mike] is using optocouplers to send the recorded sounds to the output. This build is also a whole lot cleaner, with the wiring looking very professional. As for a sound demo, you can check out the video below.

Continue reading “The Melloman, Mk. II”

Building A Small Keypad For Strategy Games

A month ago [Andreas] started playing Starcraft 2 again. As he was not comfortable with the default hotkeys on a normal keyboard, [Andreas] decided to build his own.

He started by salvaging keys from an old keyboard he had lying around, then 3D printed the case you see in the picture above to fit them. The keyboard electrical design is a simple matrix and it appears that he etched the PCB himself. To provide the required USB connectivity, the Atmega8U2 was chosen. It comes with a pre-programmed USB bootloader that [Andreas] chose to activate when the left key is pressed at the system startup. The HID class was implemented using the LUFA-USB Framework and the final product is definitely good looking.

All the files required to duplicate his design can be found here. You can also checkout another starcraft keyboard and an ergonomic keyboard that we previously featured.

ArduGuitar, An Arduino Controllable Guitar

The ArduGuitar

Electric guitars have several switches and potentiometers for controlling volume, tone, and which pickups are enabled. Rather than fiddling with these by hand, [Bob] built the ArduGuitar. It uses an Arduino to control the parameters over Bluetooth. This allows for musicians to configure presets, then recall them as needed, providing the exact same sound every time. It’s similar to the Guitarduino, but adds wireless control.

The internals of the ArduGuitar consist of the Arduino Micro, a BlueSMiRF from Sparkfun, and resistive opto-isolators. The resistive opto-isolators allow the Arduino to adjust resistance through an electrically isolated barrier. This prevents the Arduino from interfering with the guitar’s sound.

Some of the first Vactrols were used to create a tremolo effect in guitar amplifiers. These pulsed a incandescent lamp onto a photoresistor. Fortunately, there are now integrated solutions. PerkinElmer makes these, and they have a nice application note [PDF] on audio applications.

The final part of the design is an Android app, which provides remote control over Bluetooth. The source for everything is available on Github, and the detailed build log is available here.