Measuring The Planck Constant With Lego

For nearly 130 years, the kilogram has been defined by a small platinum and iridium cylinder sitting in a vault outside Paris. Every other unit of measurement is defined by reproducible physical phenomenon; the second is a precise number of oscillations of a cesium atom, and a meter is the length light travels in 1/299792458th of a second. Only the kilogram is defined by an actual object, until NIST and the International Committee of Weights and Measures defines it as a function of the Planck constant. How do you measure the Planck constant? With a Watt balance. How do you build a Watt balance? With Lego, of course.

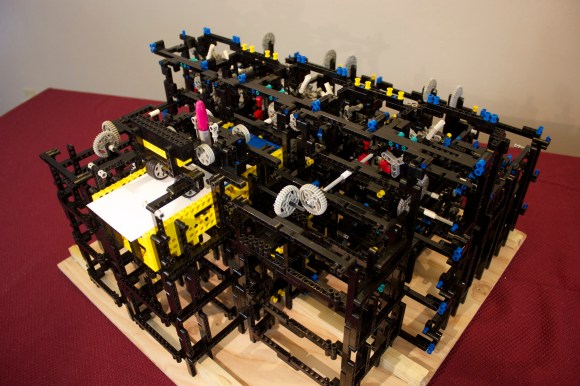
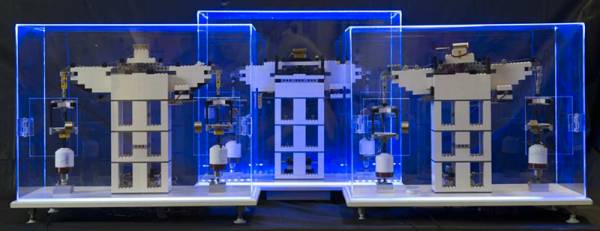
A Watt balance looks like a double-armed scale where one weight can be compared to another weight of known mass. Instead of using two arms, a Watt balance only has one arm, brought into balance by a current flowing through a coil. The mechanical power in the balance – brought about by whatever is on the balance plate – can then be compared to the electrical power, and eventually the Planck constant. This will soon be part of the formal definition of the kilogram, and yes, a machine to measure this can be made out of Lego.

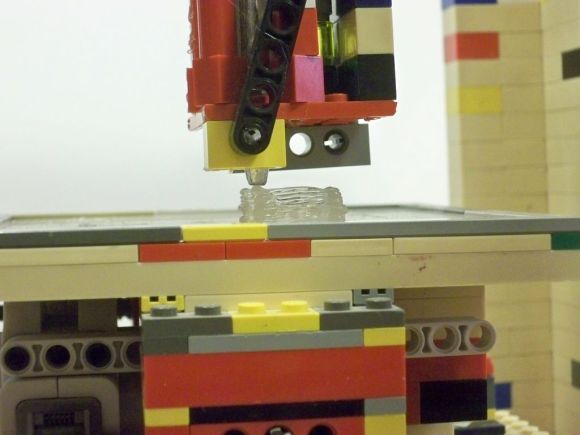
The only major non-Lego parts in the Lego Watt balance are a few coils of wire wound around a PVC pipe and a few neodymium magnets. These are placed on both arms of the balance, and a pair of lasers are used to make sure both arms of the balance are level. Data are collected by measuring the coils through a few analog pins on a Labjack and a Phidget. Once the voltage and current induced in each coil is measured, the Wattage can be calculated, then the Planck constant, and finally how close the mass on the balance pan is to a real, idealized kilogram. Despite being made out of Lego, this system can measure a gram mass to 1% uncertainty.

The authors have included a list of Lego parts, most of which could be found in any giant tub of Lego in an 8-year-old’s closet. The only really expensive item on the BOM is a 16-bit USB DAQ; apart from that, it’s something anyone can build.

Thanks [Matt] for the tip.

LEGO And Arduino Meet Han Solo

lego blaster gif

This full-size replica blaster from Star Wars, most iconically used by Han Solo and Princess Leia, has everything. Flashing LEDs, blaster noises, LEGO, and yes, even an Arduino. Not bad for [Baron von Brunk]’s first project to use an Arduino!

The blaster was based on electronics and LEGO that were lying around and was intended for use for Star Wars Day 2014. (May the Fourth be with you.) “Lying around” in this sense might be a bit of an understatement for [Baron von Brunk], as the design of the blaster required the use of the LEGO Digital Designer and 400 blocks, some of which are quite rare.

The electronics for the project are tied to a moving trigger mechanism (also made from LEGO). The trigger mechanism hits a momentary pushbutton which tells the Arduino to activate the LEDs and a separate 555 timer and sound recording/playback device which handles the classic blaster sounds. The whole thing is powered by a 9V battery and housed in the front of the blaster, and all of the code (and the LEGO schematics) are available on the project’s site.

This is quite an impressive replica, and the craftsmanship that went into the build shows, especially in the LEGO parts. We think Han Solo would indeed be proud! If you’re ready to go even further with Star Wars and LEGO, you might want to check out this barrel organ that plays the Star Wars theme.

Kinect + Wiper Motor + LEGO = 3D Scanner

[Christopher] from the Bamberg Germany hackerspace, [Backspace], wrote in to tell us about one of the group’s most recent projects. It’s a Kinect-based 3D scanner (translated) that has been made mostly from parts lying around the shop.

There are 2 main components to the hardware-side of this build; the Kinect Stand and the Rotating Platform. The Kinect sits atop a platform made from LEGO pieces. This platform rides up and down an extruded aluminum rail, powered by an old windshield wiper motor.

The Rotating Platform went through a couple of iterations. The first was an un-powered platform supported by 5 roller blade wheels. The lack of automatic rotation didn’t work out so well for scanning so out came another windshield wiper motor which was strapped to an old office chair with the seat replaced by a piece of MDF. This setup may not be the best for the acrophobic, but the scan results speak for themselves.

Continue reading “Kinect + Wiper Motor + LEGO = 3D Scanner”

Drawing With Legos

WritingMachineFrontLarge

There are a number of elaborate Lego creations out there, but you probably haven’t seen something quite like [Andrew Carol’s] Lego drawing machine. He drew inspiration from the film Hugo and from automata of the 1800’s, specifically [Jaquet-Droz]’s Draughtsman, which we featured in a Retrotechtacular article not too long ago.

[Andrew’s] hand-cranked creation is divided into three components: a plotter, an “encoded pen stroke program”—which stores messages in links of pieces—and a reader that translates the links into pen strokes. The plotter moves the pen in the Y axis and moves the paper in the X to mark on the page, and also has a simple lift mechanism that temporarily raises the pen on the Z axis to interrupt pen strokes between letters (or drawings).

[Andrew] describes the chain reader by comparing it to a film projector, feeding the message through the mechanism. Although you won’t find a detailed how-to guide explaining the devices’ inner-workings on his site, there are some clues describing basic components and a couple of videos, both of which are embedded below.

Continue reading “Drawing With Legos”

Green Light LEGO, Red Light Stop

Master LEGO craftsman [Baron von Brunk] had the same childhood passions as a lot of us—LEGO (obviously), Transformers, and Nintendo. But he also harbored a passion for traffic lights and road signs. His latest offering, a fully functional LEGO traffic light, is some pretty fantastic plastic. You might recall that we featured [Baron von Brunk]’s LEGO mosaic lamps a few weeks ago. This project is that one on steroids.

The body is made of 1700+ LEGO and Technic pieces. [Baron von Brunk] was kind enough to provide his LDD file, though he says it should be considered a rough guide to construction. The red, yellow, and green 1×1 areas are each lit with a 48-SMD LED floodlight bulb. Colored lights are available, but he used the solid white variety for greater luminescence. The lights are driven by a traffic light controller typically used for model railroads.

[Baron von Brunk] ended up lining the inside with black 1x1s and metallic reflective duct tape to keep the light from leaking out of the masonry. He used some Technic bricks on the rear door to form hinges, and Technic pins to hold the LED lamps.

Is A LEGO 3D Printer By Definition Self-replicating?

lego-3d-printer

LEGO parts are plastic. 3D printers make parts out of plastic. So the transitive property tells us that a LEGO 3D printer should be able to recreate itself. This one’s not quite there yet, mostly because it doesn’t use plastic filament as a printing medium. Look close and you’ll probably recognize that extruder as the tip of a hot glue gun. If all else fails you can use the machine as a precision hot glue applicator.

The instructions to make your own version include the design reference and a few ideas for getting the most out of the glue dispenser. For the design phase [Matstermind] used LEGO Digital Designer. It’s basically CAD with the entire library of LEGO parts available as building blocks. from there he assembled the machine which is controlled by an NXT brick. He goes on to link to a few different printing mediums. There’s instructions for using crayons to make colored glue sticks, as well as a method of printing in sugar using the hot glue extruder.

We remember seeing one other LEGO 3D printer. That one didn’t use an extruder either. It placed blocks based on the design to be printed.

Continue reading “Is A LEGO 3D Printer By Definition Self-replicating?”

Tens Of Thousands Saved By Building A BAM Microscope Out Of LEGO

A Brewster Angle Microscope (BAM) can run you around $100,000. If you don’t have that lying around you could just use some LEGO pieces to build your own. Having been faced with no budget to buy the hardware, and needing the data to finish his PhD, [Matthew] figured out a way to build something passable on the cheap.

These microscopes bounce a light source off of a pool of water and into the lens of a camera. The thing is the angle of the sender and receiver must be just perfect at 53.1 degrees. [Matthew] was able to afford a used camera, and started experimenting with some lab equipment to mount the rig. But he just couldn’t get the adjustments right. Since he had to move the mounting hardware by hand it was impossible not to over or under shoot the corrections. But then he had a eureka moment. LEGO pieces have very accurate tolerances, and you can get geared and motorized parts. He leveraged the quality of the toy into a BAM whose alignment can be tweak with great precision.

It may not look like much, but you can see stearic acid floating through the microscope’s field of vision in the clip after the break. This is exactly the type of observations he needed to perform. Of course if you just need a microscope you can use a laser and a drop of water.

Continue reading “Tens Of Thousands Saved By Building A BAM Microscope Out Of LEGO”