Portable DVD Player Gets Raspberry Pi Zero Upgrade

You might remember a time when people thought portable DVD players were a pretty neat idea. In the days before netbooks, cheap tablets, and arguably even the widespread adoption of smartphones, it seemed perfectly reasonable to lug around a device that did nothing but play movies. Today we look back at them as we would flip phones: a quaint precursor to the technology overload we find ourselves in currently. But the fact remains that millions of these comical little devices were pumped into the greedy maw of the consumer electronics market. They’re ripe for the hacking, all you need is some inspiration.

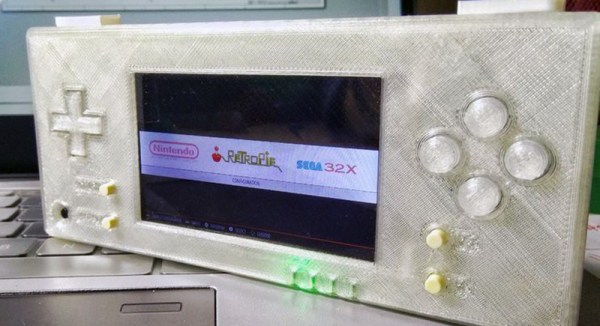
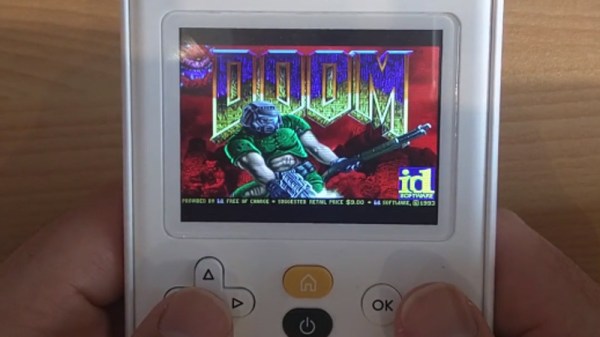
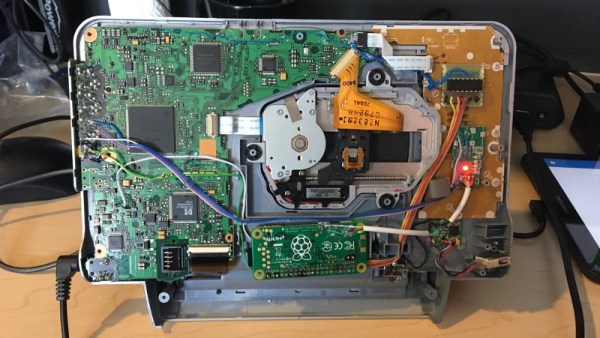
So if this grafting of a portable DVD player and the Raspberry Pi Zero W created by [nutsacrilege] doesn’t get you sniffing around your local second-hand store for a donor device, nothing will. By integrating a Pi running Kodi, the player gets a multi-media kick in the pants that arguably makes up for the rather archaic form factor. Not only can it play a wide array of local and online content, but it could even be used as portable game system if you were so inclined.

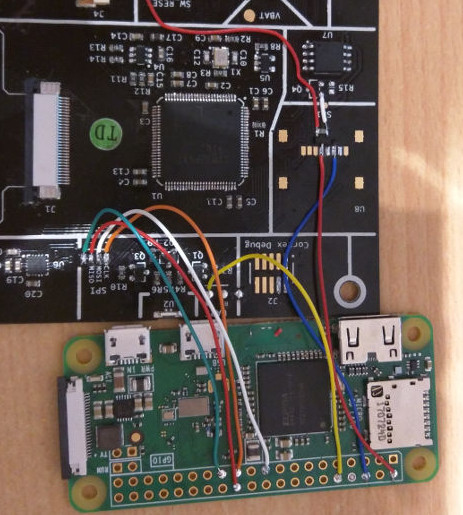
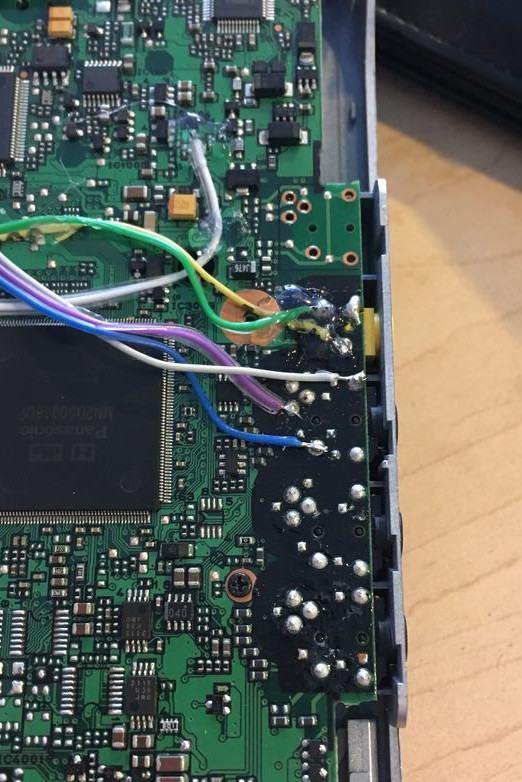
Rest assured, this isn’t some lazy five-minute mod. All of the original physical controls have been made functional by way of a MCP3008 ADC connected to the Pi’s GPIO and some clever Python scripting. Even the headphone jack was made functional by wiring it up to a USB sound card, and by integrating a tiny stripped down hub he was also able to add an external USB port. Who needs discs when you can plug in a flash drive full of content?

Speaking of which, [nutsacrilege] reports that the original functions of the device are still intact after all his modifications. So if you can get the museum to loan you one, you can even play a DVD on the thing as its creators intended.

With luck, this project will help spur on some more portable DVD player hacking, which we’ve seen precious little of so far. Frankly, it would be nice to see people cramming Raspberry Pi’s into something other than Game Boys for once.

[via /r/raspberry_pi]

The Better RetroPie Handheld

The Raspberry Pi has become the best video game console on the planet. With RetroPi, anyone can play Super Mario 3, Doctor Mario, and even Doki Doki Panic. Adafruit’s PiGRRL Zero and [Wermy]’s reconfabulation of an old brick Game Boy to house a Raspi Zero and display have made the Raspberry Pi portable, along with all those retro games we love so dearly.

There’s a problem with these builds, though. They only use the Raspberry Pi Zero, and with that the limitations on emulation performance, and the Raspi 3 is far too big for a portable console. What’s the solution? It’s the greatest homebrew console ever created. For this year’s Hackaday Prize, [DeanChu] is building the Retro-CM3. It’s a retro handheld with a 3D printed enclosure, that’s powered by the Raspberry Pi Compute Module 3. Stand back, folks. We have a winner that will top the Raspberry Pi and 3D printing subreddits.

The key feature for this build is, of course, the raw processing power of the Raspberry Pi Compute Module 3. This is a Raspberry Pi 3 with 4 GB of eMMC stuffed onto a board that fits into an SODIMM socket. The pins on this device give you access to the GPIOs and the DSI connector. All you really need to turn this into an amazing vintage emulation console is a breakout board with a few buttons, power supply, and a display.

The extra components for this build include a 3.2 inch LCD using the DPI interface. There’s a speaker, and a 2000mAh battery. The real tricky part here is the custom PCB, breaking out the DPI pins on the Compute Module, adding a small speaker, and throwing a small STM32 to read the buttons. It’s an entire system, ready to be housed in a 3D printed enclosure.

This is, simply, the best Raspberry Pi portable you’ll ever see, at least until we get a Rasberry Pi Zero with the capabilities of the Pi 3. It’s an excellent use of the very small Compute Module, and one of the most polished Hackaday Prize entries we’ve seen thus far.

Friday Hack Chat: Everything About The ESP

When the ESP-8266 first arrived, it was a marvel. For two dollars, you could buy a simple module that could serve as a bridge between WiFi networks and microcontroller projects. It understood the Hayes command set, it didn’t use much power, and, as noted before, it only cost two dollars. The idea of cheap and accessible Internet of Things things was right there for the taking.

Then hackers figured out what was actually going on inside the ESP-8266. It was a full-blown microcontroller. There was Lua stuff you could put on it. You could program it with the Arduino IDE. It had WiFi. This was the greatest microcontroller release in the last decade, and it came from a company no one had ever heard of.

Since then, the ESP ecosystem has bloomed, and there’s a new ESP on the block. The ESP-32 is an even more powerful WiFi and Bluetooth-enabled chip that’s just as easy to program, and it costs three dollars. Microcontrollers have never been cooler.

For this week’s Hack Chat, we’re going to be talking all about the ESP. Our guest for this Hack Chat should need no introduction, but if you’re unfamiliar, [Sprite_tm] plays video games on his keyboard and has installed Linux on a hard drive. He also works at Espressif, the company behind the ESP-8266 and ESP-32, where he’s applied his skills towards tiny Game Boys and miniature Macs.

During this week’s Hack Chat, we’re going to be covering everything about the ESP, including peripherals, ultra-low power consumption, SIP packages, and what’s coming up for the ESP family. You are, as always, welcome to submit your questions for [Sprite]; just add those as a comment on the Hack Chat page.

join-hack-chat

Our Hack Chats are live community events on the Hackaday.io Hack Chat group messaging. [Sprite]’s in China, so we’re not doing this one at the usual time: This week, the Hack Chat will happen at 7:00 am, Pacific, Friday, March 9th. Want to know what time this is happening in your neck of the woods? Have a countdown timer!

Click that speech bubble to the right, and you’ll be taken directly to the Hack Chat group on Hackaday.io.

You don’t have to wait until Friday; join whenever you want and you can see what the community is talking about.

Graphing Calculator Dual Boots With Pi Zero

The nearly limitless array of consumer gadgets hackers have shoved the Raspberry Pi into should really come as no surprise. The Pi is cheap, well documented, and in the case of the Pi Zero, incredibly compact. It’s like the thing is begging to get grafted into toys, game systems, or anything else that could use a penguin-flavored infusion.

But this particular project takes it to the next level. Rather than just cramming the Pi and a cheap LCD into his Numworks graphing calculator, [Zardam] integrated it into the device so well that you’d swear it was a feature from the factory. By exploiting the fact that the calculator has some convenient solder pads connected to its SPI bus, he was able to create an application which switches the display between the Pi and the calculator at will. With just a press of a button, he’s able to switch between using the stock calculator software and having full access to the internal Pi Zero.

In a very detailed write-up on his site, [Zardam] explains the process of getting the Pi Zero to output video over SPI. The first part of the battle was re-configuring the GPIO pins and DMA controller. After that, there was the small issue of writing a Linux SPI framebuffer driver. Luckily he was able to find some work done previously by [Sprite_TM] which helped him get on the right track. His final driver is able to push 320×240 video at 50 FPS via GPIO, more than enough to kick back with some DOOM.

With video sorted out, he still needed a way to interface the calculator’s keyboard with the Pi. For this, he added a function in his calculator application that echoed the keys pressed to the calculator’s UART port. This is connected to the Pi, where a daemon is listening for key presses. The daemon then generates the appropriate keycodes for the kernel via uinput. [Zardam] acknowledges this part of the system could do with some refinement, but judging by the video after the break, it works well enough for a first version.

We’ve seen the Pi Zero get transplanted into everything from a 56K modem to the venerated Game Boy, and figured nothing would surprise us at this point. But we’ve got to say, this is one of the cleanest and most practical builds we’ve seen yet.

[Thanks to EdS for the tip]

Continue reading “Graphing Calculator Dual Boots With Pi Zero”

Home Decorating With Tiny Arcade Cabinets

Thanks to the general miniaturization of electronics, the wide availability of cheap color LCD screens, and the fact that licensing decades old arcade games is something of a free-for-all, we can now purchase miniature clones of classic arcade cabinets for about $20 USD. In theory you could play these things, but given they’re less than 4 inches in height they end up being more of a desk novelty than anything. Especially since it seems like most of the effort went into making the cabinet itself; a classic example of “form over function”.

Unfortunately, if you want to buy these little arcade cabinets to use as decoration for your office or game room, they aren’t particularly well suited to the task. The “demo” mode where the game plays itself doesn’t last for very long, and even if it did, the game would chew through batteries at an alarming rate. [Travis] decided to tackle both issues head on by powering his Tiny Arcades over USB and locking them into demo mode.

The stock power for the Tiny Arcade comes from three AAA batteries, or 4.5 V. This made it easy enough to run over  5 V USB, and a four port USB charger is used to provide power to multiple machines at once. Forcing the game to stay in demo mode wasn’t much harder: a 555 timer was used to “push” the demo button with a frequency of every 10 seconds or so to keep the game up and running. A simple timer circuit was put together in the classic “dead bug” style, and sealed up with liquid rubber so it would play nice with the insides of the Tiny Arcade.

Since his little machines wouldn’t need their stock power switches anymore, [Travis] rewired the speaker lead through it. So now the machine stays on and in demo mode as long as it’s plugged into USB power, and you can flip the switch on the back to turn off the sounds. Perfect for sitting up on a shelf or the corner of your desk.

Usability issues not withstanding, there’s a pretty big (no pun intended) following for micro sized arcade cabinets. We’ve seen projects ranging from modding a Game Boy Advance to even tinier scratch builds.

Continue reading “Home Decorating With Tiny Arcade Cabinets”

Friday Hack Chat: Assembling In Quantity With MacroFab

Building one of something is easy. You see it here every day, and yes, building a single robot, or a board to convert Segas to HDMI, or an Internet of Things thing is easy. Manufacturing is another story entirely. You’re going to have BOMs to work with, you’ll have suppliers, and you need to deal with assembly, programming, and packaging. Do you even know where you’re going to store all those boxes of parts? Manufacturing is a difficult task, but luckily there are assembly houses and contract manufacturers ready to ease the burden a little.

For this week’s Hack Chat, we’re going to be talking about Assembly as a Service through MacroFab. MacroFab is an online assembly house and contract manufacturer that makes creating hardware simple. If you thought sending a board file off to OSH Park and receiving a PCB in a week is amazing, you clearly haven’t experienced MacroFab. Here, you can upload your board and BOM, and with minimal effort, receive a completely populated product in a few weeks.

Our guest for this week’s Hack Chat will be [Parker Dillmann], MacroFab co-founder, with backgrounds in embedded design and DSP. He runs longhornengineer, a blog full of amazing projects that fit in well with the usual Hackaday fare. Shoutouts are especially deserved for the Game Boy VGA adapter.

During this week’s Hack chat, we’re going to be talking to [Parker] about manufacturing, the pitfalls, how you can better design for manufacturing (DFM), the machines used by MacroFab, pogo pin adapters, solder fountains, and all the cool stuff that turns one of a thing into thousands of a thing. If you’re wondering what MacroFab’s results look like, you’ve probably already held a few in your hands; the badge for this year’s Hackaday Superconference was manufactured by MacroFab, as were a lot of the independent badges at last year’s Def Con.

During this Hack Chat, we’ll be discussing:

  • What is the process for a first-time manufacturer?
  • Where can you find out how to design better for manufacturing?
  • What kinds of products are made at MacroFab?
  • What kinds of equipment is typically used for board assembly?

As always, we’re looking for questions from the community, you can add those as a comment on the Hack Chat event page.

join-hack-chat

Our Hack Chats are live community events on the Hackaday.io Hack Chat group messaging. This Hack Chat is going down Friday, January 12th at noon, Pacific time. Time Zones got you down? Here’s a handy countdown timer!

Click that speech bubble to the left, and you’ll be taken directly to the Hack Chat group on Hackaday.io.

You don’t have to wait until Friday; join whenever you want and you can see what the community is talking about.

Generate Random Numbers The Hard Way

Your job is to create a random number generator.

Your device starts with a speaker and a membrane. On this membrane will sit a handful of small, marble-size copper balls. An audio source feeds the speaker and causes the balls to bounce to and fro. If a ball bounces high enough, it will gain the opportunity to travel down one of seven copper tubes. Optical sensors in each of the tubes detect the ball and feed data to an Ardunio Mega. When the ball reaches the end of the tube, a robotic hand will take the ball and put it back on the speaker membrane. The magic happens when we write an algorithm such that the audio output for the speaker is a function of how many balls fall down the pipes.

The above is a rough description of [::vtol::]’s art piece: kinetic random number generator. We’re pretty sure that there are easier ways to get some non-determinstic bits, but there may be none more fun to watch.

[::vtol::] is a frequent flyer here on Hackaday Airlines. Where else would you showcase your 8-bit Game Boy Photo Gun or your brainwave-activated ferrofluid monster bath? Would it shock you to find out that we’ve even covered another kinetic random number generator of his?  Fun stuff!