Art Deco Radio Gets FM Reception

Taking a vintage radio and cramming it full of modern, Internet-connected, guts has long been a staple of the hacking and making scene. While some might see it as a crime to take what’s arguably a legitimate piece of history and turn it into nothing more than a slipshod case for the Raspberry Pi, we have to admit there’s a certain appeal to the idea. Taking the beauty of classic design and pairing it with more modern capabilities is getting the best of both worlds.

But this project by [Nick Koumaris] is a somewhat unique take on the concept. Rather than sacrificing a real vintage piece of hardware to house the electronics, he’s designed a 3D printable case that looks like a classic 1936 AWA Radiolette. But what’s really interesting to us is that he then puts a basic FM radio inside of it.

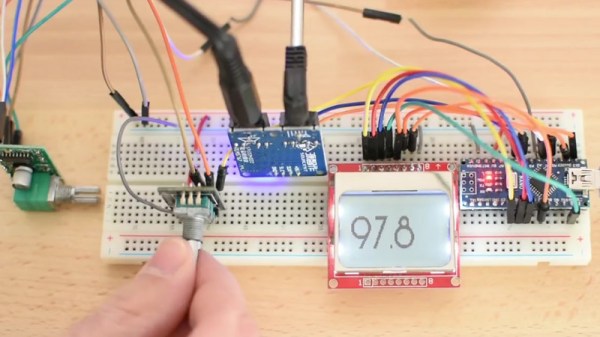
That’s right, no Internet radio streaming or smartphone Bluetooth compatibility here. It’s just a regular FM radio, not entirely unlike the kind of hardware you’d expect to be inside of a classic radio. Of course, it’s much more modern, and [Nick] actually built it himself from a TEA5767 FM radio module and an Arduino Pro Mini.

While functionally it might not be terribly exciting, we do appreciate that he went through the trouble to make a vintage-looking user interface for the radio. While physical buttons would arguably have been more appropriate given the era, the art deco inspired font and graphics that show on the device’s Nokia 5110 LCD do look really slick.

Purists will surely be happy to see another project where a piece of vintage piece of audio equipment wasn’t sacrificed at the Altar of Hack, but we’ve also played host to many projects which weren’t nearly as concerned with historical preservation.

Continue reading “Art Deco Radio Gets FM Reception”

You Can Build Anything Out Of What Is Holding Your 97 Eagle Talon Together

We all know it, we all love it, and the guy parked outside of the 7-11 covered his car in it. What is it? Polyester body filler, better known by the almost generic trademark, Bondo. There’s a lot more you can do with Bondo than fairing in that sweet body kit, bro, and [Eric Strebel] is here to show you how far you can push the mechanical properties of polyester body filler.

We didn’t always have polyester body filler. In the days before OSHA, auto body workers would use a torch, bricks of lead, and a grinder. You can check out a video of the era before OSHA here. Needless to say, vaporizing and grinding lead in your shop isn’t the greatest idea, and there had to be a better way. This led Robert ‘Bondo Bob’ Spink to invent a much less toxic auto body filler that we now know as Bondo.

For the beginning of the demonstration, [Eric] mixes up a cup of polyester body filler with a few special additions: he’s using printer ink to get his mixture to something other than that one shade of pink we all know. Although Bondo is a bit too thick to cast, he did manage to put a little bit of it in a square mold, a PVC pipe, and applied a little to foam and wood. It’s enough for a demonstration, but for the actual ins and outs of machining Bondo we’re going to have to wait until [Eric]’s next video. Until then, you can check out this introduction below, or look at his previous work on free-form sculpting of uncured Bondo.

Continue reading “You Can Build Anything Out Of What Is Holding Your 97 Eagle Talon Together”

Moiré marine navigation light

Using Moiré Patterns To Guide Ships

Moiré screens for arrows

[Tom Scott] ran across an interesting visual effect created with Moiré patterns and used for guiding ships but we’re sure it can be adapted for hacks somewhere. Without the aid of any motors or LED animation, the image changes as the user views it from different angles. When viewed straight on, the user sees vertical lines, but from the left they see a right-pointing arrow and from the right, they see a left-pointing arrow. It’s used with shipping to guide ships. For example, one use would be to guide them to the center point of a bridge. When the pilots see straight, vertical lines then they know where to steer the ship.

US patent 4,629,325, Leading mark indicator, explains how it works and how to make one. Two screens are separated from each other. The one in front is vertical but the one behind is split in two and angled. It’s this angle which creates the slants of the arrows when viewed from the left or right. We had to convince ourselves that we understood it correctly and a quick test with two combs showed that we did. See below for the test in action as well as for [Tom’s] video of the real-world shipping one.

Continue reading “Using Moiré Patterns To Guide Ships”

The Better RetroPie Handheld

The Raspberry Pi has become the best video game console on the planet. With RetroPi, anyone can play Super Mario 3, Doctor Mario, and even Doki Doki Panic. Adafruit’s PiGRRL Zero and [Wermy]’s reconfabulation of an old brick Game Boy to house a Raspi Zero and display have made the Raspberry Pi portable, along with all those retro games we love so dearly.

There’s a problem with these builds, though. They only use the Raspberry Pi Zero, and with that the limitations on emulation performance, and the Raspi 3 is far too big for a portable console. What’s the solution? It’s the greatest homebrew console ever created. For this year’s Hackaday Prize, [DeanChu] is building the Retro-CM3. It’s a retro handheld with a 3D printed enclosure, that’s powered by the Raspberry Pi Compute Module 3. Stand back, folks. We have a winner that will top the Raspberry Pi and 3D printing subreddits.

The key feature for this build is, of course, the raw processing power of the Raspberry Pi Compute Module 3. This is a Raspberry Pi 3 with 4 GB of eMMC stuffed onto a board that fits into an SODIMM socket. The pins on this device give you access to the GPIOs and the DSI connector. All you really need to turn this into an amazing vintage emulation console is a breakout board with a few buttons, power supply, and a display.

The extra components for this build include a 3.2 inch LCD using the DPI interface. There’s a speaker, and a 2000mAh battery. The real tricky part here is the custom PCB, breaking out the DPI pins on the Compute Module, adding a small speaker, and throwing a small STM32 to read the buttons. It’s an entire system, ready to be housed in a 3D printed enclosure.

This is, simply, the best Raspberry Pi portable you’ll ever see, at least until we get a Rasberry Pi Zero with the capabilities of the Pi 3. It’s an excellent use of the very small Compute Module, and one of the most polished Hackaday Prize entries we’ve seen thus far.

Applications Open: Ada Lovelace Fellowships For 2018 Open Hardware Summit

The Open Source Hardware Association is now accepting applications for the Ada Lovelace fellowship which provides free admission to the Open Hardware Summit and a $500 travel stipend. One of OSHWA’s goals is to foster a more diverse community within open source. As part of this, Ada Lovelace Fellowships are open to women, LGBTA+, and people of color. There are a total of 10 fellowships available and applications are due by April 30th. The Open Hardware Summit will be held on September 27th at MIT.

The fellowship program, founded by Addie Wagenknecht and Alicia Gibb in 2013, builds on the ideal that Open Hardware is one way to reduce the barriers associated in access to technology. Removing some of the financial barriers associated with attending the Summit will help to ensure more people of diverse backgrounds are involved in shaping the Open Hardware world. In addition to the talks shared at the gathering, over the last several year OSWHA has been evolving the Open Hardware definition and an Open Hardware certification.

Disclaimer: [Christopher Wang] is a board member of the Open Source Hardware Association

These Gorgeous Robot Parts Are Hand-Made

[Dickel]’s robot MDi #4 has been in progress for several years, but what we wanted to draw your attention to is the way the parts have been fabricated and what kind of remarkable results are possible with careful design, measurement, cutting, and finishing. Much of MDi #4 was made by hand-cutting and drilling sheets of high impact polystyrene (HIPS) with a utility knife and layering them as needed. Epoxy and aluminum provide gap filling and reinforcement of key sections, and fiberglass took care of one of the larger sections.

The process [Dickel] follows is to prototype using cardboard first. Parts are then designed carefully in CAD, and printed out at a 1:1 scale and glued to sheets of polystyrene. Each sheet is cut and drilled by hand as necessary. Layers are stacked and epoxied, embedding any hardware needed in the process. Two examples of embedding hardware include sealing captive nuts into parts with epoxy, or using aluminum to add reinforcement. After some careful sanding, the pieces look amazing.

Scroll down a bit on that project page and you’ll see plenty of great photos of the process [Dickel] used. A video highlighting the head and a video showing the careful work that goes into making each part are embedded below.

Continue reading “These Gorgeous Robot Parts Are Hand-Made”

Retrofit Temperature Control To A Soldering Station

We’ve probably all seen USB soldering irons advertised for very little money, and concluded that they might not necessarily be the most useful of tools. The cheapest of these lack any real temperature regulation. Enter [Paulo Bruckmann], who has attached a thermistor to his iron with Kapton tape, added an Arduino Uno clone with rotary encoder and Nokia LCD, and put the result in a 3D printed case for a tiny and low powered temperature controlled soldering station. The claimed cost is only $10, which seems credible given the low price of Arduino clones.

The software provides the expected PID control, with the advantage of very quick warm-up due to the tip’s tiny size. The power source is 9 V rather than a USB 5 V, so the combination gives an iron capable of working on much larger joints than when unmodified. He therefore seems to have created what appears to be a significantly more capable iron from this unpromising start, something we find quite impressive. Take a look at his video below the break.

We reviewed one of these little irons last year, and found it to be a toy, but not a joke. Meanwhile we’ve seen some other mods for them, including a pair of desoldering tweezers.

Continue reading “Retrofit Temperature Control To A Soldering Station”